Using Waterslide Image Transfers

by Tammy Honaman, Author, Jewelry-Making Expert and Educator, Exclusively for Fire Mountain Gems and Beads®
Instructions
Step 1
Using a pair of scissors, cut out the waterslide image transfer you're planning to use for your project. Set it aside.
Step 2
Condition and prepare your polymer clay for your design. Light-colored clay works best with the image transfer.
Tip: Working on a ceramic tile will make it easier to transport the uncured clay to the Clay Craft Oven for curing.
Step 3
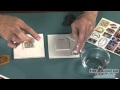
Temporarily place the waterslide image transfer, cut out in Step 1, onto the prepared polymer clay to test the fit. Make any adjustments at this time; once the image transfer is placed permanently onto the clay, it cannot be trimmed due to the thickness of the material.
Step 4
Remove the transfer from the clay. Dip your finger into the bowl of water. Apply the water to the back of the image transfer and let it sit for 30-60 seconds. Peel the paper backing away and dispose of it.
Place the transfer, face up, onto the prepared piece of polymer clay. Smooth the image transfer so no air bubbles are present.
Step 5
Using an artist-quality paintbrush, apply a thin coat of clear liquid polymer clay to the image transfer. The liquid will seal the image transfer. Use a toothpick or fine piece of wire to pop any bubbles that might be present.
Step 6
Place the tile into the Clay Craft Oven and bake at 300 degrees Fahrenheit for the manufacturer's recommended amount of time.
Shop for Your Materials Here:


Have a question regarding this project? Email Customer Service.
Copyright Permissions
The pieces featured in the Gallery of Designs are copyrighted designs and are provided for inspiration only. We encourage you to substitute different colors, products and techniques to make the design your own.
All works of authorship (articles, videos, tutorials and other creative works) are from the Fire Mountain Gems and Beads® Collection, and permission to copy is granted for non-commercial educational purposes only. All other reproduction requires written permission. For more information, please email copyrightpermission@firemtn.com.