5 Simple Tricks for Photographing Jewelry
Photo and text by Steve Meltzer

Behind every successful artist is a head full of inspiration and a persistence of vision. Good artists are able to bring these ideas to life in the form of three-dimensional (3-D) craft objects. The task for the photographer is to turn these 3-D objects into two-dimensional images that capture the artist's intentions. My friend Isabelle Bourdet's work is full of fun, bright colors, and it was my job to show that in photos of her distinctive jewelry.
Bourdet makes crocheted jewelry, meticulously stitching colorful threads together to form the images and textures that are the base of her art. I'm using these photos in this column to illustrate how many of the issues I have written about in the past come together, full-circle, when you shoot your own work. It was a challenge to shoot her work in her small shop, Mademoiselle Stella, on a tourist-filled street and not in my studio, but I wanted to demonstrate that you can get very good crafts photos with the minimum amount of gear in a very tiny space

1. Background Basics
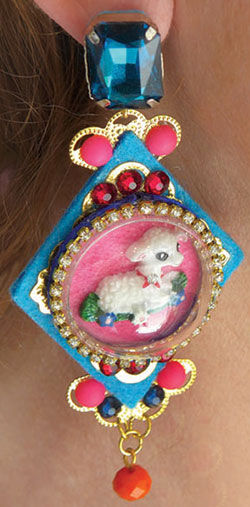
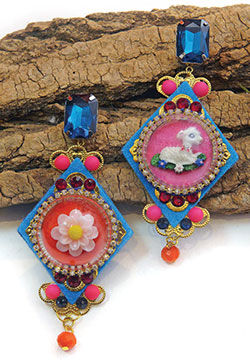
The choice of a background is fundamental in photographing crafts. Backgrounds isolate crafts and focus attention--and they need to complement the objects. Looking at Bourdet's bright colored jewelry, I tried to imagine how each piece would look on various backgrounds. Since there are so many colors in each piece, I decided that neither a solid color like gray or blue nor a graduated background would work. Instead, I opted to use white in order to emphasize the jewelry's bright colors. I used a large page from one of Bourdet's sketch books as the background.
This worked pretty well until I got to a pair of earrings with pin posts, which made it impossible to lay the earrings out flat. To get around this, I stuck the post into a piece of driftwood Bourdet had in the shop. My next decision to face was my choice of lenses.
2. Getting Close-Ups
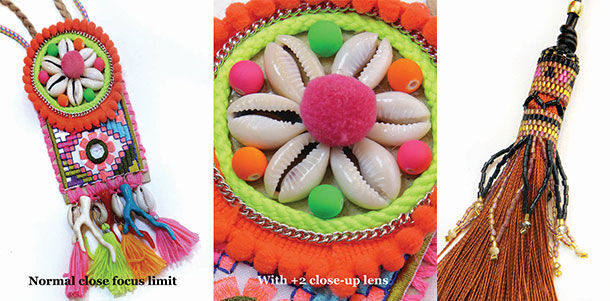
No matter what you are photographing, it is important for the subject to dominate the frame. This is especially a challenge with small rings and earrings which require close-up shots to highlight details. It was especially important to show the wonderful crocheted images of faces and flowers in Bourdet's pieces.
Unfortunately, most reflex (DSLRs) and mirrorless cameras equipped with zoom lenses don't focus close-up. These zoom lenses are very useful for general photography, but few focus closer than one foot from a subject. Small fixed-lens compact cameras are a little better, as they can take close-ups at their wide-angle settings. But these close-ups often suffer from wide-angle distortion which results in bulging.
When photographing crafts, I try to use moderate telephoto focal lengths of about 90-100mm (in 35mm equivalent). The advantages of a telephoto is that it flattens perspective producing a more natural look, and gives me a reasonable working distance between the jewelry and the camera. The extra distance of about 10 or 12 inches provides just enough space for lighting the subject. The problem is that with telephoto settings, most lenses do not focus close-up.
There are several solutions for this, and the simplest one is to crop after you shoot. Most cameras have sensors that are 12MP or larger. That gives you a lot of pixels to work with, and if needed, to crop out. Just focus as closely as possible with your lens and then crop the image in editing software. You will lose lots of pixels, but will still have plenty for a useable jury submission or for the web.
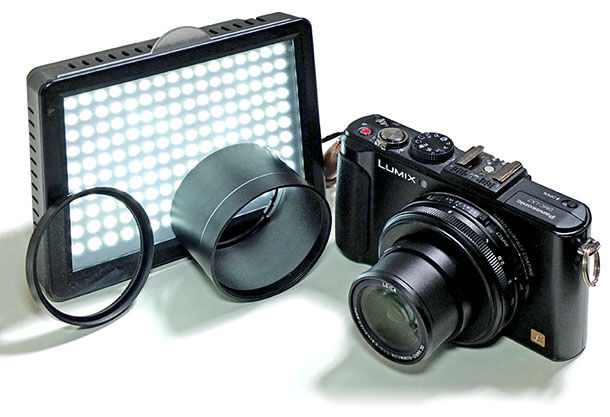
The second option is just as easy--get an accessory close-up lens. These lenses are simple magnifying glasses. They come in various strengths with the weakest labeled +1, +2, and +4, and the strongest, +10. For jewelry I use either a +2 or +4. They are absurdly easy to use. Just screw the close-up lens onto the front of your camera lens front, and take pictures. There are no special camera settings to worry about as the camera will continue to auto-focus and auto-expose correctly. These accessory close-up lenses are available online or in larger camera shops for just $4 to $10 each.If you have an interchangeable lens camera and you regularly shoot small objects, such as jewelry, the third option is to buy a special purpose "macro" lens. These are typically moderate telephoto lenses of 90-105mm (in 35mm terms) that focus from infinity to an inch or two from a subject with one continuous turn of the focusing ring. Typically macro lenses cost between $200 to $800 depending on your camera brand and the type of lens you get.
No matter which of these three options you chose, close-up photography demands a tripod. Cameras on tripods always produce sharper images than handheld shots, even if your camera has a very good image stabilizing system.
3. Cool Lights
Thankfully photographing small objects doesn't require gigantic room-filling electronic strobes or floodlights. For the photographs in this column I used a small LED array for lighting. LED lights are made up of hundreds of individual Light Emitting Diodes that produce very bright daylight balanced light. They are particularly good for close-up work in tight spaces because they produce little or no heat. I used a 160-diode LED that was powered by six AA batteries. With my camera on a tripod instead of using a light stand, I held the LED light in my hand which allowed me to move it around until I found the best lighting. These diode arrays come in many sizes and are relatively inexpensive. On eBay or other photography sites, a basic 160-diode LED light cost $25.
Because Bourdet's work is very shiny, I needed to soften the LED's hard light. I used the diffuser that came with it, but felt that I needed to soften it even more. So I used an old photographer's trick and softened the light by covering the front with a white pocket handkerchief.
4. Settings
When shooting close-ups, the "depth of field" is an important concern. The area of sharpness around the subject is narrower in close-ups than in normal photography. To get as much of each piece in sharp focus, I set my camera to the A (Aperture Preferred) exposure mode and the aperture to F/5.6--three stops from the widest aperture of F/2. At this setting, the aperture opening is very small and the depth of field very large. At ISO 200 I was getting exposure times of between 1/10th and 1/30th of a second. With the camera on a tripod, these long exposure times were no problem.
As what often happens when working with a white background, with some objects like a necklace chain, the camera exposure metering sees too much white space and underexposes the photo. This is one of the most common problems I see with crafts photos. I had that problem with some of these pieces, so I used the camera's exposure compensation to fix the problem.
5. A Model Question
Sometimes jewelry shots need models. I generally try to avoid models in crafts photos because they can easily distract from the work. Models are chosen for their good looks, and while a pretty face is a plus in an ad, they are not what you want for jury submissions. Jurors only have a few seconds to view images and when they see a face they unconsciously react as most of us do by looking at her eyes and make-up first. Also, in a full head shot, an earring is going to look very small, so you have to use models carefully. One trick is to shoot as little of a model's face as possible.
As most readers know, I take a minimalist approach to photography and use as little equipment as possible. For this column my gear included just one +2 close-up lens, a LED light, an adapter tube, a 10MP compact camera, and a tripod. I needed the adapter tube because this camera lens has no filter thread. The total cost for all of this equipment was under $400.
Sure, I could have used bigger cameras and much larger lights, but the high quality of these images produced with simple gear speaks for itself. Of course, this is what good photographs are all about.
Have a question regarding this project? Email Customer Service.
Copyright Permissions
All works of authorship (articles, videos, tutorials and other creative works) are from the Fire Mountain Gems and Beads® Collection, and permission to copy is granted for non-commercial educational purposes only. All other reproduction requires written permission. For more information, please email copyrightpermission@firemtn.com.