ComposiMold's Reusable Mold Putty
Courtesy of Vendor
FB37

ReMold Putty (Our Reusable Mold Making Putty)
ReMold Putty (Beta) is our newest reusable mold making material in a putty form. It can be applied directly to almost any model, capturing the finest detail and curing within minutes. ReMold putty can be used to make molds of sculptures, prototypes, candles, picture frames, coins, etc. You can cast wax, clay, low melt plastics, low melt metal, and a variety of resins into ReMold putty. It can be re-melted and used over and over.
- High melting point: 185°F
- No old box required
- Simple two part system
- Reusable
- Microwaveable
- Compatible with dozens of casting materials
- Shore hardness: 60A
ComposiMold's Reusable Mold Putty
Reusable Mold Putty: Can be applied directly to almost any model; capturing the finest detail and curing within minutes. Reusable mold putty can be used to make molds of sculptures, prototypes, candles, picture frames, coins, etc. You can cast wax, clay, low melt plastics, low melt metal, and a variety of resins into reusable mold putty. Reusable mold putty may be re-melted and used over and over. No expensive equipment is necessary.
Instructions: Microwave the putty in an oven safe bag. Add 2 drops of the Activator to the bag for every oz. of putty. Heat the putty at 10 second intervals until completely melted. Let the putty cool to a temperature comfortable to the touch (115 degrees or less.) Release compound is not typically necessary. Reusable mold putty may be reused many times. Store reusable mold putty in a tightly sealed plastic bag between uses.
| Product | Reusable mold putty |
| Color | Off white |
| Mix Ratio | N/A |
| Cooling Time | dependent on quantity 30 min for 3oz |
| Open Time | 45 min after cooling time |
| Demold Time | dependent on thickness and temperature starting at 30 minutes 1/4 inch thick in freezer |
| Mixed Viscosity (cps.) | Putty |
| Specific Gravity | 1.56 |
| Shor A Hardness | 60 A equivalent |
| Linear Shrink (%) | Nil |
| Tear Strength (ppi) | 5 |
| Tensile Strength (psi) | 30 |
| Elongation | 15% |
| Melting point (F) | 185 |
Directions ComposiMolds Reusable Molding Putty Step by Step
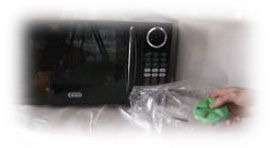
Melt the Putty
Step 1

- Place the putty in the included microwavable bag.
- Add 2 drop of the activator to the bag for every oz. of putty i.e. 12 drops for 6oz of putty (no mixing required).
- Seal the bag with an oven safe plastic tie.
- Heat the putty in the microwave until completely melted/ becomes dough or clay like and no clumps (see estimated microwave times below). Caution!! It is very hot.
| Size | Microwave times (estimates - times will vary) |
| 3oz. | 10 second intervals until melted |
| 6oz. | 20 second intervals until melted |
| 16oz. | 35 second intervals until melted |
Step 2

Let the putty sit at room temp until cool to the touch. Stick in fridge to cool faster (See tips).
Step 3
(Optional) Add cooking oil to your hands to prevent sticking.
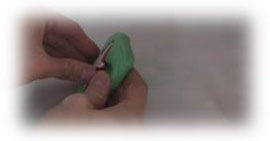
Step 4
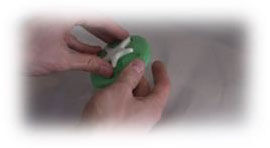
Knead the putty for several minutes to allow the activator to mix evenly. Use a rolling pin and your fingers to smooth the putty. Remove all the lines in the putty. If you are planning on moving your mold before it solidifies, place it on a plate.
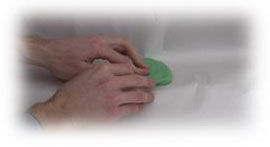
Step 5
Push your master object into the putty, or push the putty onto your master object.
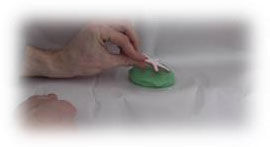
Step 6
Let the mold putty solidify. The master object is ready to be removed from the mold when the putty is firm when pressed with your finger. At room temp, leave the mold overnight.
Step 7
(Optional) move your mold to the freezer to solidify faster. Wait 1 hour before DE-molding the object.
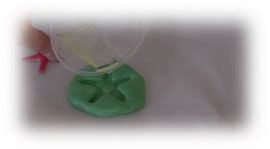
Step 8
Now cast something! Pour or press your casting material into the mold.
Step 9
Do it again! Make a completely new mold by following these same instructions each time.
Tips
- Spray porous objects such as wood or cloth with water. Water helps pull the putty into highly detailed areas of the object. Once the putty touches the damp porous surface do not attempt to remove it until completely solidified.
- Do not add water to smooth objects, putty will move and it may crack.
- For best results wait for the putty to cool to about 80 degrees Fahrenheit before using it. If you do not wait for it to cool to 80 degrees Fahrenheit the putty will slowly droop losing its shape. However there are some situations where drooping may be beneficial to the user. Example: Letting it ''flow'' onto fine detail of a flat object such as a leaf or cloth. In these instances use it at higher temps (90-115) Fahrenheit. (Be careful of burns).
- Smooth the putty surface before attempting to create a mold to avoid creating unwanted lines.
- Wash and thoroughly dry your hands before shaping to prevent sticking to hands.
- The putty can be carved or sculpted--when molding a sculpture or carving that was created from the reusable putty, coat it with a mold release such as cooking oil or silicone mold release.
- Molds will last as long as they are kept out of direct sun and high temps.
- Place the putty in the bag after use to keep the leaking activator contained.
- When casting with resin or silicone and the mold is slimy and not easy to wipe; rinse the mold in denatured alcohol, paint thinner or mineral spirits then dry the mold.
Important Note:
The activator is important for solidifying the mold and useful as a built in mold release, but it will slowly leak out of the mold over time. Too much activator on the mold surface is undesirable; simply remove the excess and pools of the activator with a sponge or dry cloth before pouring your casting resin.
Have a question regarding this project? Email Customer Service.
Copyright Permissions
All works of authorship (articles, videos, tutorials and other creative works) are from the Fire Mountain Gems and Beads® Collection, and permission to copy is granted for non-commercial educational purposes only. All other reproduction requires written permission. For more information, please email copyrightpermission@firemtn.com.