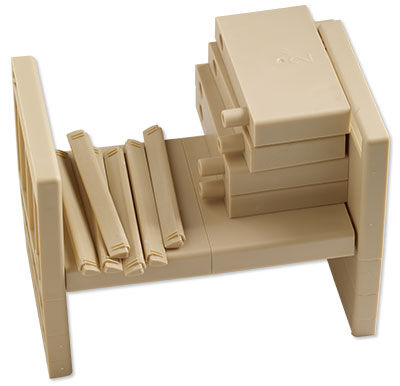
How to Use the Versa-Loom™
Instructions
These instructions use one color of one size of bead; suggested size is 6 or 8. Design is 5 beads wide.
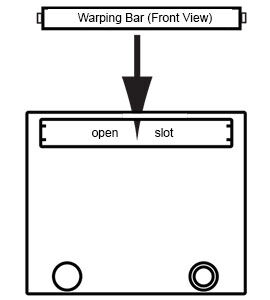
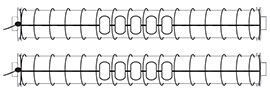
Warp Bars (6) 4 are replacements.
Warp bar fits into the slot of an end section. The wide/flat side of warp bar faces inward.
Ends(2)
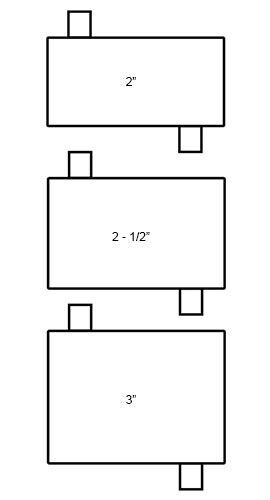
Spacers (6)
(2 each; 2-inch, 2-1/2 inch and 3-inch)
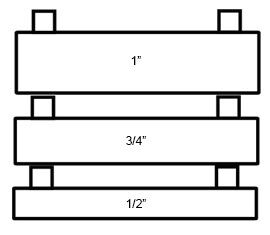
Legs (6)
(2 each; 1/2 inch, 3/4 inch and 1-inch)
Leg sections attach to bottom of the end sections. Choose appropriate sizes to obtain the height desired. Attach some or all to one or both ends as needed.
Warp Bar Set Up
Start with about 2 yards of thread. Wax or condition as needed. (Nymo®, Power Pro®, Fireline®, or thread of choice)
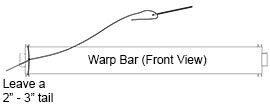
Wrap thread around one end of the Warp Bar using the slot provided. Keep thread tight and secure with a knot.

Add a needle to the working end of the thread.
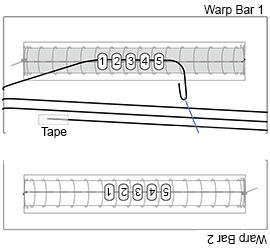
Add the FIRST row of 5 beads to Warp Bar 2 and LAST row of 5 beads to Warp Bar 1. These instructions use the same color and size of beads for both Warp Bars.
Stretch thread across the center front of the Warp Bar.

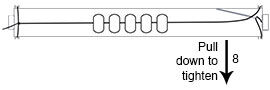
Loop thread around Warp Bar.
Pass needle under thread.
Pull down against thread to tighten.
Begin to wrap, keep tension tight.

The straight line of thread running along the front of the Warp Bar must be straight, in the center, and tight.
While keeping a tight tension wrap thread around the Warp Bar moving toward the opposite end of the Warp Bar. Wraps should be approximately 1 bead width apart (with or without beads to wrap between).
Continue until you reach the other end of the Warp Bar.
Secure thread ends (knot), be sure to keep wraps tight.
Cut thread ends, leave 1/4 inch to 1/2 inch tails.
Repeat to create two matching Warp Bars.
Loom Set Up
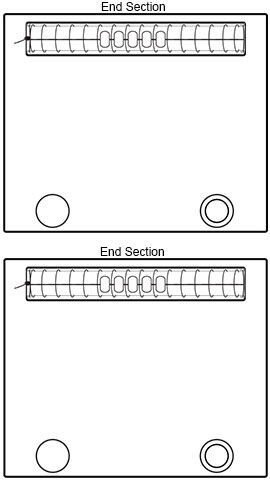
Insert and press Warp Bars firmly into End Sections.
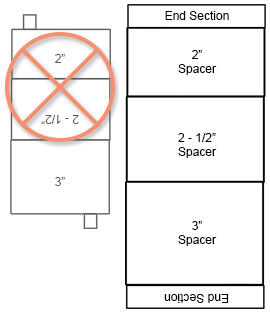
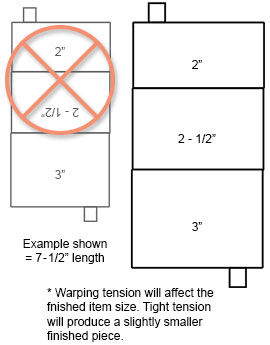
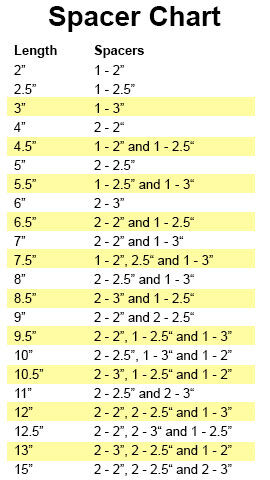
Choose appropriate Spacer pieces.
For this example the finished length will be 7-1/2 inches.
Attach End Sections to the Spacer pieces. All pieces should fit snugly (no gaps).
Note: To separate pieces jiggle or walk them until loose. Excess strain may cause breakage.
Add Leg sections as needed. Legs can be added to one or both End Sections.
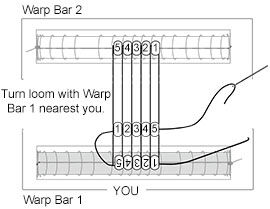
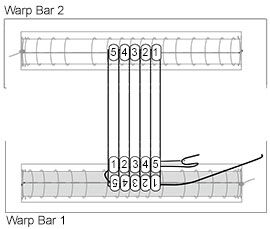
Warping the Loom
Start with about 3 yards of thread, wax or condition as needed.
Tape one end of thread to the End Section. Wrap thread around the End Section two or more times (this extra thread can be used for finishing work, adding clasps, fringe, etc.).
Thread needle onto the other end of thread.
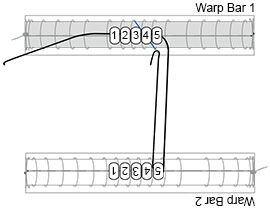
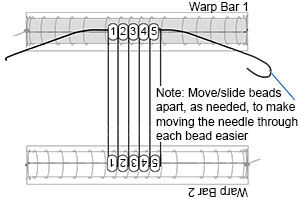
Insert needle/thread through all beads on Warp Bar 1. Begin by entering bead 1, end by exiting bead 5.
Note: I find it easier to navigate the needle through a single bead on the Warp Bar by angling the needle through the bead. Picking up the loom may also make the process easier. Sliding the beads apart, temporarily, creates some working room for the needle. Try different methods and use what works best for you.
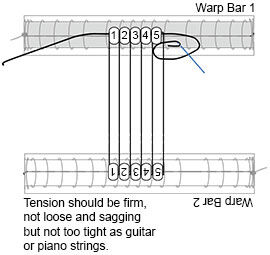
Tension should be firm, not loose and sagging but not too tight as guitar or piano strings.
Snug beads together on both Warp Bars.
Note: Move/slide beads apart, as needed, to make moving the needle through each bead easier.
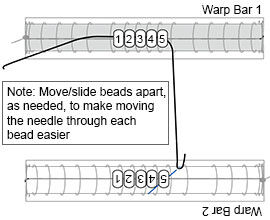
Insert needle/thread through bead 5 of Warp Bar 2, aim needle toward bead 1 on same Warp Bar.
Insert needle/thread through bead 4 of Warp Bar 1, aim needle toward bead 1 on same Warp Bar. Keep thread taught as warping continues.
Insert needle/thread through bead 3 of Warp Bar 2, aim needle toward bead 1 on same Warp Bar.
Insert needle/thread through bead 2 of Warp Bar 1, aim needle toward bead 1 on same Warp Bar. Keep thread taught as warping continues.
Insert needle/thread through bead 1 of Warp Bar 2, aim needle toward bead 1 on same Warp Bar.
Insert needle/thread through all beads on Warp Bar 1. Begin by entering bead 1, end by exiting bead 5.
Adjust warp thread tension on all warp threads, then tie an overhand knot around the nearest outside warp thread. Snug knot near or inside nearest bead (bead 5 on Warp Bar 1). This knot can be loosened and is used to stabilize warp tension as weaving begins.
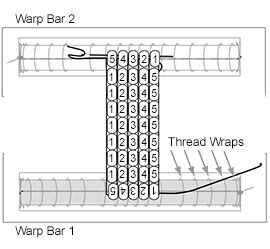
Weaving on the Loom
Pass needle and thread underneath (below) the warp threads.
Pick up 5 beads for next row.
Slide the beads all the way down the thread and position each bead between the proper warp threads.
Using finger(s), firmly press beads UP, popping the beads into place between the appropriate warp threads. Continue to hold beads in place while using the other hand to insert the needle back through all 5 beads; aim needle UP toward the TOP of the beads, keeping this thread pass above all warp threads. This process locks the beads in place.
Slide this new row of beads next to previous row, snug/pet beads and thread to keep an even tension and to create straight rows.
Repeat steps 1 through 5 until you reach the opposite Warp Bar.
Remove Beadwork from the Loom
Insert needle/thread through all 5 beads on Warp Bar 2, begin with bead 5, end by exiting bead 1. This step is required to secure the beads on Warp Bar 2 to the rest of the bead woven piece.
We are ready to remove bead woven piece from the Versa-Loom.
Using a pointed pair of scissors or seam ripper cut the straight thread running along the center front of Warp Bar 2. Wiggle until woven piece is free from Warp Bar. If threads on a Warp Bar were pierced/split you may also need to cut the wraps going around the Warp Bar.
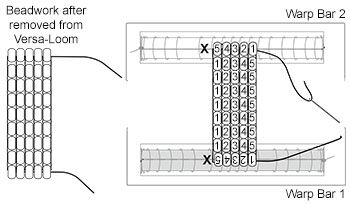
Remove tape that is securing thread to the End Section which holds Warp Bar 1. Unwrap thread from End Section. Cut/snip straight thread on Warp Bar 1.
Creating a Sample Gauge:
To create detailed patterns it may be necessary to know exactly how many rows are needed to fit within a certain length. Length is preselected when using the Versa-Loom and a SAMPLE GAUGE piece may be the best way to find out exactly how many rows you would need to fill a specific length.
Various tensions, bead sizes, and thread possibilities make it difficult to know exactly how many beads one individual would need for a specific length.
Different beads, bead sizes, manufacturers and combinations thereof are reasons that various SAMPLE pieces may be needed.
Choose the length and bead you most often use. It is recommended to create at least a 6-inch length for the SAMPLE. Once you have counted and recorded your finding you may cut the sample piece apart and re-use your beads.
Wrap 2 warp bars with 5 or 7 beads (width).
Weave the entire length.
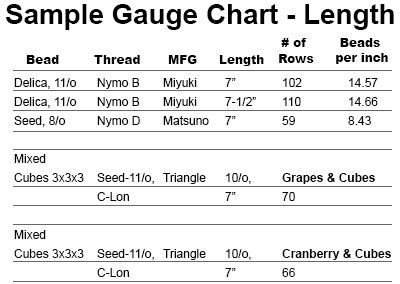
Record your findings for later reference. Keep in mind that even your own SAMPLE numbers may vary because some days you may warp/weave tight and other days loose.
Have a question regarding this project? Email Customer Service.
Copyright Permissions
All works of authorship (articles, videos, tutorials and other creative works) are from the Fire Mountain Gems and Beads® Collection, and permission to copy is granted for non-commercial educational purposes only. All other reproduction requires written permission. For more information, please email copyrightpermission@firemtn.com.