Making a Square Pendant with Wubbers® Jumbo Square Mandrel Pliers
Patti Bullard, PhD and inventor of Wubbers® jewelry-making pliers, walks you through the steps on how to create a pendant out of Argentium® silver wire with the square mandrel pliers, butane torch and texturing hammer.
Instructions
Step 1
Cut a length of 12-gauge Argentium® dead-soft silver wire long enough to work around a pair of Wubbers® jumbo square mandrel pliers.
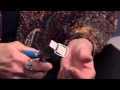
Insert the wire between the jaws of the jumbo square mandrel pliers, lining up the edge of the wire with one edge of the larger jaw. Close and grip the pliers then shape the wire around each side of the large jaw, forming a square. Finish by bringing the wire back through the jaws parallel to the first side. Close the pliers to press the parallel wires flat.
Use a pair of heavy-duty flush-cutters to cut each of the parallel wires flush in the middle, so the ends meet.
Tips:
- Larger gauges of dead-soft wire may be stiff to shape by hand. If needed, use a pair of flat- or bent-nose pliers to assist in wrapping the wire around the jaws of the square mandrel pliers.
- Work directly from the wire spool to reduce wire waste
- Save scraps of Argentium wire for recycling into other projects
Step 2
Align the ends of the wire ensuring that a bit of pressure is present. Work the wire back and forth if needed.
Note: The wire may not be square. This is fine, as it is more important at this point that the two ends of wire meet uniformly with a bit of tension.
Fusing
Step 3
Set up a soldering station by first placing down a ceramic tile, then placing a charcoal block on top.
Note: The ceramic tile will provide protection for the work surface and the charcoal block will help prevent discoloration from occurring during the fusing process.
Step 4
Place the formed Argentium silver wire square on the charcoal block then use a hand-held butane torch to evenly heat the wire. Although not necessary, heating the wire evenly will help reduce discoloration.
Continue to heat the wire evenly, carefully watching until the surface appears to shine or starts to glow. Once this occurs, focus the flame on and around the joint where the two ends meet. Continue to heat the joint until the metal begins to flow slightly and the joint disappears.
Tips:
- Ignite the torch with the flame size lever in a middle position
- Use the locking feature to lock the flame on to make the torch easier to work with, then adjust the size of the flame as needed
- When not in use, always ensure the safety lever is in the safe position
Let the wire cool for approximately 30 seconds on the charcoal block then, using a pair of tweezers, move the wire onto the cooler ceramic tile. Continue to let cool for a few more seconds, then submerge the wire into water.
Note: Due to the composition of Argentium silver, it is important not to touch the wire while it is hot, as it may fracture.
Remove the wire from the water and dry. Check for a solid connection by applying slight pressure to the fused joint. Use a nail file and file away any discoloration that may have occurred during the fusing process.
Shaping
Step 5
Insert the fused wire back into the large jaw of the jumbo square mandrel pliers with the fused edge between the jaws.
Note: Heating wire may cause slight shrinkage. If this occurs and the fused wire no longer fits onto the large jaw of the jumbo square mandrel pliers, it is fine to angle the wire off of the front.
Press the jaws of the jumbo square mandrel pliers closed to flatten. Repeat starting with the opposite side of the fuse to press each side of the wire together to square the corners and straighten any uneven sides.
To sharpen the corners, insert the wire onto the smaller jaw of the square mandrel pliers. Hold the wire snug against the small jaw and press down on the pliers. Rotate the wire and, on the same corner, press down again. Repeat on the other three corners.
Tip: If one side appears higher than another, insert the wire back into the large jaw of the jumbo square mandrel pliers and, while lifting up on the side that is high, press down on the pliers. Repeat as needed to work down any high sides to form a uniform square.
Step 6
Place the shaped wire onto a smooth steel block. Using a texturing hammer with interchangeable faces, attach a smooth domed face to one side and begin to tap along one side of the wire while holding the opposite side.
Tip: If finger safety is a concern, hold the wire approximately 1/2 off the steel block and hammer the side that is resting on the block.
Continue to flatten each side, including the corners, until the desired thickness is achieved. Use the edge of the smooth curved face of the hammer to smooth out the outside edge of the wire.
Note: To prevent distortion, hammer straight down from the top and keep a uniform width, starting from one side and working around to the last side. Multiple passes with the hammer may be required.
If desired, attach a textured head to the hammer then gently hammer aound each side to add texture to the wire.
Step 7
Pass a 16-gauge or heavier jumpring through the square pendant and close, working it back and forth until a slight tension is achieved.
Note: Smaller gauges of jumprings may require fusing or soldering to secure the pendant.
Step 8
Use a brass brush to brush the pendant. This will even out and smooth any rough areas. Optionally, insert the pendant into a tumble polisher.
Wrap a Sunshine® polishing cloth around a nail file and, while bracing the pendant against the steel block, polish the face (textured side) of the pendant.


Have a question regarding this project? Email Customer Service.
Copyright Permissions
All works of authorship (articles, videos, tutorials and other creative works) are from the Fire Mountain Gems and Beads® Collection, and permission to copy is granted for non-commercial educational purposes only. All other reproduction requires written permission. For more information, please email copyrightpermission@firemtn.com.