How to Assemble the Beading Loom
Instructions
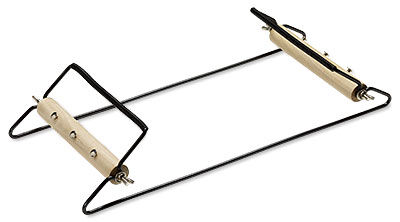
Assembling the Loom
Beading Loom Set Includes:
- 1 beading loom frame (A) with attached thread separators (D)
- 2 spools (C) with inserted nailheads
- 2 bolts (E)
- 2 wing nuts (B)
Thread a bolt through the hole in one of the vertical supports at one end of the beading loom, one spool, and the hole in the opposite verticle support.
Add a wing nut to the end of the bolt, but do not fully tighten. Repeat on the opposite end of the loom frame.
Tips:
- The number of warp threads needed should be the same as the number of beads across your design, plus one more
- The length of the warp threads should be approximately two feet longer than the loom frame
- Nylon threads and monofilaments are good choices for warp threads
Warping the Loom
Lay all the warp threads side by side. Tie one end of the threads together using an overhand knot. From the knot, separate the secured threads into two equal sections.
Hook the knot under the nail head on one of the spools. Make sure that one section of the threads is to the left of the nail and the other to the right. Turn the spool slightly so the warp threads go up and over, then tighten the wing nut to secure to spool.
Bring the loose ends of the warp threads back together at the opposite end of the loom. About 2 to 3 inches past the loom secure the ends in an over hand knot. Hook the knot under the nail of the second spool.
Guide the warp threads into the proper slots of the thread separators.
Turn the second spool to tighten the warp threads. Tighten the wing nut to secure the spool.
You are now ready to begin your project.
Have a question regarding this project? Email Customer Service.
Copyright Permissions
All works of authorship (articles, videos, tutorials and other creative works) are from the Fire Mountain Gems and Beads® Collection, and permission to copy is granted for non-commercial educational purposes only. All other reproduction requires written permission. For more information, please email copyrightpermission@firemtn.com.