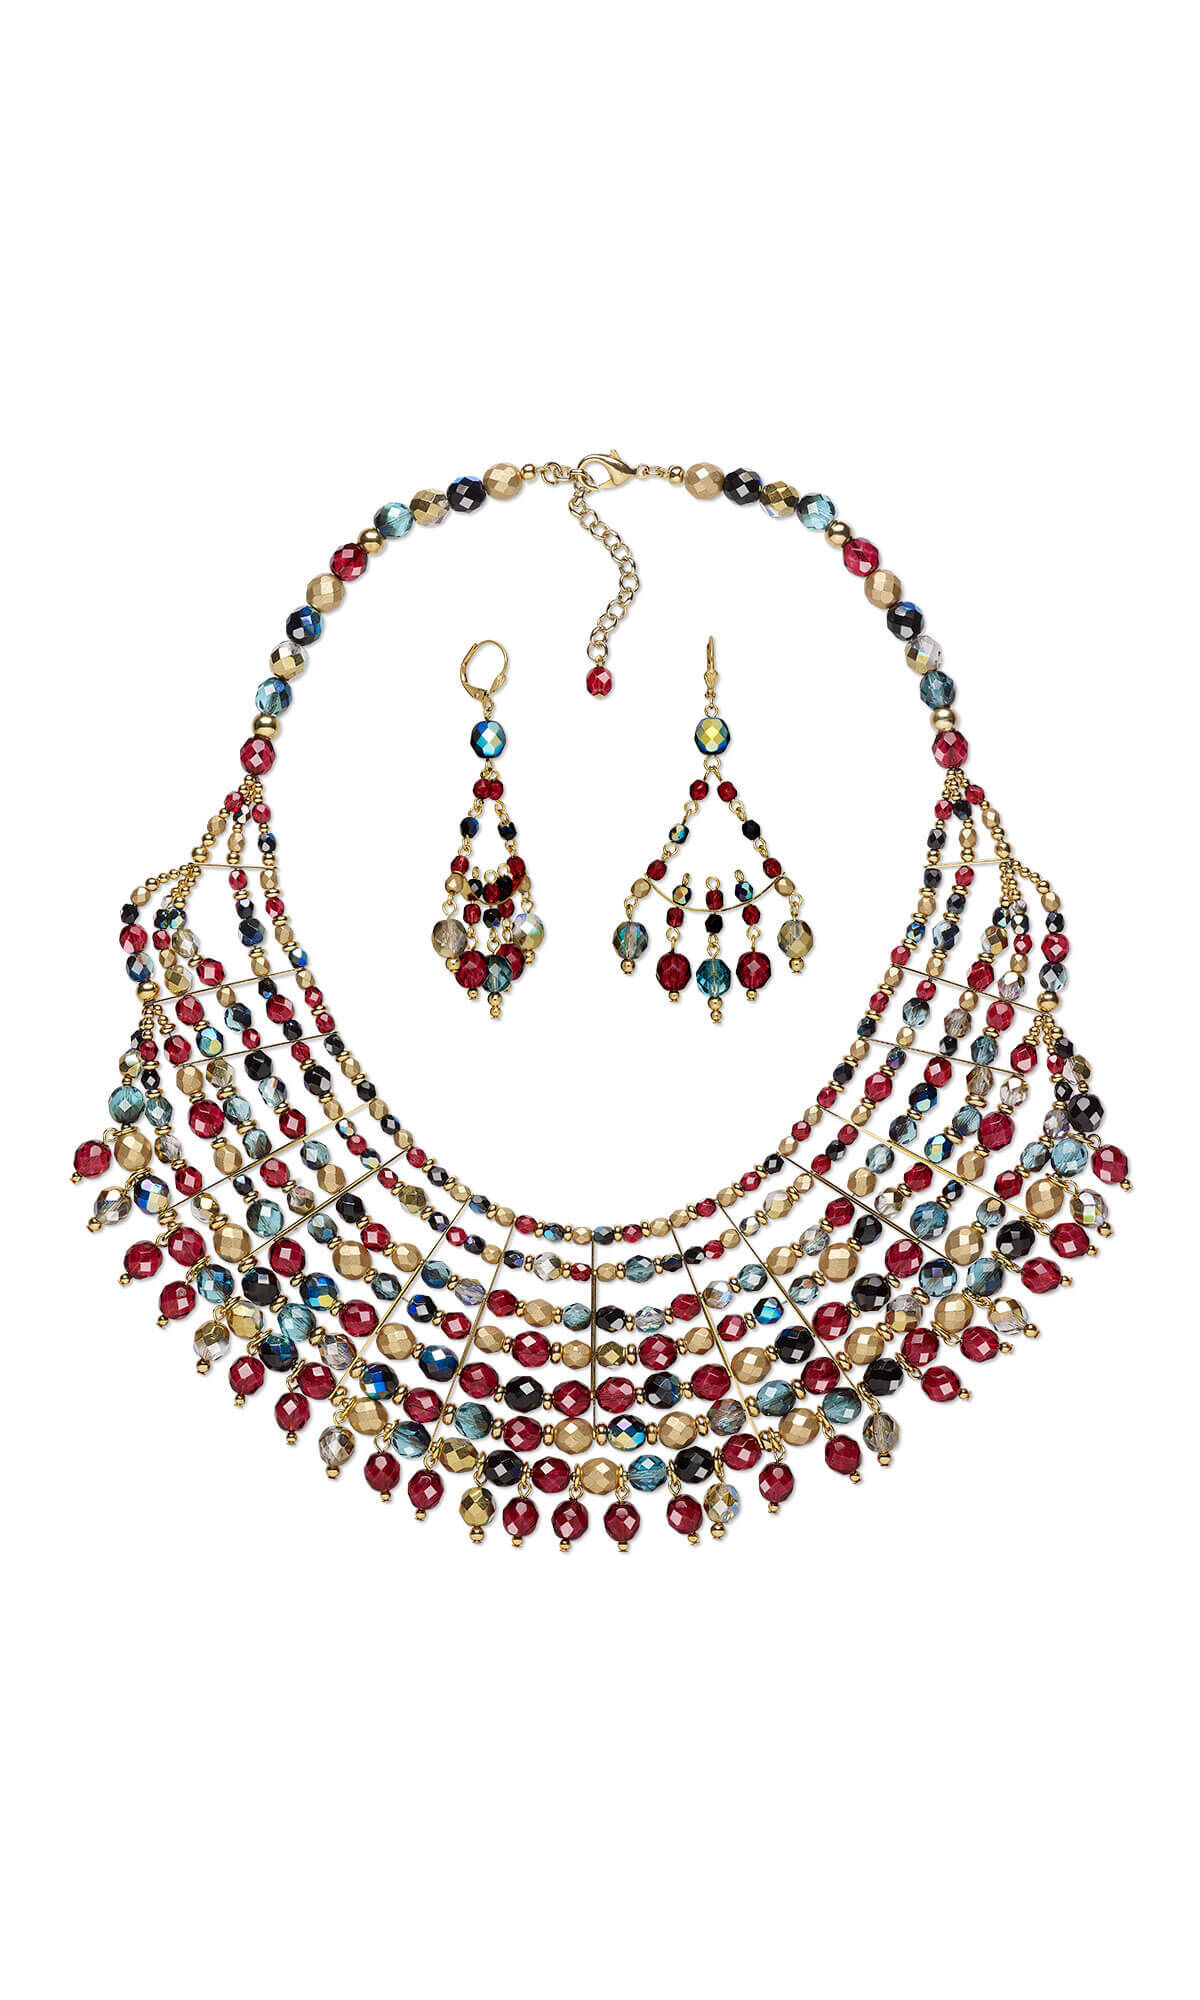
Bib-Style Necklace and Earring Set with Czech Fire-Polished Glass Beads and Gold-Plated Brass Beads and Spacer Bars


Design Idea HA1X
Huipil in Cancun
-- Designer --
Esther, Jewelry Designer, Exclusively for Fire Mountain Gems and Beads®
To learn more about Esther Pollock, read her jewelry artist success story here.
: : : Materials : : :
Click here to view a full list of materials used in this design.
Please take the creative opportunity to select the products of your choice for this design, offered here at Fire Mountain Gems and Beads. Some materials may not be available or listed.
- Spacer bar, gold-plated brass, 35x3mm 5-strand, fits up to 8mm bead
- Spacer bar, gold-plated brass, 19x3mm 3-strand, fits up to 8mm bead
- Jump ring, gold-plated brass, 6mm round, 4.4mm inside diameter, 20 gauge
- Jump ring, gold-plated brass, 5mm round, 3mm inside diameter, 18 gauge
- Head pin, gold-plated brass, 1 inch, 21 gauge
- Eye pin, gold-plated brass, 1 inch, 21 gauge
- Ear wire, gold-plated brass, 15mm leverback with 6x3mm shell and open loop
- Crimp, 12Kt gold-filled, 2mm smooth tube, 1.1mm inside diameter
- Crimp cover, gold-plated brass, 5mm round
- Crimp cover, gold-plated brass, 4mm round
- Clasp, lobster claw, gold-plated brass, 13x8mm
- Chain, gold-plated brass, 5mm rolo
- Beading wire, Accu-Flex®, nylon and stainless steel, clear, 49 strand, 0.019-inch diameter
- Bead, gold-plated brass, 6mm round
- Bead, gold-plated brass, 5x2mm heishi
- Bead, gold-plated brass, 4x2mm heishi
- Bead, gold-plated brass, 3mm round
- Bead, gold-plated brass, 2.5mm round
- Bead, Czech fire-polished glass, two-tone clear AB and metallic amber gold, 8mm faceted round
- Bead, Czech fire-polished glass, two-tone clear AB and metallic amber gold, 6mm faceted round
- Bead, Czech fire-polished glass, two-tone clear AB and metallic amber gold, 3mm faceted round
- Bead, Czech fire-polished glass, teal blue iris, 8mm faceted round
- Bead, Czech fire-polished glass, teal blue iris, 6mm faceted round
- Bead, Czech fire-polished glass, opaque satin metallic gold, 4mm faceted round
- Bead, Czech fire-polished glass, opaque satin gold, 8mm faceted round
- Bead, Czech fire-polished glass, opaque satin gold, 6mm faceted round
- Bead, Czech fire-polished glass, opaque jet AB, 8mm faceted round
- Bead, Czech fire-polished glass, opaque jet AB, 6mm faceted round
- Bead, Czech fire-polished glass, opaque jet AB, 4mm faceted round
- Bead, Czech fire-polished dipped décor glass, garnet red, 8mm faceted round
- Bead, Czech fire-polished dipped décor glass, garnet red, 6mm faceted round
- Bead, Czech fire-polished dipped décor glass, garnet red, 4mm faceted round
Instructions
Necklace Instructions
Cut the following:
- Accu-Flex® professional-quality beading wire:
- Two 13-inch lengths
- Two 15-inch lengths
- One 17-inch length
- One 20-inch length
- One 22-inch length
- Two 1/2 inch lengths of French wire
- One 2-inch length of 5mm rolo chain
String onto a 1-inch headpin: one gold-plated brass 3mm round and one two-tone clear AB and metallic gold 8mm round then form a simple loop. Repeat to create a total of eight two-tone 8mm drops.
Repeat to create 18 garnet red 8mm drops using: one gold-plated brass 2.5mm round and one garnet red 8mm round. Attach one 6mm jumpring to each 8mm drop.
String onto a 1-inch headpin: one garnet red 6mm round then form a simple loop.
First, Second and Third Strands
String onto the 22-inch length of beading wire: one crimp and one length of French wire. Pass the beading wire back through the crimp. Pull the beading wire so the crimp rests snug against the French wire leaving approximately 1/4 inch of beading wire on the end. Crimp, then trim the excess from the short end of the beading wire. Finish with a crimp cover.
String onto the beading wire:
- One opaque satin gold 8mm round
- One opaque jet AB 8mm round
- One two-tone clear AB and metallic gold 8mm round
- One teal iris blue 8mm round
- One crimp
Bring the ends of one 15-inch length and one 20-inch length of beading wire together and pass through the crimp. Line up the ends of the two lengths of wire with the crimp then crimp.
Continue to string onto all three beading wires:
- One gold-plated brass 6mm round with 3mm hole (position over the crimp)
- One garnet red 8mm round
- One opaque satin gold 8mm round
- One opaque jet AB 8mm round
- One two-tone clear AB and metallic gold 8mm round
- One teal iris blue 8mm round
- One crimp
Crimp to secure the wires, then continue to string onto all three wires:
- One gold-plated brass 6mm round with 3mm hole (position over the crimp)
- One garnet red 8mm round
Separate the lengths of beading wire then string the following onto the 15-inch length (first strand):
- Two gold-plated brass 2.5mm rounds
- One garnet red 4mm round
- One gold-plated brass 2.5mm round
- One opaque jet AB 4mm round
- One gold-plated brass 3mm round
- One 19x3mm 3-strand spacer bar (through the first hole)
- One set of:
- Four 4mm rounds
- Three 4x2mm heishi beads (between the 4mm rounds)
- One 35x3mm 5-strand spacer bar (through the first hole)
- Two sets of:
- Three 4mm rounds
- Two 4x2mm heishi beads (between the rounds)
- One 35x3mm 5-strand spacer bar (through the first hole)
- Three 4mm rounds
- One 35x3mm 5-strand spacer bar (through the first hole)
- One set of:
- Three 4mm rounds
- Two 4x2mm heishi beads (between the rounds)
- One 35x3mm 5-strand spacer bar (through the first hole)
- One set of:
- Two 4mm rounds
- One 4x2mm heishi (between the rounds)
- One 35x3mm 5-strand spacer bar (through the first hole)
- Three 4mm rounds
- Two 4x2mm heishi beads (between the rounds)
Note: Use beads in the color pattern of your choice in instances where no color is given. This design looks best when using an asymmetrical color pattern!
Continue to add one 35x3mm 5-strand spacer bar (through the first hole) to the strand then repeat the stringing sequence from Step 5 in the opposite direction. Add a Bead Stopper™ after the last bead.
String onto the 22-inch length (second strand):
- Three gold-plated brass 2.5mm rounds
- One opaque jet AB 4mm round
- One gold-plated brass 2.5mm round
- One opaque satin gold 4mm round
- One gold-plated brass 3mm round
- The center hole of the 3-strand spacer bar from the first strand
Continue to string the following:
- One set of:
- Three 4mm rounds
- One 6mm round
- Three 4x2mm heishi beads (between the 4mm and 6mm rounds)
- The second hole of the 5-strand spacer bar from the first strand
- One 4mm round
- One 6mm round
- One 4mm round
- The second hole of the 5-strand spacer bar from the first strand
- One 4mm round
- One 4x2mm heishi
- One 6mm round
- One 4x2mm heishi
- One 4mm round
- The second hole of the 5-strand spacer bar from the first strand
- Three 4mm rounds
- One 35x3mm 5-strand spacer bar (through the first hole)
- The second hole of the 5-strand spacer bar from the first strand
- One 4mm round
- One 4x2mm heishi
- One 6mm round
- One 4x2mm heishi
- One 4mm round
- The second hole of the 5-strand spacer bar from the first strand
- Three 4mm rounds
- The second hole of the 5-strand spacer bar from the first strand
- One 4mm round
- One 4x2mm heishi
- One 6mm round
- One 4x2mm heishi
- One 4mm round
- The second hole of the 5-strand spacer bar from the first strand
Continue to add one 35x3mm 5-strand spacer bar (through the first hole) to the strand, then repeat the stringing sequence from Step 7 in the opposite direction. Add a Bead Stopper after the last bead.
String onto the 20-inch length (third strand):
- Two gold-plated brass 2.5mm rounds
- One garnet red 4mm round
- One gold-plated brass 2.5mm round
- One opaque satin gold 4mm round
- One gold-plated brass 2.5mm round
- One crimp
Bring the ends of one 13-inch length and one 15-inch length of beading wire together and pass through the crimp. Line up the ends of the two lengths of wire with the crimp. Crimp then finish with a crimp cover.
The 15-inch length will become the fourth strand and the 13-inch length will become the fifth strand.
Pass all three strands through the third hole of the 3-strand spacer bar from the previous two strands.
String onto the third strand:
- Three gold-plated brass 2.5mm rounds
- One gold-plated brass 3mm round
- One opaque jet AB 4mm round
- One two-tone clear AB and metallic gold 6mm round
- One 4x2mm heishi
- One garnet red 6mm round
- The center hole of the 5-strand spacer bar from the previous strand
- One 4mm round
- One 6mm round
- One 4mm round
- The center hole of the 5-strand spacer bar from the previous strand
- Two 6mm rounds
- One 4x2mm heishi
- One 6mm round
- One 35x3mm 5-strand spacer bar (through the first hole)
- The center hole of the 5-strand spacer bar from the previous row
- Two 6mm rounds
- The second hole of the 5-strand spacer bar from the second strand
- The middle hole of the 5-strand spacer bar from the first strand
- One set of:
- Three 6mm rounds
- Two 4x2mm heishi beads (between the 6mm rounds)
- One 35x3mm 5-strand spacer bar (through the first hole)
- The center hole of the 5-strand spacer bar from the first strand
- One 6mm round
- One 4x2mm heishi
- One 6mm round
- One 35x3mm 5-strand spacer bar (through the first hole)
- The center hole of the 5-strand spacer bar from the first strand
- One set of:
- Three 6mm rounds
- Two 4x2mm heishi beads (between the 6mm rounds)
Continue to string onto the beading wire: the center hole of the 5-strand spacer bar from the first strand and the second hole of the 5-strand spacer bar from the second strand, then repeat the stringing sequence from Step 10 in the opposite direction.
Pass the beading wire through the third hole of 3-strand spacer bar then add a bead stopper.
Fourth and Fifth Strands
String onto the 15-inch length (fourth strand):
- Three gold-plated brass 2.5mm rounds
- One two-tone clear AB and metallic gold 3mm round
- One opaque jet AB 4mm round
- One garnet red 4mm round
- One satin metallic gold 4mm round
- One two-tone clear AB and metallic gold 6mm round
- The fourth hole of the 5-strand spacer bar from the first strand
- One set of:
- Two 6mm rounds
- One 4x2mm heishi (between the 6mm rounds)
- The fourth hole of the 5-strand spacer bar from the first strand
- One set of:
- Three 6mm rounds
- Two 5x2mm heishi beads (between the 6mm rounds)
- The second hole of the 5-strand spacer bar from the third strand
- The fourth hole of the 5-strand spacer bar from the first strand
- One set of:
- Two 6mm rounds
- One 4x2mm heishi (between the 6mm rounds)
- The third hole of the 5-strand spacer bar from the second strand
- The fourth hole of the 5-strand spacer bar from the first strand
- One 6mm round
- One 4x2mm heishi
- One 8mm round
- One 4x2mm heishi
- One 6mm round
- The second hole of the 5-strand spacer bar from the third strand
- The fourth hole of the 5-strand spacer bar from the first strand
- One 6mm round
- One 4x2mm heishi
- One 6mm round
- The second hole of the 5-strand spacer bar from the third strand
- The fourth hole of the 5-strand spacer bar from the first strand
- One 6mm round
- One 4x2mm heishi
- One 8mm round
- One 4x2mm heishi
- One 6mm round
Continue to string onto the fourth strand: the fourth hole of the 5-strand spacer bar from the first strand and the third hole of the 5-strand spacer bar from the second strand then repeat the stringing sequence from Step 12 in the opposite direction to string the second half of the strand.
Pass the beading wire through the third hole of the 3-strand spacer bar then add a Bead Stopper.
String onto the 13-inch length (fifth strand):
- Three gold-plated brass 2.5mm rounds
- One gold-plated brass 3mm round
- One satin metallic gold 4mm round
- One opaque jet AB 4mm round
- One garnet red 6mm round
- One teal iris blue 6mm round
- One crimp
Bring the ends of one 13-inch length and one 17-inch length of beading wire together and pass through the crimp. Line up the ends of the two lengths of wire with the crimp. Crimp then finish with a crimp cover.
The 17-inch length will become the sixth strand and the 13-inch length will become the seventh strand.
Continue to string onto the fifth strand:
- The fifth hole of the 5-strand spacer bar from the first strand
- Two gold-plated brass 2.5mm rounds
- One 4x2mm heishi
- One garnet red 6mm round
- The fifth hole of the 5-strand spacer bar from the first strand
- One 6mm round
- One 4x2mm heishi
- One 8mm round
- One 4x2mm heishi
- One 6mm round
- The third hole of the 5-strand spacer bar from the third strand
- The fifth hole of the 5-strand spacer bar from the first strand
- One 4mm round
- One 4x2mm heishi
- One 8mm round
- The fourth hole of the 5-strand spacer bar from the second strand
- The fifth hole of the 5-strand spacer bar from the first strand
- One set of:
- Three 8mm rounds
- Two 4x2mm heishi beads (between the 8mm rounds)
- The third hole of the 5-strand spacer bar from the third strand
- The fifth hole of the 5-strand spacer bar from the first strand
- One 8mm round
- One 4x2mm heishi
- One 8mm round
- The third hole of the 5-strand spacer bar from the third strand
- The fifth hole of the 5-strand spacer bar from the first strand
- One set of:
- Three 8mm rounds
- Two 4x2mm heishi beads (between the 8mm rounds)
Continue to string onto the strand: the fifth hole of the 5-strand spacer bar from the first strand and the fourth hole of the 5-strand spacer bar from the second strand then repeat the stringing sequence from Step 14 in the opposite direction.
Pass the beading wire through the third hole of the 3-strand spacer bar then add a Bead Stopper.
Sixth Strand
String onto the 17-inch length (sixth strand):
- Three gold-plated brass 2.5mm rounds
- The following rounds in the pattern of your choice (adding a 4x2mm heishi between each):
- One 4mm round
- Three 6mm rounds
- The fourth hole of the 5-strand spacer bar from the third strand
- One 6mm round
- One 4x2mm heishi
- One 8mm round
- The fifth hole of the 5-strand spacer bar from the second strand
- Three sets of:
- One 8mm round
- One 5x2mm heishi
- The fourth hole of the next 5-strand spacer bar from the third strand
- Two sets of:
- One 8mm round
- One 5x2mm heishi
- The fourth hole of the next 5-strand spacer bar from the third strand
- Three sets of:
- One 8mm round
- One 5x2mm heishi
Continue to string onto the sixth strand the fifth hole of the next spacer bar from the second strand, then repeat Step 16 in the opposite direction to string the second half of the sixth strand.
Place a Bead Stopper at the end.
Seventh Strand
String onto the 13-inch length (seventh strand):
- One gold-plated brass 2.5mm round
- One gold-plated brass 3mm round
- One 4mm round
- One 6mm round
- One gold-plated brass 2.5mm round
- One 8mm round
- One gold-plated brass 2.5mm round
- One garnet red 8mm drop
- One 8mm round
- One gold-plated brass 2.5mm round
- One two-tone clear AB and metallic gold 8mm drop
- One 8mm round
- The fifth hole of the next 5-strand spacer bar from the third strand
- Two sets of:
- One gold-plated brass 2.5mm round
- One garnet red 8mm drop
- One 8mm round
- One gold-plated brass 2.5mm round
- One two-tone clear AB and metallic gold 8mm drop
- One 8mm round
- Two sets of:
- One gold-plated brass 2.5mm round
- One garnet red 8mm drop
- One 8mm round
- One gold-plated brass 2.5mm round
- One two-tone clear AB and metallic gold 8mm drop
- The fifth hole of the next 5-strand spacer bar from the third strand
- Two sets:
- One 8mm round
- One gold-plated brass 2.5mm round
- One garnet red 8mm drop
- One 5x2mm heishi
- The fifth hole of the next 5-strand spacer bar from the third strand
- One 8mm round
- One gold-plated brass 2.5mm round
- One two-tone clear AB and metallic gold 8mm drop
- Two sets of:
- One 8mm round
- One gold-plated brass 2.5mm round
- One garnet red 8mm drop
Continue to string one 8mm round onto the beading wire, then repeat the stringing sequence from Step 18 in the opposite direction to string the second half of the seventh strand.
Place a Bead Stopper on the end.
Connecting the Strands
Working from the bottom up, remove the bead stoppers from the bottom three strands.
Begin by adjusting the fifth, sixth and seventh strands as needed so the necklace lays even on both sides. Crimp where those strands meet then trim excess wire from the sixth and seventh strands. Finish with a crimp cover.
Remove the Bead Stoppers from the third, fourth and fifth strands. String one crimp onto all three strands. Adjust the strands so they lay correctly on a flat surface. Crimp then finish with a crimp cover. Trim excess wire from the fourth and fifth strands.
Continue to string onto the third strand:
- One gold-plated brass 3mm round
- One satin metallic gold 4mm round
- One gold-plated brass 2.5mm round
- One garnet red 4mm round
- Two gold-plated brass 2.5mm rounds
Remove the Bead Stoppers from the first and second strands. Bring the first, second and third strands together. String onto all three: one garnet red 8mm round and one crimp.
Adjust the strands as needed so they lay correctly on a flat surface. Crimp then finish with a crimp cover.
Continue to string onto all three strands:
- One teal iris blue 8mm round
- One two-tone clear AB and metallic gold 8mm round
- One opaque jet AB 8mm round
- One opaque satin gold 8mm round
- One garnet red 8mm round
- One crimp
Crimp then trim excess wire from the first (15-inch) and third (20-inch) strands. Finish with a crimp cover. Continue to string onto the remaining length of beading wire:
- One teal iris blue 8mm round
- One two-tone clear AB and metallic gold 8mm round
- One opaque jet AB 8mm round
- One opaque satin gold 8mm round
Repeat Step 3 to secure the strand.
Pass one 5mm jumpring through one lobster claw clasp and the French wire loop on one end of the necklace and close.
Connect the following components together end-to-end using 5mm jumprings:
- The opposite French wire loop
- One length of chain
- The garnet red 6mm drop
Earring Instructions
String onto a 1-inch headpin: one gold-plated brass 2.5mm round, one gold-plated brass 3mm round and one teal iris blue 8mm round then form a simple loop. Repeat to create a second drop.
String onto a 1-inch headpin: one gold-plated brass 2.5mm round and one garnet red 8mm round then form a simple loop. Repeat to create a total of four garnet red 8mm drops and four two-tone clear AB and metallic gold 8mm round drops.
String onto a 1-inch eyepin: one opaque jet AB 8mm round then form a simple loop.
Repeat to create four opaque jet AB 4mm links and four garnet red 4mm links.
String onto a 1-inch eyepin: one opaque jet AB 4mm round, the center loop on one 35x3mm 5-strand spacer bar and one garnet red 4mm round then form a simple loop.
Note: The side with the opaque jet AB round will be the bottom side.
String onto a 1-inch eyepin: one opaque stain metallic gold 4mm round, the outside loop on the 35x3mm 5-strand spacer bar (through the bottom) and one garnet red 4mm round then form a simple loop. Repeat on the opposite loop of the spacer bar.
String onto a 1-inch eyepin: one garnet red 4mm round, one open loop on the 35x3mm spacer bar (through the bottom) and one opaque jet AB 4mm round then form a simple loop. Repeat using the remaining open loop on the spacer bar.
Repeat Step 3 to create a second linked bar component.
Bend the spacer bar to create a curve with the convex side being the bottom of the bar.
Attach the following components end-to-end:
- One opaque jet AB 8mm link
- One garnet red 4mm link
- One opaque jet AB 4mm link
- The top garnet red loop on one outermost spacer bar link
Repeat using the same opaque jet AB 8mm link and the opposite spacer bar link.
Attach the following drops along the bottom of the spacer bar link:
- Each two-tone 8mm drop to the outermost links on the bottom
- The teal iris blue 8mm drop to the bottom of the center link
- Each garnet red 8mm drop to the bottom of the remaining two links
Repeat Steps 5 and 6 to create a second earring.
Have a question regarding this project? Email Customer Service.
Copyright Permissions
All works of authorship (articles, videos, tutorials and other creative works) are from the Fire Mountain Gems and Beads® Collection, and permission to copy is granted for non-commercial educational purposes only. All other reproduction requires written permission. For more information, please email copyrightpermission@firemtn.com.

