How to Make Shibori Dyed Ribbon

Delicate colorful folds beg to be touched. We wanted to share the elements to make this new soft jewelry medium which we have incorporated into our Comprehensive front cover design.
The shibori method of tie dyeing dates back to the 8th century in Japan. The main fabrics originally used were silk, hemp and (later) cotton. The fabric on our front cover was wrapped and dyed using the Arashi shibori method. The word Arashi is the Japanese word for storm. The folds and diagonal pattern suggests the driving rain of a heavy storm.
The most common contemporary fabric used in jewelry applications (and our front cover) is silk. It has a soft texture, a fine shimmer to the fabric and accepts the dye readily. Check online sources or fabric stores for the best selection and price for un-dyed silk fabric.
Many people love silk dyeing and get hooked on the beautiful colors and patterns. One of our lovely customers helped us with some easy home instructions. Try for yourself!
Instructions
Step 1

Iron the length of fabric to be dyed on silk setting.
Step 2
Begin by drilling a small hole at the top and bottom of a pipe to knot the fishing line to. Start tightly knotting your cord around the top of the pipe. Knot with a surgeon's knot so it stays in place and does not loosen when pulled.
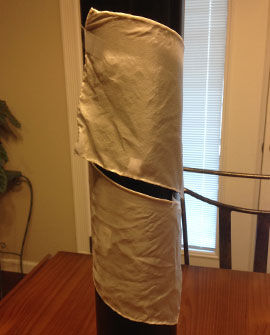
Step 3
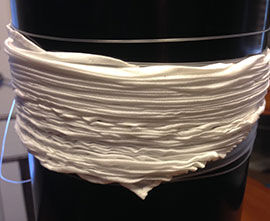
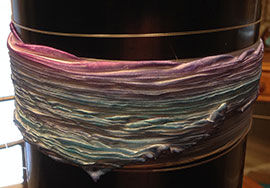
Wrap length of silk around the pipe, in a circular fashion as shown. Tape it periodically with normal tape to temporarily hold the fabric in place.
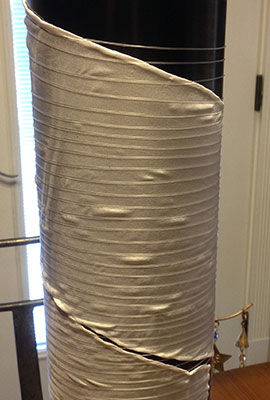
Now you will begin wrapping the cord around the tube and fabric tightly, making sure it is continuous and pretty darn tight. You will have to move the fabric later, so don't make it Godzilla tight.
We wrapped the line at 1/4 inch intervals, but you can use whatever spacing you like. (Closer spacing creates tighter wrinkles--wider spacing creates softer ripples.) As you wrap, remove the temporary tape so it does not get wrapped under the fishing line. Wrap the entire length and then securely knot at the bottom end of the tube.
Step 4
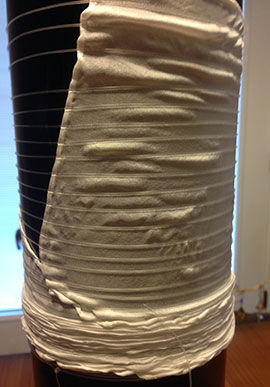
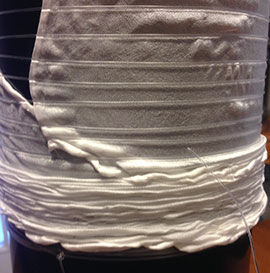
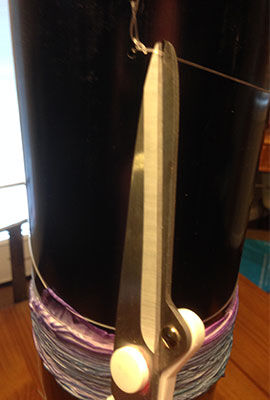
Now comes the hard part. Start scrunching the fabric together (see images 1,2,3 to the left). Work the fabric from top to bottom, and bottom to top. It's is a little hard to do because it is bound so tightly, but this step is very important. You'll want to have delicate small folds and contrast when you dye the fabric. You'll see what we mean in the next few steps.
Keep moving fabric together until all fabric is gathered in a complete scrunched bundle. It does not necessarily look beautiful at this time, but now the magic begins.
Step 5
Your workplace should be over a sink or outdoors where the dyes will not damage the sink or counter surfaces. Wear rubber gloves so your hands will not look like rainbows for days. Although dyes are not hazardous, goggles are a great safety precaution too. Read complete directions for mixing, drying and setting instructions.
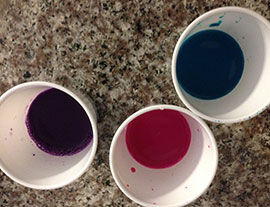
Now mix your cold water dyes. We used a rainbow blend for happy colorful contrast. Here is where your personal taste comes in. Any color scheme you like will work, multi-colors or single colors. As you experiment you will see what resonates for you! Each piece will be unique.
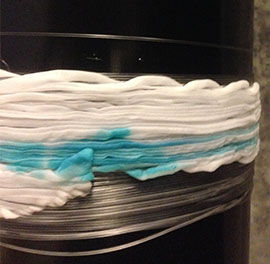
First wet your silk. It should be damp, but not dripping wet. SLOWLY and gently start applying dye to your gathered cloth. You can use a small foam brush or a small soft sponge, depending on what you have around. The most important part is gradual small amounts of dye and a light touch. You do not want to saturate the dye deeply into the fabric. You only want to apply to the top surface of your gathers.
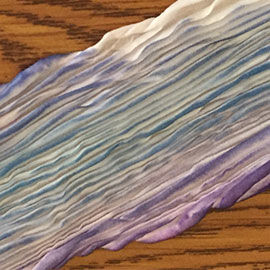
Because the fabric is damp, it will wick in and spread the color. Multiple colors will bleed into one another, creating new colors (cool). The fishing line acts as a resist. Color will not transfer into the inside creases as long as your line is pulled tightly enough.
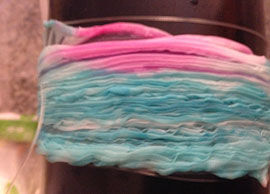
Now, let it dry, following the instructions on the dye being used. We dried ours in the sun for about 3 hours. Once dry you can more readily see the contrast of the outer dye color and the original natural color inside your gathers. Be patient, you are almost ready to reveal your creation.
Read your dye instructions carefully. Some are heat set and will require your finished piece to be put in a hot dryer to complete the dye setting.
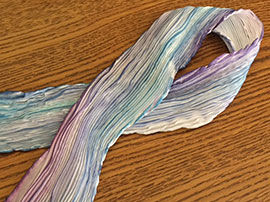
Shibori dyed silk is suitable for necklace cords, purse liners, embellishment for seed beading as in the unique beaded artistry shown on our 2015-2016 Comprehensive catalog cover. The technique can be used for clothing and larger scarves too. Enjoy this ancient technique and share your unique artistry with others!
Have a question regarding this project? Email Customer Service.
Copyright Permissions
All works of authorship (articles, videos, tutorials and other creative works) are from the Fire Mountain Gems and Beads® Collection, and permission to copy is granted for non-commercial educational purposes only. All other reproduction requires written permission. For more information, please email copyrightpermission@firemtn.com.