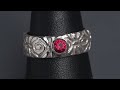
Art Clay® Silver Border Mold Ring
Follow along in this fine silver metal clay tutorial from prominent mixed media artist Lisa Pavelka to learn how to make an Art Clay® silver ring from a border mold and even add a gemstone to take your jewelry project up a notch.
Instructions
It's important not to open the metal clay package until you're ready to use it since metal clay begins to dry very quickly. It's a good idea to use polymer clay to do a dry run of the design before using metal clay to verify tools and supplies are right where you need them.
Create a nonstick template of the ring using a Teflon® sheet. Metal clay shrinks approximately 8 - 10% during firing so make the template is two ring sizes larger than the desired size of the ring. Cut out the template, bring the ends together and secure them with a piece of tape. Place the template on a ring mandrel for working on later.
Use a cosmetic sponge to apply slikbaby releasing agent to all of the tools, including your hands, that will be used to create the design.
Tip: Have a piece of cling wrap ready to use for handling the clay. This helps to keep the air off the clay and slow the drying process.
Position the blue acrylic slats (or bigger depending on the desired thickness of the ring) approximately the width of the acrylic roller.
Open the outer two packages then open the third inner package at the seam to guarantee that no clay will be wasted; metal clay is pure silver. Handle the clay as little as possible to prevent it from sticking to your hands. Place the clay onto the cling wrap then fold it to condition it slightly. Continue to fold the clay and form it into a snake-like strip.
- If the clay is too moist and sticks to the cling wrap, open the wrap for just a few seconds. Fold the clay in the wrap again and verify it's not sticking.
- If the clay begins to crack or feels stiff it is too dry. Use a fingertip to apply a very small amount of water to the clay then fold the clay in half. Continue to fold the clay to blend the water through the clay, adding a drop of water at a time if needed.
Remove the clay from the wrap then use the slats and roller to roll the clay to an even thickness and approximately the circumference of the desired ring size (approximately 2-1/2 to 4 inches).
If the clay sticks to the roller, it's still too moist. Remove the clay from the roller, compress it very tightly and wrap it in the cling wrap once more to let it dry just slightly. Continue to test the moisture by rolling it and letting it sit just a bit until the clay no longer sticks to the roller.
Once the clay rolls out without sticking, roll the clay out evenly then use a straight clay blade to trim the edges to the width of the mold.
Tip: Tightly wrap excess metal clay in the cling wrap then place it in a small zip-lock bag with a moistened paper towel. The clay should stay moist for a few days and up to one to two weeks.
Place the metal clay strip in the border mold then use a finger, or use a paintbrush, to spread it thin and even. Very gently lift and ease the strip from the mold. Use caution to avoid tearing the strip.
Gently place the strip over the Teflon template onto the ring mandrel. Use a blade to trim the strip to the desired size then trim the end to a 45-degree angle so the ends meet at a beveled angle. (Place excess clay back in the cling wrap.)
Tip: If the ring begins to dry on the mandrel, use a paintbrush to apply very small amounts of water.
Use a slip syringe to apply a very small amount of metal paste to the seam of the ring. Use a craft knife to bring the ends together over the paste. Apply a very small bit more paste then use the paintbrush to flatten the seam.
Tip: Use a paper towel to wick away excess water that may come out with the paste.
Allow the ring to dehydrate overnight, use a food dehydrator to dry or bake at 250-degrees for approximately 10 minutes.
Once the ring is dry, remove the Teflon with ring from the mandrel. Use a paintbrush to apply a very small amount of water to the inside of the seam then apply paste with the syringe.
If the ring breaks during removal from the mandrel, dampen the area then apply paste with the syringe. Very gently pull the break apart slightly to slip the paste inside the break.
Allow the ring to dehydrate once more.
Cut small strips of sandpaper.
Place the ring on a piece of sandpaper then rotate the ring to smooth the edges and make them level. Continue to sand the ring, gradually moving to higher grits. Use a file to gently smooth the inside of the ring then use the strips to continue to smooth.
Note:
- The ring is very delicate when in the greenware state. Approximately the strength of a potato chip.
- If the ring feels very smooth you may want to begin sanding with a higher grit sandpaper.
Tips:
- 600 or higher sandpaper will sharpen your scissors, 600 or lower will dull scissors.
- If you're nervous about breakage during this stage, smooth the ring after firing instead.
Optional Gemstone Bezel (This section can be done first if desired)
Conceal the seam or a flaw in the design with a gemstone bezel.
Remove the wrap from the excess metal clay then press the clay to approximately 1/4 inch thick. Use a damp paintbrush to smooth the surface of the clay. Gently press the faceted gem into the center of the clay, keeping the table (flat surface of the stone) level. Use a blade to trim around the faceted gem as desired.
Note: The clay forms a raised bezel that locks the stone in place.
Tip: Select a gemstone or lab-created stone that is small enough to torch fire (approximately 6mm round). Larger stones must be ramp fired in a kiln to prevent thermal shock of the stone, which can crack a fireable stone.
Dehydrate the gemstone bezel then attach it to the ring with a small amount of metal paste from the syringe and dehydrate once more.
Torch Firing
Remove flammable objects from the workspace, pull any loose clothing or hair back then place the ring on a firebrick on top of a heatproof work surface. Have a timer or stopwatch ready for use.
Working in a darkened room (not completely dark), pull down the safety lock on the butane torch then press in the ignition button and hold down the button on the side for a continuous flame.
Adjust the flame to the strongest setting then aim the blue tip of the flame at the ring. The ring will begin to smoke and then there will be fire. The fire is the binder burning away. Continue to fire the ring to create a pink to salmon glow then maintain the glow for approximately 3 - 4 minutes. Continuously hold the torch at an angle moving it in circles around the ring to sinter the ring.
Note: Failing to properly sinter (fuse the silver molecules) by not firing long enough or at the right heat will cause the ring to be weak or brittle.
Once firing is complete, press the back ignition button to turn off the flame then set it and the firing block aside, away from contact with anything.
If there is a stone in the ring it needs to cool on its own to prevent cracking, so transfer the ring to the tile on a metal tray and allow to cool for approximately 15 minutes.
If there is not a stone quench the ring in a glass or ceramic dish with water.
Note: The molecules in the ring are standing up so it looks white instead of silver.
Use a wire brush to brush the inside, outside and around the bezel of the ring, working away from fingers, to create a matte silver finish. Use an agate burnisher to flatten the silver molecules and polish the details, surface and edges or the ring, leaving a matte finish in the background or use the Jooltool™ or rock tumbler to polish the entire ring to a high shine.
Optional: Use liver of sulfur patina gel to patina or blacken the inside recessed areas.
Have a question regarding this tutorial? Email Customer Service.
Copyright Permissions
All works of authorship (articles, videos, tutorials and other creative works) are from the Fire Mountain Gems and Beads® Collection, and permission to copy is granted for non-commercial educational purposes only. All other reproduction requires written permission. For more information, please email copyrightpermission@firemtn.com.