Everything You Need to Know About Jeweler's Saws


Create uniquely shaped components for your jewelry creations by sawing metal sheet. Just follow these tips and tricks to use a jeweler's saw and get the design you want.
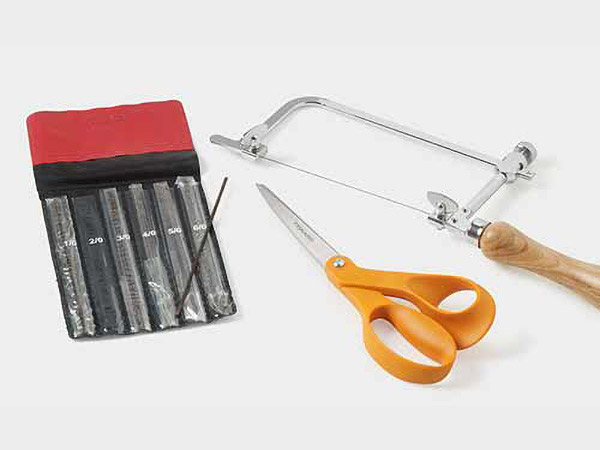
A Jeweler's Saw
Jewelry-making starts with the right tools and no jeweler's bench is complete without a jeweler's saw. As one of the most important and fundamental jewelry-making tools, jeweler's saws make the finest cuts in any material including soft metals, wood, fiberglass, Styrofoam and plastic.
Why jewelry saws? Jeweler's saws are required for cutting clean shapes out of metal without bending the metal, compared to metal shears and cutting pliers that can still bend the metal. Jeweler's saws are able to cut thicker metal and allow the designer to cut intricate shapes, smoother curves, holes or other shapes in a piece of metal sheet. Sawing a piece of metal saves precious metal for other uses or to melt down and remake into plate or wire, as opposed to filing or sanding the metal.
A jeweler's saw is an indispensable jewelry-making tool for cutting and piercing metal, making jumprings and bead/pearl reaming. Jeweler's saws allow for straight cuts, pierced cuts, tube cutting and jumpring/coil cutting for jewelry designs. Sink your teeth into sawing and learn all about jeweler's saws, how to select the right size blades for sawing success and view FREE how-to videos, tutorials and design ideas to expand your jewelry-making repertoire.
Getting to Know a Jeweler's Saw
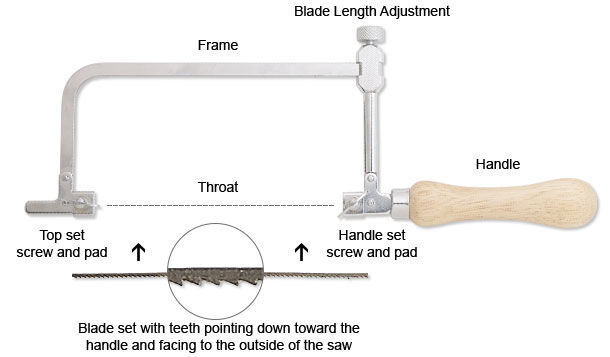
Jeweler's saw frames are designed for easy use and intricate cutting. Fire Mountain Gems and Beads offers a sturdy nickel-plated steel frame jeweler's saw with rubberwood handle. The saw frame features a thumb screw locking device for easily changing blades and adjusting tension.
A jeweler's saw frame has a top and bottom wing screw for securing blades and a blade length adjustment for ensuring the proper blade tension. The throat of the jeweler's saw is the depth of the saw from the blade to the back of the frame and the handle allows for easy use. A blade is added to the saw frame for intricate cutting. Blades are added with teeth facing down towards the handle and facing to the outside of the jeweler's saw.
Jeweler's Saw Blades
Choosing the Right Size Blades
The next step is selecting the right size blade for the thickness of the material you want to saw. If your jewelry saw blade is too big for the metal, it will catch and grab, and if the jewelry saw blade is too small, it will be ineffective and the saw blade will dull quickly.
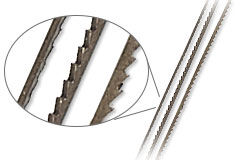
Saw blades don't really cut. They weaken and then chip small particles of metal away. If you look closely at the teeth of the blades, you'll see they alternate left and right in a predictable pattern called a set. This arrangement allows the chips of metal to fall away on both sides of the blade. The distance from the outer point of the right teeth and the outer point of the left teeth is the blade thickness.
Take the guesswork out of selecting jeweler's saw blades with Fire Mountain Gems and Beads' handy "Jeweler Saw Blade Sizes and Information" chart. This chart shows you the dimensions of the most common saw blade sizes along with the equivalent jeweler's drill sizes and recommended range of material thicknesses. Print this FREE resource and post in your work area for easy reference.
Jeweler's saw blades are sized on a scale. Considering size 0 (zero) to be the middle of the scale, larger jewelry saw blades are subsequently numbered: #1, #2, #3 etc. Therefore, the higher the jewelry saw blade number, the larger the blade. Smaller jewelry saw blades are numbered: 1/0, 2/0, 3/0. The higher the jewelry saw blade number the smaller the blade.
A good rule of thumb is three (3) teeth on the metal thickness. So, if the metal sheet is thicker, the blade will be coarser. Generally speaking, if you're cutting a lot of straight lines, bigger blades work well, and smaller sizes are better for curved cutouts. Thinner blades can be more precise, but may break easier.
Stringing the Jeweler's Saw
After selecting the right size jeweler's saw blade, it's time to string the jeweler's saw blade in the jeweler's saw frame. You'll know the tension is right when you gently pluck the blade for a sweet-sounding "ping."
The jeweler's saw blade teeth should be facing toward you and down, so lightly stroking up on the jeweler's saw blade will catch your finger and indicate tooth direction. The idea is that you want the jeweler's saw blade to cut by pulling, not pushing.
It's important to realize that jewelry saw blades will break. However, a good sawing technique, the right size blades and beeswax lubricant can all help to reduce breakage.
Fire Mountain Gems and Beads' offers a FREE how-to video on ''Inserting a Saw Blade into a Jeweler's Saw Frame''. Follow along as Tammy Honaman, Author, Jewelry-Making Expert and Educator shows how to string a jeweler's saw.
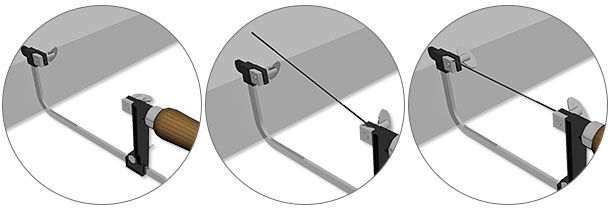
Select a jeweler's saw blade, untwist the wire around the bundle of saw blades and remove the blade, twisting the wire back around the remaining blades. Loosen the top and bottom wing screws of the jeweler's saw frame and prop the far end of the jewelry saw frame against the edge of a table or desk. Hold the handle and push the frame end against the table with a steady pressure, yet without bending the jeweler's saw frame.
The blades in the jeweler's saw frame are slightly stretched, similar to stringing an archery bow, so insert the blade end into the clamp nearest the handle first and tighten firmly. Be sure the teeth are facing out and down toward the handle.
Insert the far end of the blade into the frame, tighten slightly and release the pressure against the table or desk edge. Tighten the far end firmly. Pluck the blade--if you get a tinny or flat note, reposition the frame on the table, push on the handle and a little more firmly, release the wing screw on the far end, reposition the blade and tighten the wing screw. Repeat until the sound you hear is good note, a sweet-sounding "ping."
Sawing
View Fire Mountain Gems and Beads' FREE how-to video on ''Sawing Metal'', as Tammy Honaman shares the steps for successful sawing.
When using a jeweler's saw and saw blade, avoid pushing the blade against the metal being cut because it will catch and snag, possibly breaking the blade. Using a gentle up and down motion, let the teeth of the saw blade do the work of cutting the metal.
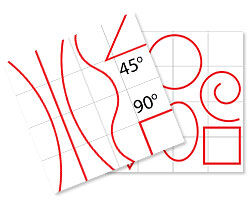
Use a marker to draw the pattern or shape you are cutting out onto the metal being cut. You can also adhere paper with rubber cement with your desired pattern to cut. Find a FREE practice template that includes straight lines, curved lines, spirals, circles and more.
If you are cutting out a hole of the center section of a piece of metal, drill a small hole in the metal area being sawn out, then thread the hole onto your saw blade before inserting the second end of the blade into the frame.
It's helpful to notch the metal a little bit to help get the blade engaged. Use a jeweler's file to file a small notch on the edge of the metal.
Place the metal onto the bench pin mounted in the bench pin system. Position the fingers of your non-dominant hand onto the metal, stabilizing it and holding the area to be cut first over the "V" notch in the bench pin. Run the saw blade across a block of beeswax to lubricate the blade. Hold the saw frame so the blade is vertical or slightly pitched forward at an angle to the metal being cut--the position is a personal preference. Place the blade in the filed notch and begin to move the blade up and then down, utilizing the full length of the blade.
Continue sawing all the way around the metal until the shape is cut free. If you're cutting out the center section of a piece of metal, remove one end of the blade from the jeweler's saw frame, then remove the blade. File then polish the metal edges so they are smooth.
Helpful Sawing Tips:
- Sawing motion should be fluid, up and down, not pushing forward--let the tool do the work!
- If you saw with too much force or try too hard, you'll probably break a blade. Always check the tension of your blade, as a loose blade is more likely to break.
- The cutting motion comes from the elbow, not the wrist. Hold the saw frame lightly, keeping your arm and body relaxed and saw using long, even strokes.
- If your pattern calls for curves, or when it's time to turn a corner, turn the metal being cut, not the saw
- If the blade gets caught in the metal, stop moving the saw then try to remove it from the metal
- If you are able to get it out, re-lubricate the blade while it's in place then try to move it
- If you are not able to get the blade out, try to start sawing again
- Once you are able to free the blade from this one spot, lubricate the blade again, to keep the friction at a minimum
- If you force the blade through a tough spot, you run the risk of breaking the blade. If this happens, remove the blade, reinsert a new one then start sawing again.
Jeweler's Saws Continued
Jeweler's saws are also used to make jumprings. Wind wire around a mandrel and use a jeweler's saw to cut apart. View this FREE how-to video: ''Making Jumprings with Jumpring Mandrels'' and watch as Sandra Lupo, jewelry designer and instructor, demonstrates this sawing technique. Find a helpful chart on ''Wire Lengths to Make 100 Jumprings'' to easily estimate the amount of wire needed.
Use a jeweler's saw as a pearl/bead reamer. View this FREE video tutorial: ''Using a Jeweler's Saw as a Pearl/Bead Reamer'' and see for yourself how clever this jewelry-making technique is for reaming beads.
Create metal strips, rods and tubing by using a tube cutter vise and jeweler's saw. Learn more about this in the FREE how-to video: ''Tube Cutting Jig''.
Sawing Safety and Comfort
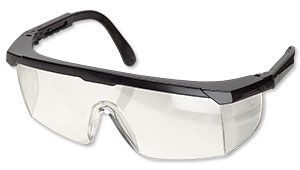
Always wear safety glass while sawing because blades can break and you'll notice yourself getting closer and closer to your project as you work. It's always a good idea to take frequent breaks, ensure proper lighting and set up your sawing station at a height that is comfortable for you.
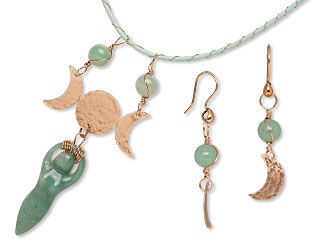
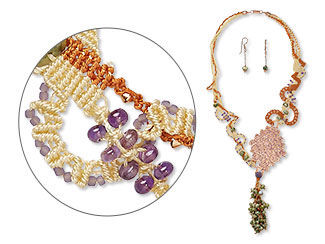
View a collection of jewelry design ideas including basic, intricate and pierced metal sawn shapes from Fire Mountain Gems and Beads' Gallery of Designs for jewelry sawing inspiration.
Happy sawing!
Shop for Your Materials Here:
Have a question regarding this project? Email Customer Service.
Copyright Permissions
All works of authorship (articles, videos, tutorials and other creative works) are from the Fire Mountain Gems and Beads® Collection, and permission to copy is granted for non-commercial educational purposes only. All other reproduction requires written permission. For more information, please email copyrightpermission@firemtn.com.