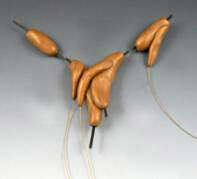
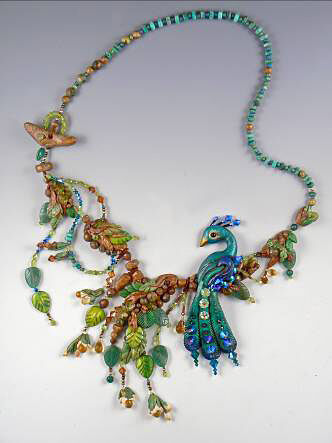
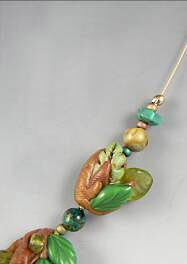
Single-Strand Necklace with Polymer Clay Focal and Beads and Gemstone Beads


Design Idea 940J
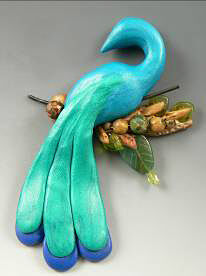
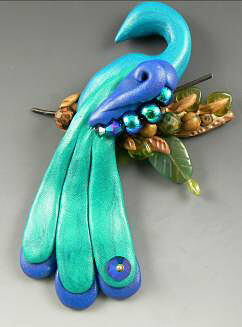
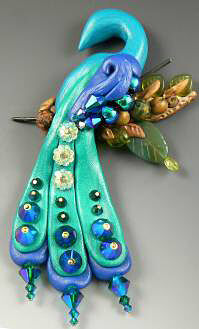
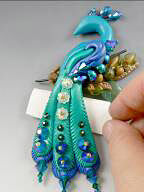
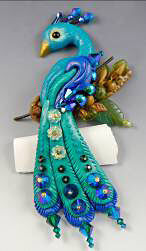
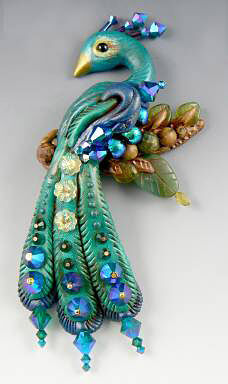
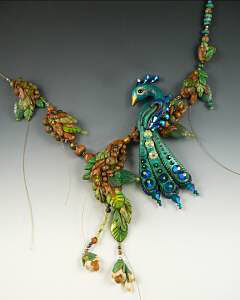
Peacock Pizzazz
-- Designer --
Christi Friesen
To learn more about Christi Friesen, read her jewelry artist success story here.
: : : Materials : : :
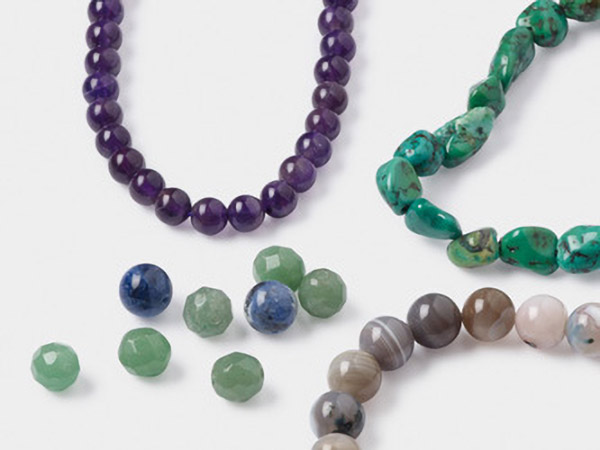
Please take the creative opportunity to select the products of your choice for this design, offered here at Fire Mountain Gems and Beads.
Instructions
Peacock Pizzazz
Christi Friesen has graciously provided step-by-step instructions for her Fire Mountain Gems and Beads' catalog cover piece, Peacock Pizzazz. This piece began, like most of her complex necklaces, with sketches to bring to life a ''half-formed idea.'' Although Christi had experimented with peacock designs in the past, the idea for this necklace was to create a masterpiece full of dramatic color and design.
Here's your opportunity to follow along with Christi Friesen as she guides us through the creation of Peacock Pizzazz.
Get ready to make a real show-off of a necklace!
©Christi Friesen 2009, www.christifriesen.com
Distributed by Fire Mountain Gems and Beads with permission from the author. This project is for personal use only: do not pass on this instruction sheet or any replica or copy thereof to any other person or people or use it, sell it or its proceeds for profit or for any other purpose without written permission from the artist or Fire Mountain Gems and Beads, or otherwise violate the laws of copyright.
Don't be fooled! This looks like a complicated project, but in this class, every step of the process will be broken down with lots of pictures and Christi's fun instructions--you'll be able to proudly show off this pizzazz necklace of your own in no time! Whether you are new to polymer clay or an ol' pro, you'll find plenty of tips and techniques to enjoy for this project, and to enhance your further creativity.
By now you've gathered the clays, tools and beads listed in the 'Materials List' file and you're ready to create!
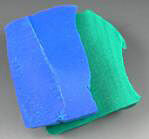
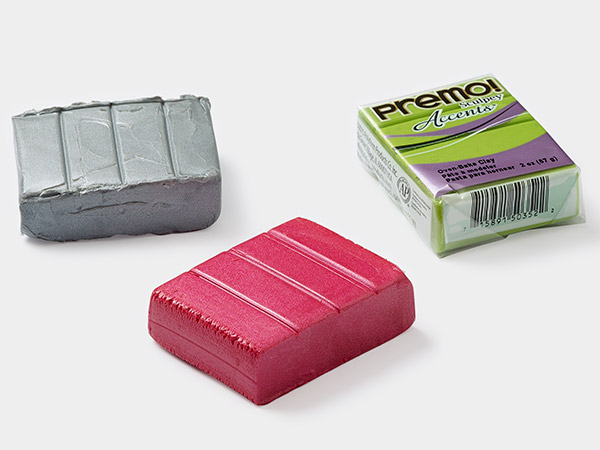
Conditioning Clay and Mixing Colors
Conditioning is always the first step to any polymer clay project. Its purpose is to make the clay soft and pliable and easy to work with. All you have to do is cut or break off a piece of clay from the package and roll it, fold it, and twist it until it's flexible. If you have a Poly-Roller™ Machine, of course that makes it much easier - just roll it out, flatten it with your fingers and feed it through the widest setting of the machine. Fold it and run it through several times until it's flexible. Easy, huh? You can condition all your colors first and then blend the special colors we'll need, or you can mix the clays together and condition and blend at the same time (that's easier and quicker, so guess which one I do?)
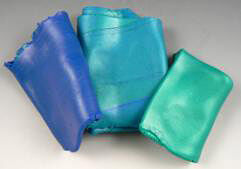
You can mix the colors as you need them, but it's easier to blend them all now. You'll need a brownish color for the branches, a greenish color for the leaves and some peacocky colors.
Let's start with the browns. You have all kinds of options here - I like to mix up a brown instead of just using a brown from the package because I like to have some streaks and stripes to make the branches more interesting. I used brown, beige flesh, green, white, and gold clay I had lying around.
This is going to be a ''lookit blend'' - just a name I made up to describe the way to mix the clay in order to create some interesting patterning. You have to ''lookit'' the clay on both sides each time you run it through the Poly-Roller™ Machine (or if you're hand-blending, each time you re-roll). Then at a certain point you'll go ''hey! lookit that cool color blend!'' (Your actual phrasing may vary slightly.)
Ok, so start with your wad of clay and mash the colors together so they are flattish and can go through the Poly-Roller™ Machine without stressing out the rollers. The first gothrough just flattens the colors. Take that first sheet and rip and stack it up to mix up the colors more quickly and interestingly. Run it through the pasta machine again. Each time you run it through, look it over and fold it up in such a way that the neatest pattern is right in the front where you can see it (don't forget to lookit/look at both sides and pick the best possible color patterns each time). Stop before the clays get over blended, and hey! lookit! what a nice brown twiggy color!
The next color to mix is the green for the leaves--there are so many choices here. I used green, some gold, beige flesh, a smidgen of brown and even some white (just a little - white can overwhelm the blend really easily if there is too much of it!).
You can also add some yellow, a touch of white or even a pinch of blue.
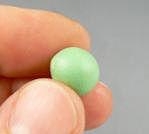
Now, how about a color for the dangling flowers?
I used mostly white, but warmed up the color mix with beige flesh, and added a touch of magenta to blush it up a bit.
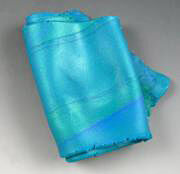
Finally, the peacock color and a few accent colors to go with it. Blue, pearl, and green blended together with almost no ''lookit'' streaks left works well. I just conditioned a bit of green- pearl and a bit of turquoise blue for the accent colors. If you prefer, your peacock could have violet accents or a brighter green (add a little yellow to the green and pearl.)
Ok, that's all the colors you'll need - let's start sculpting! (Oh, by the way, I find it helpful to wrap the blends I'm not using in a piece of plastic wrap, or stick them in a plastic baggie when I'm not using them to keep them dust free and happy.)
Making the Branches
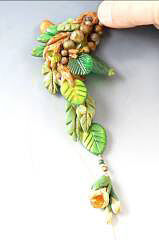
This necklace is intended to look like a cluster of flowering branches that a peacock just happened to decide to roost in. Since making a big Y-shaped branch, stringing it up, and wearing it would probably be a bit unwieldy, we'll make the branches in sections that can be strung together and have some wiggle room between them - much more comfortable.
Start with some brown blend clay. Roll the clay into a little ball to smooth out any creases or folds, and then form that ball into a little log. This first piece is going to be one of two branches that will form the ''Y'' in the center of the necklace. In order for us to string all these pieces up later, we'll need to leave a hole through the clay to hold open a channel for the cable. I think the easiest way is to insert a wire that will stay in the clay throughout the sculpting process, then when it's removed, voila! A stringing channel is left behind.
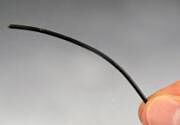
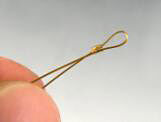
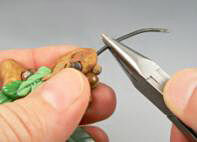
So snip off a piece of thick wire - this is about a 16 gauge - and bend it slightly into a nice little smiley arch.
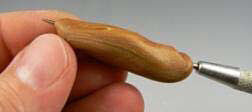
Use a beading awl tool to make a guide hole through the center of the brown clay branch. Slide in the wire. The wire's curve will bend the clay branch to match.
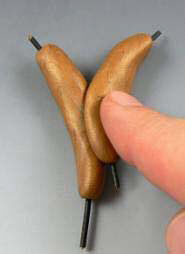
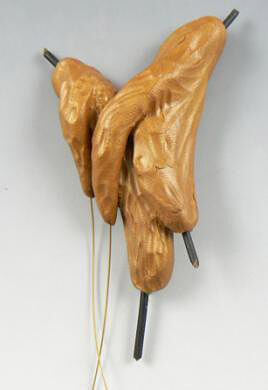
Make a second branch with another wire in it just like this one. Press them firmly together to form the center ''Y'' just like this:
Adding Dangle Wire to the Side Branches
All the rest of the little branches for this necklace will be made this same way, some longer, some shorter - all with a bit of that thick wire in the middle. Start with a shorter branch on each side made the same way as the first two.
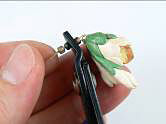
Now to get a bit fancy. When these pieces are done and baked and we string them, I have a feeling that you'll like the look of some dangling flowers and leaves coming directly off these branches. There are a few ways we could accomplish this, but one of the most interesting ways is to embed the stringing wire directly into the clay and bake it in place. Then we can string directly from that wire later. It looks very natural that way. So let's prepare the wire. I use flexible beading wire for this (the same stuff we'll use to string with later). There are several brands available, all of them are acceptable. I use Accu-Flex® professional quality beading wire - this is a 19 strand wire in a very thin .024 width - the thinner wire will dangle better, not as stiff as a thicker wire.
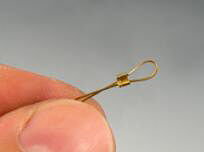
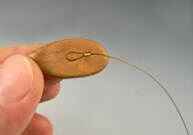
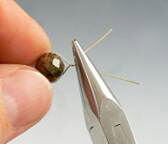
In order for the wire to stay in the clay and not be pulled out, I've found that adding a crimp to the top of the wire is the easiest solution (if you just stick the slippery lil' wire in the clay, it'll pull right out - not good).
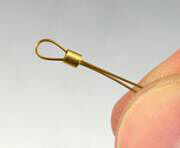
Since you'll need to know how to use a crimp when we get to the stringing part of the project, we might as well get good at that right now, huh? A crimp is a clever little thing--a metal tube (sometimes its round like a bead) that slips onto the wires and is smashed in a certain way with crimping pliers so that it grabs the wire tightly. In stringing, this provides support throughout the stringing and ends the necklace strands cleanly and securely. We'll use it here to make a loop that the clay can harden around to keep the wire in place.
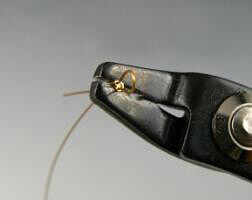
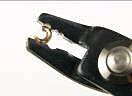
Slip the crimp tube onto the wire, and then bend the wire back through the loop. Now hold the tube in the back groove of the crimping pliers. (It's always best to use crimping pliers to set your crimps. A regular plier will just smash the tube, but will be unable to do the folding part, which is what gives the crimp its stability.)
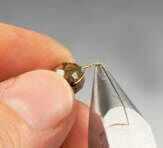
When you press the crimp in this back groove--that's the folding part. The tube will have a fold or ''crimp'' in it now.
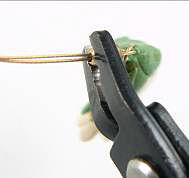
Now use the front groove of the pliers to grab the tube and press down to fold the flattened tube in half. It works best if you can get the tube positioned in that front groove so that it's standing up, allowing the plier jaws to press the top and bottom of the tube together so it folds right in half.
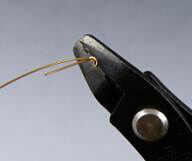
Perfecto! With wire cutters, snip off most of the excess wire from the shorter side.
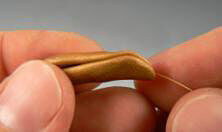
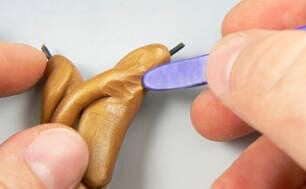
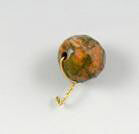
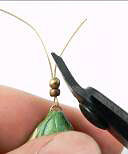
Now grab some of the brown clay mix and flatten out a little log. Press the crimped loop into the clay.
Fold the clay around the crimped wire and roll the clay into a smooth branch shape (if the branch comes to a bit of a point as it gets to the wire, that looks best).
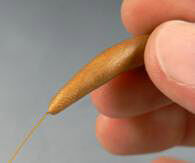
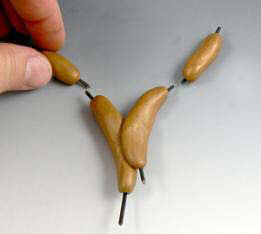
Make several of these dangly branches and add them to the ''Y'' branch cluster. Continue to make some small branch bits, extending the shape of the necklace. Add dangle branches to these as you go.
Notice that I went up the left side, but stopped after one branch on the right--the peacock will be sitting over there, so there will be some specifics later with that side. So for now, one branch is enough.
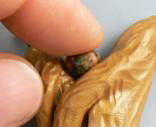
Texturing the Branches
Ok, once you have the design elements of the branches in place, we have to make them look a bit more like branches not just clumps of weird noodly things.
Use a clay carving tool and smooth the clay, starting where the smaller branches were attached to the main branches. The object is to use short, gentle strokes to pull the clays together. Leaving the tool lines is good--it looks like bark!
Blend all the branches to each other, and then keep going with the tool to make the bark texture all over the front of each of the branch clusters.
Adding Beads to Embellish the Branches
Oooh, here's the fun part! To these branches, we will be adding all kinds of beads and leaves so that they really come to life! Let's start with beads.
Beads are just meant to go with polymer clay. They enrich the sculpture (and give us a perfectly justifiable reason to go buy more beads!). Of course, we can't just stick 'em into the clay and hope they'll stay put. A glassy bit pressed into a plasticy bit is just not going to connect, so we'll use several methods of attaching wire ''tails'' to the beads to give the clay something to harden around in the oven.
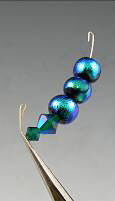
Let's start by attaching a wire tail to a single bead. Snip off a 2-inch piece of 28 gauge Zebra Wire™. Slide the bead onto the wire and center it in the middle. Pull the two ends of the wire together so that the bead is now resting at the bottom of the ''U'' of wire. Press the wire together and grip it with your pliers about half an inch or so away from the bead.
Hold the wire firmly with the pliers and twirl the bead with your fingers to make the wire twist firmly up to the bead. Snip off the excess tail to leave about a quarter of an inch or less of wire attached to the bead.
Use your pliers to bend the tip of the wire back on itself, making a little hook at the end (which will really make sure the bead stays securely in the clay). Wire up several beads in this way. Use any bead that you think will go well in the branches--I used a jasper with browns, greens and touches of reddish-brown in the blend.
Wire up a handful of single beads using this method.
Another way to add beads is to wire them up in a lineup. This always accentuates any long lines in your composition, so it's great to have some of these lineups to echo the lines of the branches.
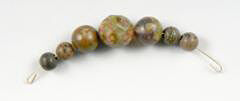
Snip off a longer bit of Zebra Wire™ 28 gauge wire--about 3-inches or more. Use pliers to bend a little hook in one end. String on several beads--I like to start with small beads, gradually make them bigger, then back down to small beads again. It's a flow thing. Once you have an inch or so of beads in the lineup, snip off the excess wire and bend a hook in that end too, leaving about a quarter of an inch of wire sticking out from both sides of the bead line. Make several of these lineups too.
Now it's time to add the wired beads to the branches! Yay! For the single beads, just press them in wire-side first (duh). Press them in deeply enough to hide the wire if possible. (If the bead is too big for the wire to be completely hidden, you can always press a bit of clay up next to the bead to hide the wire.)
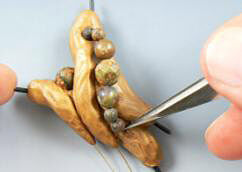
Use needle-nose tweezers to position the lineup beads. You can press the wires deep into the clay with the tweezers and then touch up any messy bits with a tool.
Looking good!
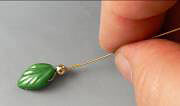
Making Clay Leaves
What would the branches be without leaves? Bare, that's what. So let's make some clay leaves to add to the composition.
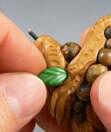
Get your green clay blend and roll out a little ball of clay--about the size of a chickpea (or do you call them garbanzo beans? I never can remember...).
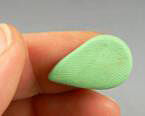
Roll that into a teardrop shape and flatten it in your fingers (don't worry, fingerprints on the clay are a good thing--adds that personal touch! And luckily adds to the organic feel of the piece as well, since overlapping fingerprints add a nice texture to the clay).
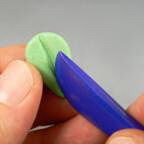
Now use a clay carving tool to impress a crease down the center of the clay (this is one of my favorite tools--the ''Gotta Have It'' tool--check my website if you're interested in more info: www.christifriesen.com).

Use the same clay carving tool (or any one you have with a blade-like edge--not too thin!) to create the impression of veins on this leaf. Press the tool into the edge of the leaf and roll it down into the clay to impress a line.
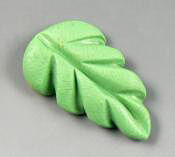
Continue up the edge of one side, and then do the other side. The lines should angle up towards the rounded end of the teardrop shape on both sides.
You'll use this leaf shape to add to your branches as you think looks best. We'll also be adding glass leaves too, but these clay ones really set the tone. So make more now if you want, or make them as you need them. To add them to the branches, simply press them firmly in place.

I chose to add this first leaf to the underside of the end of the ''Y'' branches. Press firmly and make sure you don't get in the way of the wire--keep that channel free to string through later! I added a bit more brown clay in the back to help secure the leaf and give it stability.

Add the clay leaves wherever you like, then it's time to add one more component--leaf beads!
Adding Leaf Beads and other Accents
This will bring the whole thing together--after you have the branch shapes all textured, with the dangling wires for later fun, and you've added some brownish beads, then green clay leaves, this final embellishing with leaf beads and a few more green beads will turn the branches from ''ho hum'' to ''oh wow!''
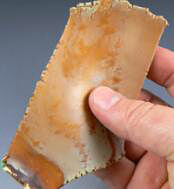
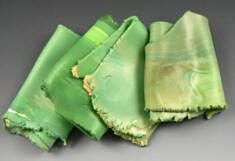
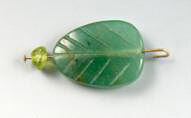
There are all kinds of leaf beads available--glass, carved stone, ceramic, metal, shell ... go nuts!
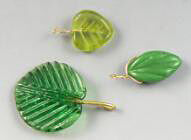
Some beads will have the holes at the end, so they can be wired up like a single bead. Some have wires already embedded into the glass--those are good to go as is.
Some leaf beads have the hole through the middle--these are fun! We'll use a different method of wiring them--headpins! Use a headpin that's thin enough to slip through the bead, and long enough for there to be wire hanging out the end. Before you slip it on, add another bead or two first if you want, just for funsies. Then trim off any excess pin and bend the tip into a hook (you know why) so that there is only about a quarter of an inch or less of wire showing at the base of the bead.
Wire up a whole bunch of different leaf beads and press them into the clay--hide the wires by pushing the beads in deeply (this helps them be less wiggly also).
Ok, get creative--make that branch come alive! Move up the line to the next one and do the same.
Notice how I've got little brown clay branches on top of some of the leaf beads--that's a great trick for making the added leaves feel like a part of the sculpture, not just something the bead fairy sprinkled on as an afterthought. As long as the clay is firmly pressed into other clay somewhere, it can lie on top of the beads and still be secure.
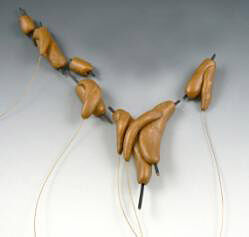
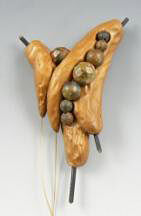
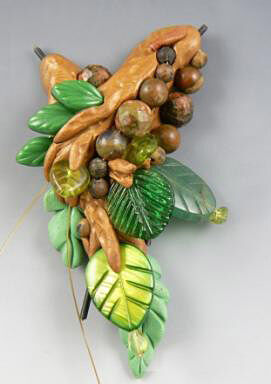
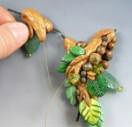
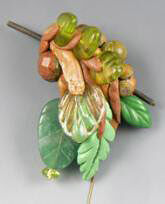
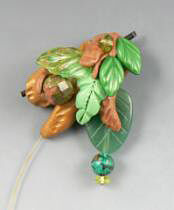
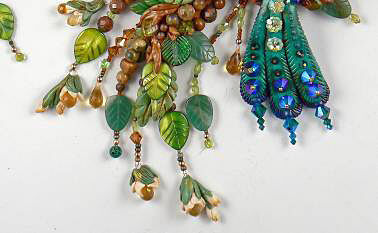
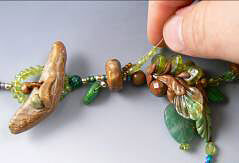
Here's the whole layout of the embellished branches, then some close-ups of each to give you some ideas on how to embellish yours.
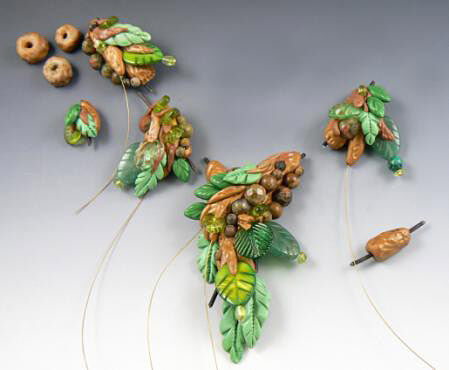
Once all the branches are to your liking, you can pull out the thick wire (the one creating the stringing channel) if you want. You can leave it in until after its done baking of course, but if it slips out easily, might as well get it out of the way to check that all the branches line up properly.

Use pliers to pull it out--twist first, then slowly pull and that should do it. We DON'T want any mushing, so if it's at all difficult, leave it in. It'll come out at the end.
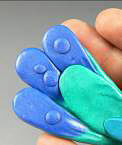
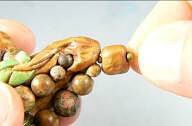
Oh, one more thing before we move on to flowers--you'll probably want to make some brown branchy-looking beads just to have when you get to the stringing part--they're always useful!
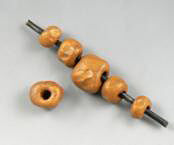
Simply roll out some brown clay into a ball, flatten it a bit in your hands into a cylinder-ish shape and stick a hole in the middle. Irregular is good--they're branch beads after all! Add texture marks with a clay carving tool to the edges, too, if you like.
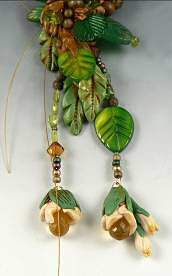
Making the Dangle Flowers and Toggle Bar
We'll make these dangling flower clusters with loops at the top to add to the stringing, when we get to that part. The dangles add a lot of movement to the piece of course, and they add nice color to complement the intense colors in the peacock.
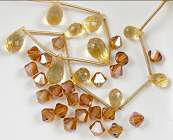
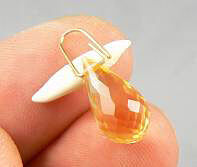
You can use any color beads, but I chose these golden, coppery colors because they would indeed enhance and not compete with the peacock (blue and orange being complementary colors of course). Pick a nice briolette bead if you can (these are yummy carnelian, you could use glass, crystal or cubic zirconia instead). I also used some crystal bicone beads.
Creating the Wire Loop
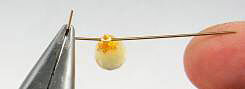
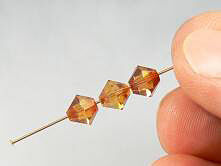
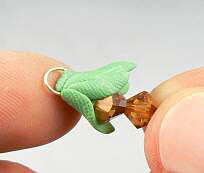
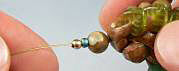
Let's start with the teardrop briolettes. It will be a lot more stable if these flowers can be strung through wire, so let's add some. Briolette-cut beads almost always have the hole at the top of the pointy end, which works just perfectly for our purposes.
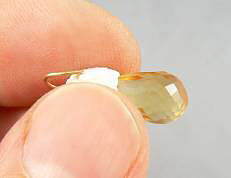
Snip a 2 to 3-inch piece of Zebra Wire™ wire (longer is better until you get the hang of it). Use the thickest wire that you can use that will still go through the hole in your bead (I used a 22 or 24 gauge, I believe).
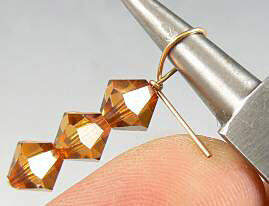
Use pliers to bend one end of the wire in a 90º angle (nice bend, you know). Thread the bead on.
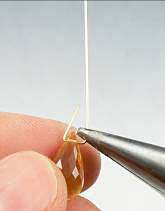
Slide the bead over to press against the wire. Now use the pliers to bend the other side straight up in another 90º angle bend. Be very careful not to put any pressure on the bead or it will crack--use the tip of your pliers (and obviously the smaller and narrower the nose of the pliers, the better!).
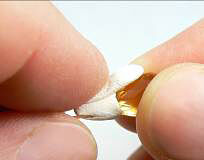
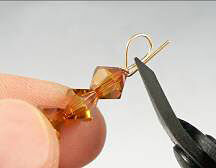
If you have a pair of round-nose pliers for this next step, it's easier. (If you don't, bend over a round-handled tool.) Take the round-nose pliers and grip the longer wire just above the tip of the bead (or place the tool handle in that spot).
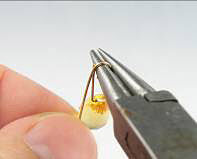
Now curve the wire around to make a nice, smooth bend. This will bring the wire even with and parallel to the wire on the other side.
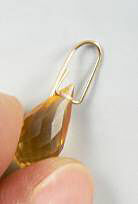
Trim off the excess wire so that it doesn't stick down too far--just to the bead is far enough.
Covering the Wire with Clay
Guess what the next step is? Yes! We're going to cover the wire with clay--how did you know?
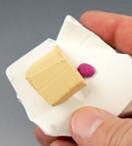
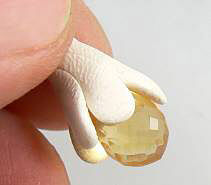
When we mixed the clay for the flowers, I suggested a color that was mostly white--this will be a good contrast for the golden bead--really let the bead stand out more than the clay, which I think works well for these dangles.
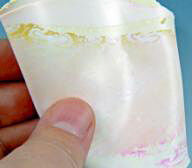
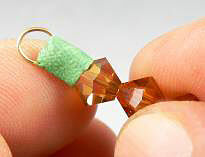
So now take a little bit of that mix, roll a little log and flatten it in your fingers. Wrap that clay around the wire at the top of the bead, in fact, overlap the clay onto the bead a bit, too. Roll the clay between your fingers to join the clay into a solid band.
Don't worry if it's a bit messy--this is just a base that will be covered with petals and leafy bits.
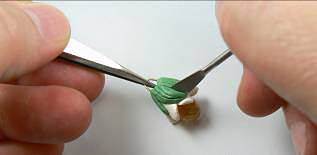
Petals and Leafy Bits
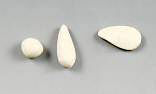
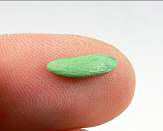
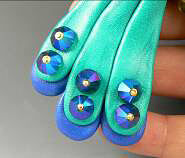
To make the petals, first roll out some tiny balls of clay--about 5 or 7 or 28 of them. Form them into teardrops, then smush the teardrops very flat with your fingers--about as thin as a dime, or maybe even a little thinner.
Press those flat bits onto the clay band, hanging down into the bead a little--all around the bead.
You can overlap them a bit, or just press them side by side. Don't cover up too much of the bead!
Don't worry if the clay is getting all over the wire at this point, we'll deal with that later--just pinch or cut off any excess, but don't do any clean up just yet.
Next let's add the little leafy bits, shall we? Yes. Yes, let's shall. Roll out smaller balls of the green clay mix, make little rice-shaped bits out of them (pointy at both ends and thicker in the middle). Smush these flat too--even flatter than the petals if you can.
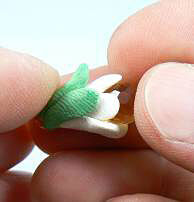
Add them all around the top of the bead, not quite as many, or as close together as the petals, though. Press firmly enough for the clays to adhere nicely to each other--we don't want any petals falling off later, do we?
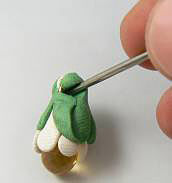
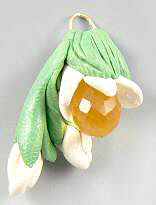
And now it's time to clean up the clay that's probably covering up the wire loop. Just use a beading awl tool to scoop out the clay from inside the wire, then press and push it all around to make it look nice and finished--it may take a few flowers before it comes easily.

The hard part is not to squish the sculpture while you're cleaning it up! You can gently cradle it in your fingers if you keep a light touch with the tool--that usually works. Just look it all over once you're done and fix any areas that may need it. (Sometimes a new leafy bit over the top of a squished one is all it takes).
The only thing that's left is to impress a few lines into the leafy bits to make them a bit more real.
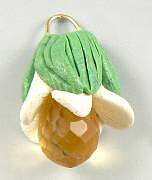
Use the tip of a beading awl tool, or a blade-ended clay carving tool and press lines in lengthwise along the leaves. (I find it helpful to hold the dangle flower steady by the wire with pliers or tweezers while impressing the lines into the clay--less squishing!)
This Buds for You
Variety is the spice of life, and I presume that goes for jewelry sculpting too--so let's not just have only one option for the dangle flowers. Let's make some little buds to cluster around one of the dangle flowers!
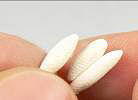
Roll out three rice-shaped bits of the flower blend clay.
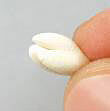
Press them together in a little bundle and press one side together. Give the un-pressed side a gentle little twist if you want to make the petals swirl.
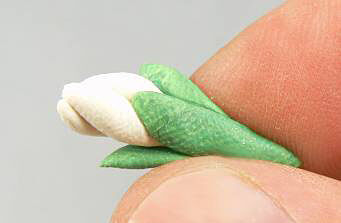
Next make a few of those flat leafy bits. Attach them all around the pressed end. Tah dah! A little bud!
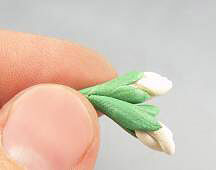
Make another bud and press them together.
Add the buds to a dangle flower. (I may not have said so yet, but you should go ahead and make several dangle flowers--you'll need them! And if you make too many--you can just slip them on some earring wires and you'll have a whole art jewelry ensemble!--necklace + earrings = spiffy!)
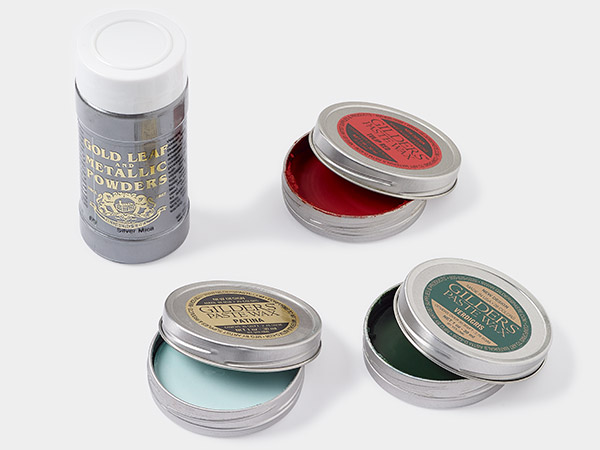
Adding Mica Powder
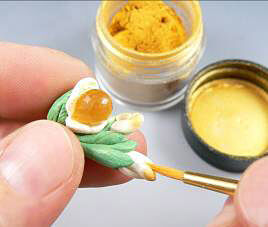
You don't have to add powder, but it can be a nice final touch that really adds that extra ''pop.'' There are several brands of mica power and they are all fine (I use PearlEx). Use a soft-haired brush, dip it in the powder and tap off the excess into the lid. It's really easy to go overboard with the powders--a light ''kiss'' of color is what we want--not a big ol' clump! I used the golden color and added just a bit on the tips of the little buds and some on the inside of the petals of the dangle flower. Just brush it right onto the clay--it'll stick and baking will adhere it to the clay quite well.
Make a nice batch of dangle flowers--singles and groupings with buds.
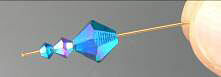
Now let's create one more simple dangle--you know, for variety!
Take a long headpin--2 or 3-inches--and thread on several beads. (I used crystal bicones, but you can use anything you like--just keep it in the same color family, or something that goes well with the dangle flowers you've already made.)

Use round-nose pliers (or the same ''bend over tool'' trick as before) and curve the headpin in a tight arch just a little above the top of the stack of beads.
Wrap the long end of the pin around the part of the pin right above the beads. Wrap it at least one full wrap around.
Snip off the excess with your wire cutters.
Wrap a little band of green clay around the top, just like we did with the white clay around the top of the dangle flowers. Roll out and smush a few leafy bits and add them all around the band--you know how.
That's all there is to it!
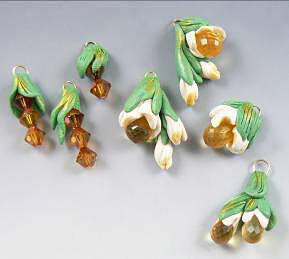
Make an assortment of this style dangle also--you can vary how many beads you add to the line up--you know, for variety!
Add some powder to the leaves of all your dangle flowers, just for funsies!
There's only one thing left to make before we leap right into making the peacock--a toggle bar.
Making a Toggle Bar
The toggle is a nice way to clasp an art jewelry necklace closed because it can become a part of the sculpture, not just some bit of hardware added for purely utilitarian reasons. This toggle will look like a part of all the branches, blending right in to the design.
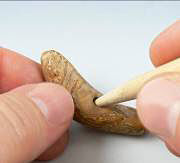
The toggle just needs to be a bar-shaped piece with a hole in the middle. It will be strung on one side of the necklace, and a loop of beads will come from the other side to loop around it, making the closure.
Roll out a bit of the branch-color clay mix and shape it into a bit of boomerang shape.
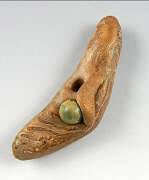
Use a beading awl to press a large-ish hole in the center. Add any details you want--a little twig, a bead. Don't let any of the details stick out--keep them all down on the clay (you don't want anything getting in the way of the loop later). If you add beads, keep them the same kind as we used in the other branch sections.
Ok, now on to the peacock!
If you want, you can bake all these pieces now. Or you can give them a quick partial bake to make sure nothing happens to them while you're creating the rest of the necklace. I like the partial bake idea--it makes sure the pieces don't get accidentally smooshed, or dusty, or leached if they are left on paper.
Full baking is in a preheated 275ºF oven for 45 minutes; partial baking is the same temperature for half that time. Just remember that the partial baked pieces may seem done--but they are fragile, so don't be poking at them and bending stuff. And when it's time to bake everything at the end, they go back in and bake for the full 45 minutes--it won't hurt them a bit!
I always bake on a fresh piece of heavy cardstock paper on top of a tile or pan. Always use an oven thermometer to monitor what's happening inside the oven (you can't trust the dial to be accurate in most ovens!).
Ok, ready to make a peacock? Me too!
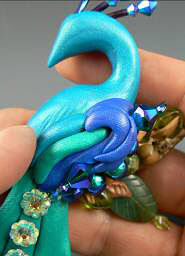
Sculpting the Peacock
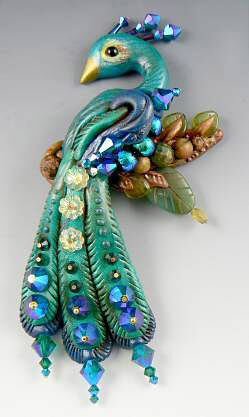
We will be making the peacock's head, neck and body all in one go--so that it's smooth and flowing. The tail feathers are added, and then all the sparkly accents.
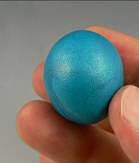
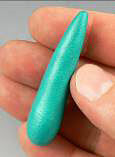
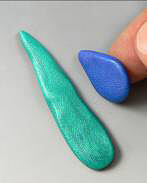
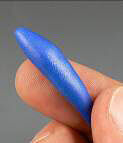
Start by taking your teal blend of clay and rolling out a smooth ball, about as big as a hard-boiled egg yolk.
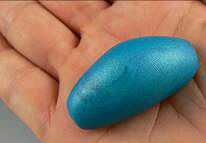
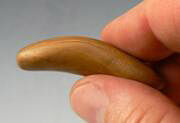
Now roll that ball into a log that's a bit tapered on each side--like a big grain of rice. Kinda.
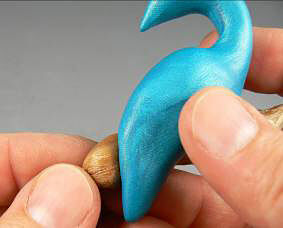
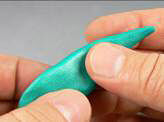
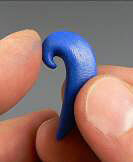
Let's elongate the clay by pressing, pinching and gentle pulling and create the neck and head.
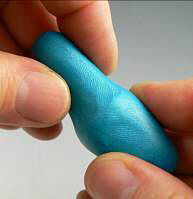
Just grab the clay from either end, not quite all the way to the middle, then press and pull, moving all around so that the resulting neck of clay is smooth and even. Keep the top a bit thicker and blobby--it's going to be the head, remember, so we don't want some little pin-headed thing.
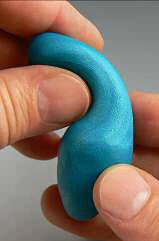
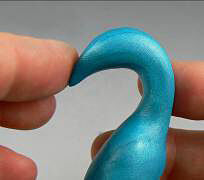
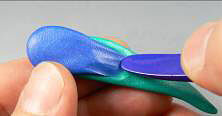
Once the neck is elongated and narrower (it should be about half as thick as its original body width), curve it around your thumb (or knuckle if you have long nails).
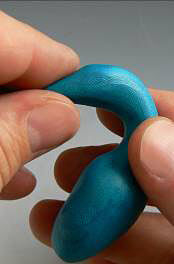
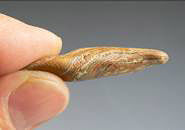
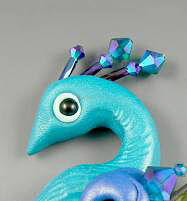
Let's just keep going with the pinching and shaping and make the head and beak shape next. Since this bird is looking over his shoulder, the beak will be pointing pretty much straight back, almost parallel with his body. This means that we'll need to pinch and press a point into that blobby bit at the top of the curve. Taper it all around, almost as if you were sharpening a pencil.
Let's get that butt into shape next! It should come to a point also. If you have too much body, pinch some off then slim the body to end in a soft point.
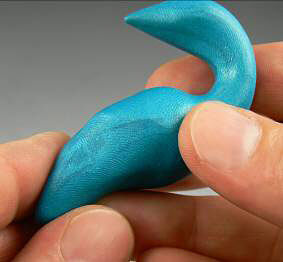
Hmmm, that neck and head looks a little thick still, don't you think--and a little short, so let's slim it down a little so that it can really arch over its shoulder!
Just squeeze and press it longer. If you find you have more beak than you need, pinch some off and then smooth what's left into a nice curved beak.
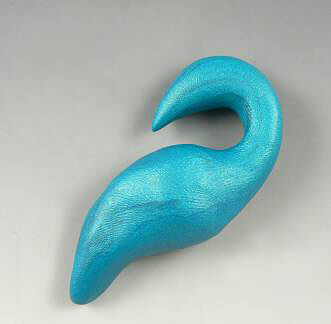
Take your time with this part--if the bird's body looks right, everything will look good. If the body is not right, then it doesn't matter how many crystals or beads you put on, it will still look wrong. So squeeze, press, shape, smooth! Use your fingers, not tools--they will keep it smooth and free from tool marks (of course long fingernails will be a challenge, but do what you can!). Here's what shape and proportions you are trying to achieve:
Don't be afraid to make the clay do what you want it to--squeeze, pinch, bend!
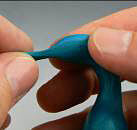
Making a Branch for the Peacock to Sit On
In order to continue the flow of the necklace--a curving bend of branches--we'll need to have a branch for the peacock to sit on.
Use the branch clay mix and roll out a branchy bit--about an inch and a half or so long should do it.
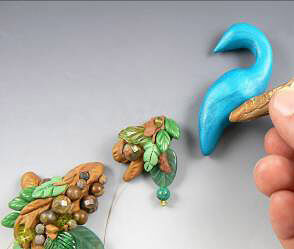
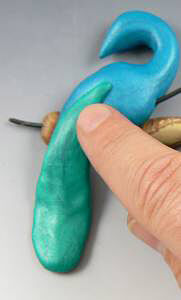
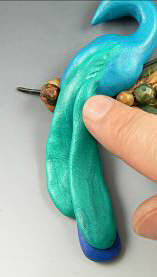
We'll press this up under his bottom, but to line it up properly, first position the bird so that the branch looks and flows naturally.
Add a little nubbin of a branch on the other side to make it look like the branch is long, and the peacock is draped over it.
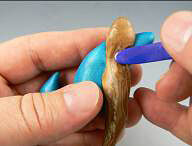
Press it in tightly and firmly, and then flip the sculpture over and smooth the backside for stability and a nice, finished look.

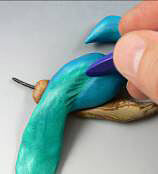
Use a beading awl tool to pierce a guide hole for the stringing channel, and then slip in a long piece of that thick wire, just like we did for all the other branches, way back in the beginning.
You'll notice that I am making the hole go through the bottom of the branch, but come out in the chest--the hang would be wrong if we just made it go through the branch only. Place it in the line-up to get the angle correct before you start stabbing.
Adding a Base for the Tail Feathers
Now that the bird has the right shape, and is sitting properly in his branch, you can add the tail feathers to get the proper balance. Of course the tail is stylized, not real--we're making the ''idea'' of a peacock, not a ''real'' peacock (stylized is more fun!). The first feather to add won't really be a feather--it's a base for the other feathers to rest on--it will add stability and give the additional feathers a nicer looking drape.
For the tail feathers, use one of the contrast colors, not the main body color--either the green or the blue (I used the green). Roll out a long, narrow teardrop shape. Flatten it in your fingers, and press it into place, right over the bottom of the peacock, up into the body a little.
Now blend this base feather clay into the body with a tool and soften any tool marks with your fingers.
Embellishing the Branch
Go ahead, embellish it! You know how! Make it look like the other branches with the same beads and clay additions.
Back to the Tail Feathers
Now we'll add three long tail feathers over the top of the tail base. Why three? Three is good--if you want you can do more of course, but keep it an odd number--odd numbers are balanced (one in the middle and the same number on either side... obviously!)
Roll out a thinner teardrop, but just as long. Flatten it out with your fingers. I think it will add a nice touch to have the hint of another feather peaking out below, in a contrasting color of course. So, roll out a short, fat teardrop in a different color (how about blue?) Flatten that teardrop out too!
Blend the blue clay onto the green clay with a clay carving tool (this will be the back of the feather).
Press the two-toned feather into place on top of the base clay. Blend the top of the clay into the body with the clay carving tool, just like you did for the tail base piece.
Do the same for two more two-toned feathers and press them into place beside each other, blend all the tops into the body.
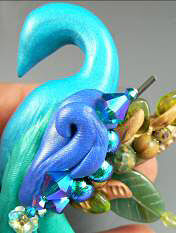
Winging It
Make sure the tops of the feathers are all blended into the body, and pressed down as well so there's no big lump of clay in the way for the next part--adding the wing. This part is stylized too to make it more a decorative appendage than an anatomically correct one. Roll out a teardrop shape and then flatten it on the backside, leaving the front side rounded. (Just hold the teardrop on your fingertip and press it down around the edges--the backside will be flattened and the front will stay domed.)
Press it into the shoulder area.
Ready for some wing bling? (Oooh, say that 10 times fast!)
Wing Bling!
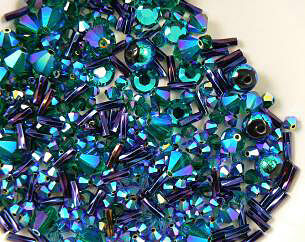
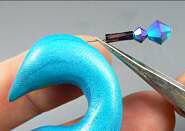
Bead time. Got your batch of peacock-colored shiny beads?
These can be crystal bicones, crystal round faceted beads, round dichroic beads, flatback crystals--anything shiny and peacocky!
Ok, now let's add them to the peacock.
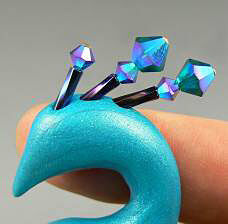
To accentuate the line of the wing, how about a lineup of round dichroic beads? (Of course you can substitute any bead you like if you can't find the dichroic ones--they're not always easy to get.) You know how to make the lineup, of course. I use some larger and some smaller ones for variety.
Use needle-nose tweezers to most effectively add the bead lineup to the clay. Grip one side of the wire (I used the side with the smaller beads to go in first, nearest the pointy part of the wing shape). First bend the wire at a right angle so that about an eighth of an inch of wire is bent. Grip the wire right above the bend with the tweezers. Press the wire into the clay of the body, right under the wing at the pointy end. Push the wire all the way into the clay, embedding it to the bend.
Push the beads down the wire so that they press into the clay. Now hold the other side of the wire, bend it at a right angle and use the tweezers to press that side in as well. I chose to press the wire end into the clay on top of the wing so the beads would be more visible (it may vary on your bird).
Press them in firmly. Push the beads down into the surface of the clay a little as well. Since the beads are large, there will be wire visible at this end that you can't press all the way in, but that's ok, I have a trick to hide that!
Roll a small teardrop of clay from the same color and press it down on top of the wing, covering the wire.
I think another, longer curl of clay on top of the wing will add to the composition. Roll out a long snake--tapered at both ends (one end a little longer and more tapered than the other).
Flatten this clay shape a little with your fingers. Roll the tip into a curl. Press it onto the wing, right above the beads.
Ok, let's leave the wing alone for a bit and go pizzazz up the tail feathers. Not because I'm getting bored of the wing or anything, but only because it helps to see where those tail details will take us so that we can accommodate the rest of the wing bling to match.
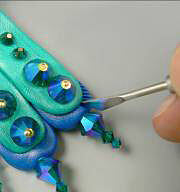
Embellishing the Tail
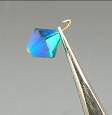
The main beaded component to the tail feathers will be crystal bicone beads. (I used Swarovski crystals in several sizes, the emerald AB2x color, cuz it is just the perfect peacock color!)
We'll be adding these beads with headpins to hold them in place, instead of the wire tails, so that we can see the bead straight on--they have a lovely pattern that way. Slip a bead on a headpin, then trim away the excess pin to leave only about an eighth of an inch of wire showing. Bend the tip over into a hook.
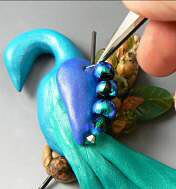
Start with a larger 6mm or 8mm size bead (these are 8mm) to press into the clay towards the bottom of the tail. Since there are several layers of clay, you should be able to press the hook into the clay and press it down without the wire poking out the back. (If the wire does poke out--you can add a little dot of clay as a band-aid to cover it.)
Keep going--add more bicone beads with headpins. I think a row or two of the largest beads at the bottom of the tail look groovy.
Keep working up the tail with beads. I switched to the 4mm beads next and added a couple rows. (6mm would work too.)

Then just for funsies, I added three 8mm Swarovski crystal emerald marguerite lochrose flower beads. They added a nice contrast in color, the shimmer had the teals in it, and it matched beautifully, I thought.
To add length to the tail feathers and a change of look from all the round-ish elements, let's add a lineup of beads off the tip of the tail feathers.
Start by lining up several beads on a headpin. Snip off the excess and bend in a tail, but leave the wire longer this time--about a quarter of an inch showing, instead of just an eighth.
Press that wire into the center of the clay (hold the bend so that it's flat when it goes in, so no wire pokes out).

Push the bead stack into the clay so that in makes a nice little indentation.
Since the stack of beads looks so fun on the end of the tail, how about one in the wing, too?
Use any additional accents of clay to make it look finished.
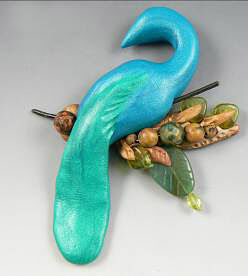
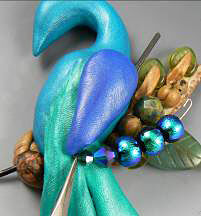
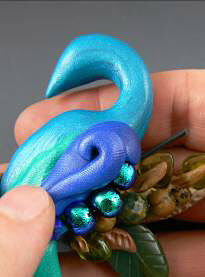
And here we are so far:
Hmmm, his shoulder needs one more little bit of bling.
Ahhh, that's better.
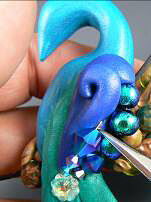
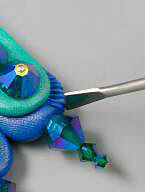
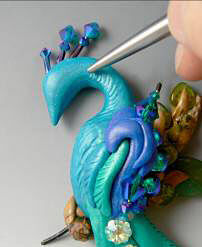
Adding a Crest
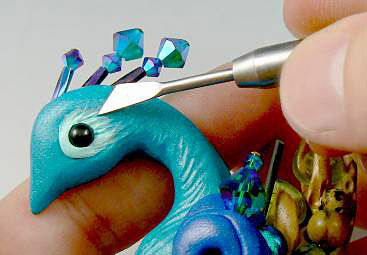
If you'll take a look at your average peacock, you'll notice a lovely crest of feathers. In keeping with our stylizing of the realistic elements of the bird into an artistic representation, our peacock will have a crest too--crystal of course.
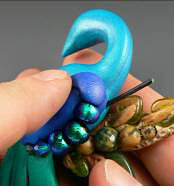
Slip on a large bead, a smaller bead, then a short bugle bead to make the back two of the three crest pieces. The Miyuki seed bead gunmetal green twisted bugle works great. For the front piece, eliminate the large bead so that crest piece is a little shorter. (If you don't have bugle beads, you can use several small glass seed beads in a row.) Trim off the excess wire and bend in a hook--you want a little longer wire, like we did for the beads on the end of the tail.
Press the crest pieces in. Don't let them be too far up on the forehead, lower towards the neck is better. Push the bugle beads into the clay a bit, too. Push in the longer ones in the back, the shorter one in the front.
Cool, huh?
Don't be afraid to experiment with other bead combos for the crest, or any other part of the embellishing for that matter! You can use fancy headpins, a variety of bead shapes--have fun with it!
Finishing Details to the Body
You may have noticed he doesn't have an eye yet, or much of a beak besides the shape either--don't worry, we'll get to that. But first, let's add any clay accents and textures to finish up everything else!
I think he needs just a bit more color in that wing area--the blue seems a bit too large and round there in the middle of the body--so let's add a little snake of green clay (which ties it in to the color in the feathers) and a little snake of body-color clay.
Yes. That looks better. This is what sculpting is all about. You have a plan but along the way you modify, change, add to ... creativity is by its very nature evolutionary--each step leads to the next. One thing builds on another, nothing stays the same each time but adapts, morphs, grows ....
From the wing, on to the tail! If you want, you can add lines to the tail feathers to hint at the texture of wings.
Use a clay carving tool with a blade end
Let's start on those blue second layer feather bits. Use the clay carving bladed tool to impress lines along the sides of each blue feather.
Angle the lines up towards the body on each side. Then use the blade to continue the lines around the side of the feather.
Now do the same for the green feathers, all the way up the edge, getting shorter in length as you continue up the sides.
If your feathers sag a bit in the middle (they probably will, it's a long stretch of clay with not much support), just use a piece of folded paper to prop them straight. This paper can go in the oven to continue the job while baking.
The ''bare'' parts of the bird will probably look quite naked compared to how much detail and embellishment there is on the rest of him, so let's make some gentle strokes to hint at soft downy feathers. Use a clay carving tool with a larger point instead of something too thin and sharp like a beading awl tool. The larger tool will leave a softer, shallower indent instead of a deep scratch.
Add the gentle lines along the neck (but fade out as you come to the face--too hairy!), and on the back.
Eye See You!
Ok, finally, it's time for the eye! As you know, we saved this for last, so it wouldn't be smooshed by all the other details. The eye is the most important feature, so we want it to be just right.

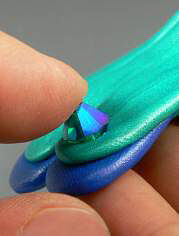
First mix up a special color for around the eye. Take a little bit of the body color clay and mix it with white--about 2 parts teal to 1 part white should do it. Blend it thoroughly--NO streaks!
Take a little bit of this color and roll it into a tiny ball--about the same size as a 3mm bead. Press this ball right onto the center of the face, flattening it like a pancake.
Use a dowel tool to impress a hole in the center. Wire up a round, black bead (this is a 4mm black onyx bead) and press it in the hole. Press it in deeply so that the bead is almost flush with the surface of the clay.
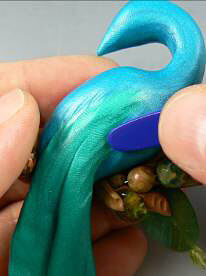
Try to make the eye bead centered in the clay (as you see, I didn't quite get in perfectly). You can leave it just like that, but I think that can look a little like he's wearing goggles, or has had too much coffee, so I like to blend the back part of that lighter clay into the face, to soften the look.
If you haven't ever done this blending one clay over another trick before, you may want to practice on a scrap bit of clay--it can take a little practice to master, so there's no sense in possibly messing up your fabulous peacock while you get good at it!
Use a clay carving bladed tool, hold it flat--almost parallel with the surface of the clay--and stroke the lighter clay into the darker clay. It will take several drags to pull the clay so that the lines are blurred from one color to the next. With this peacock, the tool marks are ok to be left mostly visible since they will add to the look of feathers, but it's a good idea to use your finger to gently press down on the blended clay once you're all done to minimize those tool marks a bit.
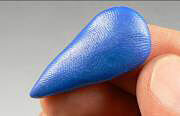
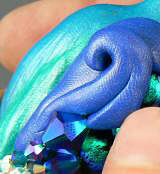
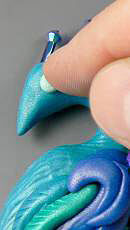
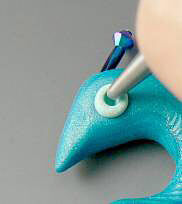
Powder the Beak
Look it all over--everything terrific? Well, except for the beak. So, finally it's time to add powder to create the beak (and to highlight the eye too, while we're at it).
You'll use mica powders for this--they stick right on to the clay and bake in, then the clear varnish that we'll coat it with will seal it perfectly.
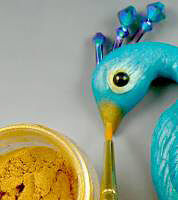
Use a soft paintbrush to brush the mica powder on the beak (I used Perfect Pearl's Aztec Gold--a very rich color). Lay it on thick, all around to the backside. Blow off any excess powder--away from the clay or he'll have a nice gilding all over.
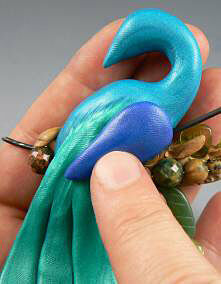
Hit the light clay around the eye too--but a very light dusting this time, not too thick.
It's done! Admire your handiwork and then it's time to bake.
Baking
Check all the details on everything you've created--once they are baked, it's much more difficult to fix anything, so now's the time to fuss and fiddle.
Ok, now lay all the pieces of the necklace on a clean piece of heavy stock paper (index cards work fine, too) and lay that in a pan or on a tile and bake in a preheated oven at 275ºF for 45 minutes. Use an oven thermometer to make sure the temperature is accurate (many ovens are not calibrated properly).
Since some of the pieces are small, you may prefer to put the small, thin bits in separately and bake them for 30 minutes, then the larger, thicker ones for 45 minutes.
Take the pieces out of the oven to cool. When the pieces come out of the oven, they will be rubbery and not hard--they harden as they cool--don't mess with them at this stage, they are still somewhat breakable! Just let them cool and then it's on to the next step ...
Adding the Patina and Clear Coat
A patina is simply a coloring applied to the surface. We'll use acrylic paint to antique the piece--letting the color get into the deepest lines and creases to add richness and bring out the details.

I use Liquitex brand acrylic--its consistency is perfect for use with polymer clay. Simply use a dry brush to spread undiluted paint onto a small area of the clay. It can get on the crystals and beads, but try to avoid them as much as possible (the paint gets down into the holes in and around the beads and muddies the look). Immediately wipe the paint off the surface of the clay and any beads with a well-wrung damp sponge. Use a second sponge to wipe again so that you avoid smearing paint around. I usually have a pile of a couple dozen sponges in front of me as I work, and a bowl of water to toss the sponges in as I use them. When the clean sponges are used up, just rinse and wring out the bowl of sponges and keep going. Ratty old dishwashing sponges ripped up small are the best for this!
I used Burnt Sienna and Burnt Umber for the peacock and Raw Sienna and Burnt Sienna for the leaves and flowers. Go easy on the paint with the flower petals--maybe just a touch between the petals--or they definitely will get muddy-looking.
Let the paint dry completely. Now brush over the clay (NOT the beads) with a clear, protective coating. Mona Lisa™ Metal Leaf™ top coat sealant works very well. I coat the front, then let it dry and do the back as well.
Let the coating dry completely. Now you can pop the pieces back into the oven to bake for 15-20 minutes at 200ºF. This will set the paint and clear coating nicely.
Ok, next it's on to the stringing! Yay!
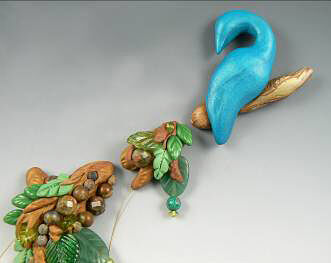
Putting it all Together: Stringing the Necklace
Laying Out the Pieces and Seeing Where You're Headed
So the clay is done and baked and patina-ed and glazed - you're just a few beads away from showing off your finished creation!
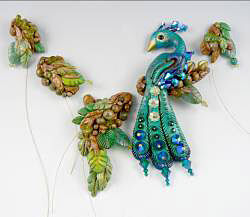
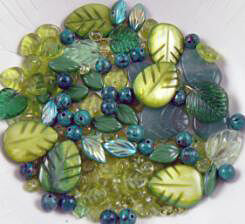
Let's start by laying out all the clay pieces on a clean work surface. Place them in the way that you anticipate stringing them. This gives you a sense of proportion, and helps determine where you'll want to use those polymer clay spacer beads you made (to fill in any visual gaps or help balance the design).
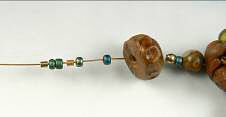
If you don't already have them ready for action beside you, get the bead mixes you used to embellish the clay work, plus any additional beads you might want in the stringing. I added more seed beads to the mix and some additional turquoise disk-shaped beads as well. You'll need to have all your crimping supplies and beading wire too, of course.
Stringing Up the Peacock - Side of the Necklace
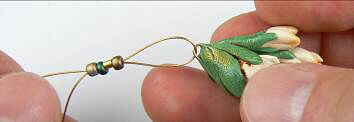
We'll string all the clay elements together on the peacock side, with beads between, of course. Begin by cutting off a length of Accu-Flex® beading wire long enough to extend about 6 inches below the center clay piece of the necklace (I thought extending the leafy bit below the clay was a nice look, so we'll be dangling some beads down there) and then go all the way around your neck and over to fasten a side toggle--this works out to about two and a half feet of beading wire. I used the small thickness of wire for this, but the medium thickness will work also. (By the way, beading wire is of course quite different from the regular wire we've used to add the beads to the clay work--the beading wire is a flexible cable made up of multiple strands of wire then plastic-coated--just in case you were wondering!)

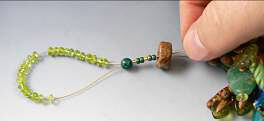
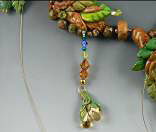
Feed the Accu-Flex® beading wire through the center branch clay piece. Leave about 6-8 inches hanging down below. To this 'down below' wire, add beads--first a bead large enough not to go through the hole (I used one of the same Swarovski bicone crystals that we used in the clay dangle flowers). Then add about an inch or inch and a half of other beads--your choice! Now slip on a larger bead, like this mother-of-pearl leaf bead. Next add a few larger seed beads (because they have holes large enough for the beading wire to double back through, which we'll do in a minute), now slip on a crimp bead and follow with another larger seed bead--it should look something like this:
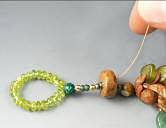
Take one of your clay flower dangles and slip it onto the wire. Thread the wire back through the seed beads and crimp bead.
Adjust the wire so that only a small bit is left sticking out past the seed beads and crimp bead by pulling on the long end. Now push the beads close to the flower so that when the crimp is set, it will be fairly tight against the wire of the flower dangle.
Crimp the bead. You know how to do that, since you did crimps when you made the dangles during the sculpting part! Use the crimping pliers, of course, in exactly the same way--press the crimp bead firmly to dent it using the back channel, then move it to the front and close the two halves of the crimp onto each other.
Next we'll be adding a crimp cover to hide the crimp. Even a properly crimped bead looks a little unfinished, so using a crimp cover over it to create a nice, professional appearance is always good.
Set the crimp cover by placing it around the crimped bead (hold it with pliers and pretend it's going to eat the crimp bead--chomp!!) Use pliers (your crimp pliers or your regular pliers) and push the opening shut, closing the cover--which will make a nice, round ball out of it! Doesn't that look nice?
Trim the short end of the wire so that it's only about a quarter inch long or so. Slip the beads over the wire, hiding it. This makes the connection more stable than if you had cut the wire close to the crimp bead--probably has to do with the laws of physics or something.
Now pull the wire from above the clay branch piece to make the strand of beads pull tight. How's that look?
Ok, now add beads to make the jog to the peacock piece which we'll be adding next! You can add whatever you like--I thought adding a couple of the clay branchy-looking beads would be a good transition.
Don't add too many beads or the peacock will be too far away from the center!
Keep on beading after you add the peacock branch, always adjusting how many beads you need to make each clay piece seem the correct distance apart--keep 'em close!
Once you've gotten all the clay pieces on and you like how the spacing looks, I always find it helpful to set a crimp on the wire above the topmost bead to keep that strand of beads taut and looking good--I think it's easier that way. If you think so too, add a crimp (and a crimp cover too, of course).
Beading Around the Neck
The next part is quick--or should I say the neck's part... no, I won't say that--too pun-ish.
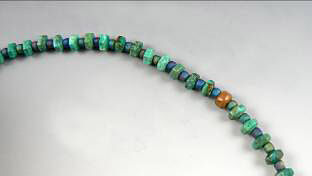
You just have to zip around the bend with beads that will go from the top of the crimp and all around the neck. This strand will end with the toggle eventually--for now though, just bead about 6 or 8-inches worth of beads. Then we'll switch to the other side and finish that beading. (Otherwise, how will you know how long to make it? We've got to be able to adjust this long strand of beads to the other side (which will have the loop part of the closure on it--just trust me, it'll work!) Ok, so bead! I used some turquoise beads and interspersed them with large seed beads for a more consistent pattern.
Now on to the other side.
Beading the Other Side of the Necklace
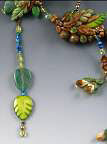
Start this side the same way as the peacock side--with a dangle. I made mine almost identical to the first dangle--flower on the bottom and some beads. Pull the wire tight (make sure it's not exactly the same length, that would look awkward).

Next, repeat the beads/polymer clay bead/more beads sequence, followed with next clay branch piece.
Add a few more beads and then the last clay branch piece. Pull everything tight and add a crimp on top--just like the other side! Don't forget a crimp cover.
It should look about like this so far, or something similar--unless you've done it all differently.
Making the Toggle Loop and Beyond
This side will get the loop part of the toggle. The placement for this loop is pretty non-critical--we'll make the loop at the end of the beads and it will be the other side that will have to adjust properly for your fit.
After the crimp bead, add a larger bead (I used one of the polymer clay beads again), next add a few larger seed beads, a crimp bead, a couple more seed beads, another crimp bead.
These two crimp beads will ensure extra strength at this critical point--the closure area. Lastly, add one large bead, just for funsies (and also cuz it looks good).
Now we'll add the beads to create the loop. It's best to use all of one kind of bead. Add enough to be able to make a loop that will allow enough space for the toggle bar to slip thru later. The best way is to add the amount of beads you think will work, loop the end of the wire through the big bead and pull it tight enough to verify clearance of the toggle bar (that clay stick with the hole in the middle, remember?) Adjust by adding more beads or taking some off (or if you got it perfect the first time--hooray!). Then thread the beading wire through that big bead and also all the seed beads and crimp beads too and keep going through the polymer bead as well.
Pull everything tight--from the dangle, all the way through the loop. Set the crimps and add crimp covers. But DO NOT trim off the excess wire!!

That extra wire is probably pretty long, so let's take advantage of it and continue to bead on it--any of your bead mix--and then loop it back into the main lineup. I had a little gap from one of the branches that I added to the nearest clay piece, so it worked well for me to loop the strand through that gap (don't forget, crimp bead, then beads to go through the loop, then tuck the wire back through the crimp bead).
If your piece doesn't have a handy little branch gap like that, just feed the wire through the top of the bead and out the bottom in another dangle, or (if you're feeling really daring) you can use a little hand-held drill and drill a little hole in the side to loop through. Polymer clay can be drilled very easily, just make sure you don't drill into the channel where the stringing wire already is! But really, if drilling is scary, and you don't have the gap, it's easiest to just go through the top of the branch and finish with more beads and a dangle.
Back to the Other Side - Finishing the Beading, Adding the Toggle Bar
So, guess what's next? Yes! Finishing up the beading on the other side to end in the toggle bar--how did you know?
Continue with adding the beads to that long ''around the back of the neck'' strand. To judge how long to make it, drape it around your neck (or any other willing victim of the same approximate proportions). Once it's about two inches shorter than you'd like it to be, it's time to add the toggle bar.
Start by adding on the usual bead and crimp bead sequence--again, two crimps are better than one. At the end of that sequence, add a larger bead then some seed beads small enough to go through the hole in the center of the toggle bar.
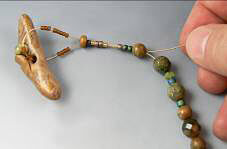
Pull everything tight--all the beads along the wire all the way back to the crimp at the top of the clay branches by the peacock.
Set the crimps, add crimp covers.
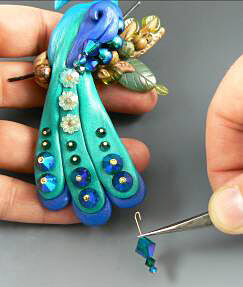
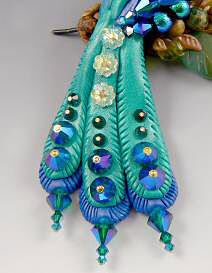
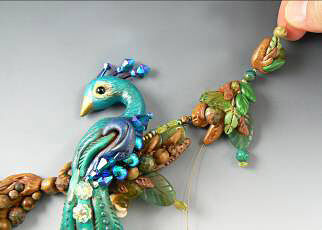
Making lots of Dangly Things
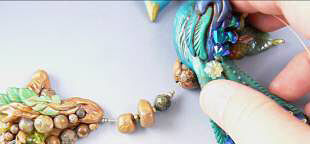
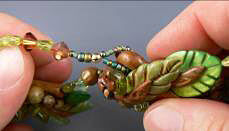
Now is the time to add the beads to all those wires you left hanging out of all the clay branches. Obviously we want them to look like they belong together--the draping branches of this particular branch the peacock has chosen to roost in. Here's where you use what's left of your flower dangles and of course your leaf beads, even a peacock-colored crystal or two (to echo the colors of the bird, of course).
Add the beads that will be at the top of the dangle first, adding the beads and ending with a crimp bead and then whatever you've chosen for the bottom such as flowers or large beads.
Use more of those big leaf beads if you got 'em!
.jpg)
Finish each by looping the wire back up through the crimp bead, set the crimp and add the crimp cover.
Bead all the dangles--vary the lengths a little for variety and good composition.
Making the Last Few Connections
All that's left now is to make a few more drapes and swoops of beads to fill up the design and balance the overall layout.
Where you choose to put your drapes may vary from where I put mine--it all depends on how your necklace has come together so far, and what it still needs to look complete.
Here's the sequence for adding a dangle, it is the same procedure you would use for any dangle, long or short.
Start with a crimp bead, and then a larger bead, wire looped back through and the crimp set with cover added--you know this part of course.
Now the other end of the wire can be fed through any likely gap in the necklace (this large polymer clay bead is a great place, although smaller beads can work well too.)

Now bead! If you have any extra flower dangles, you can add some to the middle of the swoop. You can end the swoop by looping it around the strand (or you can loop it through and end with a bead). Add any other dangles or swoops that you want or need.
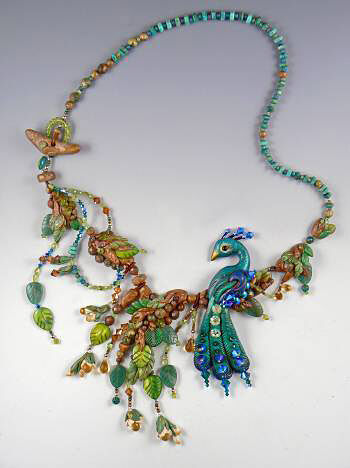
And ... you're done!
Now slip on your pizzazzy peacock and strut your stuff!!
Did you like this project? Want more? Other polymer clay projects by Christi Friesen. Visit www.christifriesen.com
Shop for Your Materials Here:

Copyright Permissions
The pieces featured in the Gallery of Designs are copyrighted designs and are provided for inspiration only. We encourage you to substitute different colors, products and techniques to make the design your own.
All works of authorship (articles, videos, tutorials and other creative works) are from the Fire Mountain Gems and Beads® Collection, and permission to copy is granted for non-commercial educational purposes only. All other reproduction requires written permission. For more information, please email copyrightpermission@firemtn.com.