How to Use Liquid Polymer Clay
What is Liquid Polymer Clay?
Liquid polymer clay is a PVC resin combined with a plasticizer and other additives—essentially, it’s a liquid vinyl. It’s the base material of regular polymer clay before solid fillers are added to give it a moldable, putty-like consistency. This means it is a versatile, pourable form of polymer clay. It stays in liquid form until it’s baked. Once cured, it becomes flexible or solid depending on the formula, and it can be used for a variety of crafting purposes including image transfers, glazing and creating faux effects.
Common Uses
- Bonding Agent – Adheres clay pieces together before baking
- Image Transfers – Apply over printed images and bake to transfer designs
- Glazing and Sealing – Add a semi-gloss finish to projects
- Creating Inclusions – Mix with glitter, mica or pigments for effects
- Molding and Casting – Pour into silicone molds to make charms or parts
- Decorative Effects – Paint or detail over baked or raw clay
- Stained Glass Effects – Mix with inks for transparent, colored gels
- Enamel Effects – Create domed, shiny surfaces like enamel jewelry
Tips for Use
- Mix thoroughly before using.
- Use thin layers for clarity.
- Bake according to brand guidelines (typically 265–300 degrees Fahrenheit / 130–150 degrees Celsius).
- Avoid overbaking to prevent yellowing.
- Use an oven thermometer for temperature accuracy.
Tools That Help
- Silicone molds – For casting charms or pieces
- Oven thermometer – Ensures correct curing temperature
- Needle tip bottles or squeeze bottles – For precise application
- Heat gun – Adds special effects or spot curing
- Brushes or spatulas – For spreading liquid clay
- Mixing palette or small cups – To tint or combine additives
- Gloves – Keeps hands clean when handling mixed clay
- Craft blades or silicone tools – For shaping and detail work
View a broad selection of polymer clay tools available from Fire Mountain Gems and Beads.
Which Liquid Polymer Clay Should I Use?
Liquid Sculpey polymer clay is available in clear and translucent varieties, as well as in many beautiful colors. Your design will dictate the type that you should choose.
Clear Liquid Sculpey
Free from darkness, obscurity and cloudiness. Transparent.
Clear Liquid Sculpey stands out for its impressive clarity. Though it looks like white glue in the bottle—thick and milky—it cures to a brilliantly clear finish, especially when used in molds and baked properly. Like other liquid clays, it’s highly versatile, but its ability to become truly transparent is what sets it apart.
When applied in thin layers and cured with a heat gun, it creates a beautiful glossy coating. Baked in the oven alone, it yields a satin finish, but applying heat after baking will bring out a high-gloss shine.
One important tip: always stir before each use. This formula separates quickly, and using the unstirred top layer can result in a cloudy or uneven finish.
Translucent Liquid Sculpey
Allowing light, but not detailed images, to pass through. Semitransparent.
Translucent Liquid Sculpey (TLS) was the first liquid clay released by the Sculpey brand, and it has gone by several names over the years. Despite the rebranding, it's still widely known in the polymer clay community simply as TLS. This formulation has a drippy, syrup-like consistency with a slightly grainy, cloudy texture. TLS does not cure to a clear finish—when applied thickly, it can appear opaque. However, it’s a reliable all-purpose liquid clay, well-suited for a variety of techniques. When baked, it has a matte surface, making it an excellent option for adding a soft, matte finish when applied with a sponge or brush. Using a heat gun on TLS will not increase its clarity, but it can enhance the surface shine, giving it a subtle glossy appearance.
Colored Liquid Clays
Colored Liquid Sculpey clays are pre-tinted versions of Sculpey’s liquid polymer clay, available in a range of vibrant colors including primary shades, metallics and pearls. These liquid clays share the same syrupy consistency as other Sculpey liquids but come ready to use, without the need for additional pigments or mixing.
Features and benefits of colored Liquid Sculpey polymer clay:
- Ready-to-use color: No need to tint with alcohol inks or powders—just shake, squeeze and bake.
- Versatile application: Perfect for molds, marbling, surface designs, faux stained glass, painting and more.
- Mixable: Colors can be blended to create custom shades, and can also be combined with clear or translucent liquid polymer clay for tinting effects.
- Satin finish: Bakes to a smooth, satin-like surface that can be made glossier with a heat gun or gloss sealer.
- Strong bond: Like other liquid clays, colored versions can be used to bond raw-to-raw or raw-to-baked polymer clay pieces.
Creative uses:
- Create colorful window clings or sun catchers
- Drizzle over solid clay for decorative accents
- Use in silicone molds for miniature items or layered effects
- Paint onto raw or baked clay for colorful surface details
- Mix with mica powders for a metallic shimmer
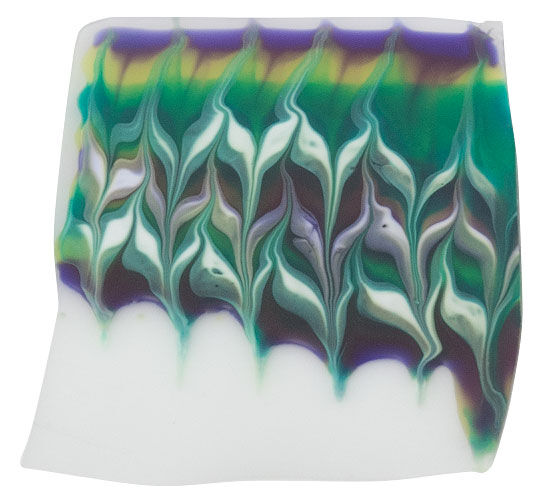
How to Create a Colorful Liquid Polymer Clay Sheet
Instructions by Tamara Honaman
Make sure your work surface and oven are level. Place a layer of aluminum foil on the bottom of your oven—just in case you need to catch any drips.
Open the bottle of clear liquid, and using a stir stick, blend the contents of the liquid well. Repeat for each liquid you will be using. With an awl or toothpick, pierce the tip of each bottle.
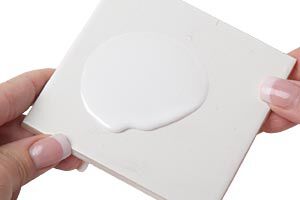
Pour a small amount of the clear liquid polymer clay onto a ceramic tile. Tilt the tile to spread the liquid out in an even layer. This will be the base of your sheet so work the liquid until it is as large as you would like your finished sheet to be; add more liquid if needed.
Tip: If bubbles appear, pierce them with a fine-tipped awl or toothpick.
Preheat the oven to 300 degrees Fahrenheit (149 degrees Celsius). Place the ceramic tile into the oven and bake for at least 5 minutes or until the liquid is clear. Carefully remove the tile and allow the tile and the liquid to cool completely before proceeding.
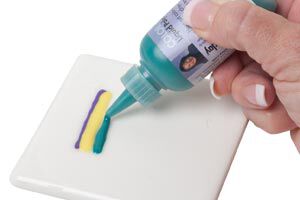
Once cooled, squeeze lines of colored liquid onto your sheet of clear.
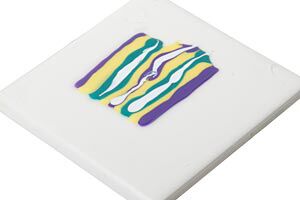
For a lighter, brighter pattern, consider adding in fine lines of white.
Carefully place into the oven for 1-1/2 minutes.
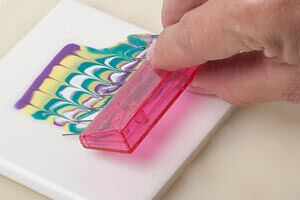
After 1-1/2 minutes, open the oven door, then carefully, drag the comb or an awl through the surface of the liquid, dragging the colors into the pattern of your choice.
Tip: The oven will be hot, so please use care when working with the liquid for combing and when removing the tile from the oven.
Tip: It is best to work with the liquid while the tile remains in the oven, as any tipping will cause the colors to shift more than you may like. If you are uncomfortable working within the oven, transfer the tile very carefully. Keep the oven at temperature as best you can while working with the liquid. Begin the timer after the oven has come back up to 300 degrees.

In this example, the metal-tined comb was dragged through in one direction then done again in the reverse.
Tip: A metal-tined comb will space the lines in your pattern far apart; a rubber comb will blend the colors as well as leave a fine-line pattern.
Close the door and cure for about 15 minutes. Once complete, allow the contents to cool to room temperature.
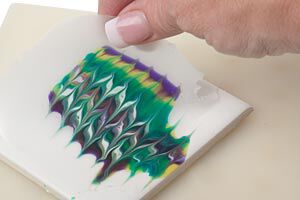
Once cooled, carefully peel the sheet from the tile then use in a design of your choice.
Additional Tips:
I had a lot of fun working out designs and patterns with the colors—here are a few things I learned along the way:
- Make sure your work surface is level.
- Make sure your oven is level.
- Line the bottom of your oven with foil—just in case your work surface is not as level as you thought.
- Do not overfill the tiles—no matter how level your surface is, liquid still likes to move and do its own thing.
- Place an oven thermometer in the oven—no ifs, ands or buts!—there is nothing pretty about toasty polymer, and without the thermometer, I know I would've had a mess on my hands.
- When in doubt, add white liquid polymer clay—it really helps brighten the patterns as well as helps when you put colors next to each other that you really shouldn't have!
- Have a color wheel handy—putting purple and green next to each other really will make mud.
- Have fun with the color blending. I believe I've only touched the surface of the patterns I will create.
Design Idea NF2M and PM3H
Have a question regarding this tutorial? Email Customer Service.
Copyright Permissions
The pieces featured in the Gallery of Designs are copyrighted designs and are provided for inspiration only. We encourage you to substitute different colors, products and techniques to make the design your own.
All works of authorship (articles, videos, tutorials and other creative works) are from the Fire Mountain Gems and Beads® Collection, and permission to copy is granted for non-commercial educational purposes only. All other reproduction requires written permission. For more information, please email copyrightpermission@firemtn.com.