Collar-Style Necklace and Earring Set with Seed Beads


Design Idea J907
Snake Charmer
-- Designer --
Rose, Jewelry Designer, Exclusively for Fire Mountain Gems and Beads®
To learn more about Rose Wingenbach, read her jewelry artist success story here.
: : : Materials : : :
Click here to view a full list of materials used in this design.
Please take the creative opportunity to select the products of your choice for this design, offered here at Fire Mountain Gems and Beads. Some materials may not be available or listed.
- Seed bead, Toho Beads®, glass, silver-lined translucent rainbow crystal, (TR-11-2021), #11 round
- Seed bead, TOHO BEADS®, glass, opaque luster baby pink, (TR-11-126), #11 round
- Clasp, hook-and-eye, sterling silver, 20x6mm
- Seed bead, Dyna-Mites™, glass, silver-lined translucent rainbow light purple, #6 round with square hole
- Seed bead, Dyna-Mites™, glass, silver-lined translucent root beer, #8 round
- Seed bead, Dyna-Mites™, glass, silver-lined translucent light gold, #8 round
- Jump ring, sterling silver, 8mm soldered textured round, 6mm inside diameter, 18 gauge
- Thread, Berkley® FireLine®, gel-spun polyethylene, smoke, 0.15mm diameter 4-fiber braid, 6-pound test
- Jump ring, sterling silver, 6mm round, 4.3mm inside diameter, 19 gauge
- Ear wire, sterling silver, 18mm fishhook with 3mm ball and 2mm coil with open loop, 22 gauge
- Needle, steel, #10 economy with 0.6mm eye width, 2-1/4 inches
Instructions
Necklace Instructions
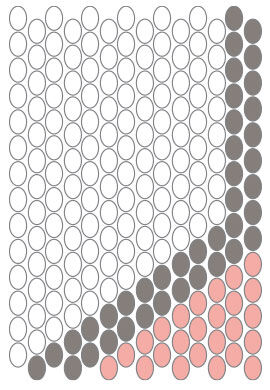
Map out a pyramid measuring 14 beads wide using our FREE printable peyote stitch graph paper.
Tip: Using graduated seed beads causes the 3D appearance in this design.
Pass one 6mm jump ring through the loop on the hook of the hook-and eye clasp and one 8mm textured jump ring, then close. Repeat to attach a second jump ring.
Use double 6mm jump rings to connect seven 8mm textured jump rings creating an extender chain.
Cut a 3-foot length of FireLine® thread then thread a beading needle almost doubling the thread (to make it easier to work with) but leaving a tail so you are working with only one thread.
Tip: It may be necessary to cut additional lengths of thread later in the design.
String 12 baby pink #11 seed beads and two silver-lined rainbow crystal #11 seed beads. Bring the seed beads toward the end of the thread, leaving an approximately 10-inch tail.
String an additional baby pink #11 seed bead, skip the previous bead (the last bead strung), then pass through the next bead in the row. Pull the thread so the last seed bead rests on top of the one next to it, beginning the next row. Continue to peyote stitch six more baby pink #11 seed beads and one silver-lined rainbow crystal #11 seed bead.
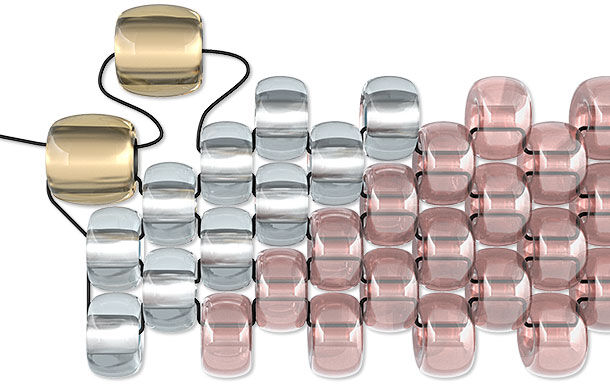
Continue to peyote stitch the pyramid pattern created in Step 1, graduating from #11 seed beads to #6 seed beads. Repeat to create a total of 12 sets of the 3D pyramid pattern.
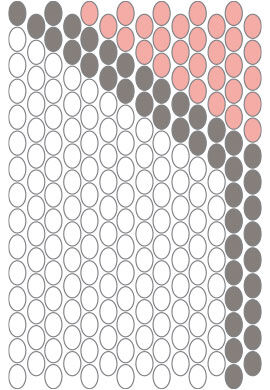
Pass through several adjacent seed beads to exit the last silver-lined rainbow crystal #11 seed bead in the second-to-last-row. Continue through the last seed bead in the last row. String an additional silver-lined rainbow crystal #11 seed bead then pass through the next seed bead in the row. Continue the pattern to finish the row. (This last section of the design will be an upside-down pink pyramid outlined with two rows of silver-lined rainbow crystal #11 seed beads.)
Continue to decrease the number of seed beads along the edge of the design down to one seed bead.
Tip: View our ''Decreasing Even-Count Peyote Stitch'' illustrated instructions for more information.
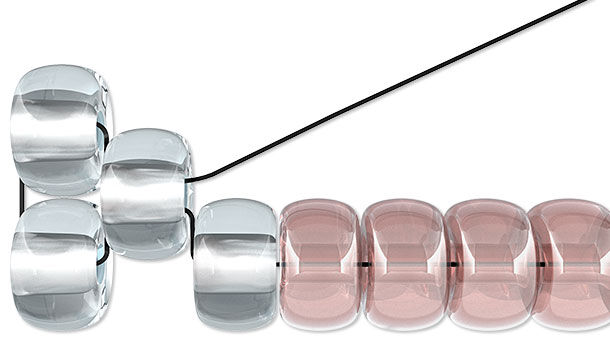
Peyote stitch a strip of silver-lined rainbow crystal #11 seed beads extending past the corner of the pyramid, approximately 1/2 inch long and two seed beads wide.
Fold the strip in half over the 8mm jump ring attached to the hook portion of the clasp then stitch through adjacent seed beads to secure the loop in place. Trim excess thread.
Repeat Steps 7 and 8 to stitch a strip on the corner of the pyramid on the opposite end of the design and attach the extender chain.
Earring Instructions
Attach an 8mm jump ring to each of the two ear wires.
Map out a half pyramid measuring 14 beads wide using our FREE printable peyote stitch graph paper.
Cut a 3-foot length of FireLine thread then thread a beading needle almost doubling the thread (to make it easier to work with) but leaving a tail so you are working with only one thread.
Create a peyote stitch pattern using the half pyramid design from Step 2.
Tip: The seed beads will form a natural curve since they reduce in size as the peyote stitch progresses.
Stitch through the seed beads to the last silver-lined rainbow crystal #11 seed bead in the first row. Pass the needle through the 8mm jump ring attached to one ear wire. Continue through the #11 seed bead and around the jump ring a few times to secure them together.
Pass through the last light gold #8 seed bead in the first row then around the 8mm jump ring. Continue through the #8 seed bead and the jump ring a couple of times to secure them together.
Repeat Steps 3 - 5 to create a second earring.
Have a question regarding this project? Email Customer Service.
Copyright Permissions
The pieces featured in the Gallery of Designs are copyrighted designs and are provided for inspiration only. We encourage you to substitute different colors, products and techniques to make the design your own.
All works of authorship (articles, videos, tutorials and other creative works) are from the Fire Mountain Gems and Beads® Collection, and permission to copy is granted for non-commercial educational purposes only. All other reproduction requires written permission. For more information, please email copyrightpermission@firemtn.com.