Single-Strand Necklace with Sterling Silver Wire, Beads and Charms and Crystal Passions® Beads

Design Idea A141
Close to Your Heart
-- Designer --
Tammy Honaman, Author, Jewelry-Making Expert and Educator, Exclusively for Fire Mountain Gems and Beads®
To learn more about Tammy Honaman, read her jewelry artist success story here.
: : : Materials : : :
Please take the creative opportunity to select the products of your choice for this design, offered here at Fire Mountain Gems and Beads.
Instructions
Wire-formed elements connect together to form a sinuous necklace. Charms are given an extra touch with a stamped message of a child's or grandchild's name, or phrasing close to your heart. Add crystal bead drops in the color of each child's birthstone or to suit your fancy--the choice is yours!
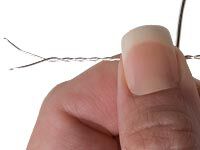
Using the wire twister pliers, twist 48 inches of 22-gauge wire for approximately 50 twists, or until the wire is as twisted as you like. Note: 48 inches of 22-gauge wire, twisted 50 times, yields about 23 inches of twisted wire.
Cut the length of twisted wire in half.
Cut a 5-1/2 inch length of 16-gauge wire. Hold the length of 16-gauge wire horizontally in your non-dominant hand. Position the length of twisted wire vertically against the16-gauge wire, with 1-1/2 inches of twisted wire extended above the 16-gauge wire.
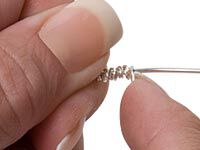
Begin to wrap the twisted wire around the 16-gauge wire, using it as your mandrel, keeping the wraps close together and forming a nice neat coil. Wrap until you have only 1-inch of twisted wire remaining.
Using round-nose pliers, form a spiral on one end, using approximately 1-1/2 inches of wire.
Form a spiral on the other end of the16-gauge wire, using about 1-inch of wire.
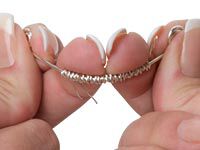
Form the 16-gauge wire into an oval or teardrop shape.
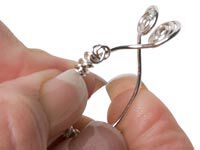
Overlap the two ''legs'' so they stay closed.
Open a 10mm jump ring and pass it through the hole in the center of each spiral.
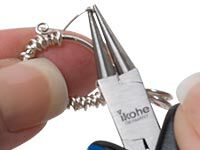
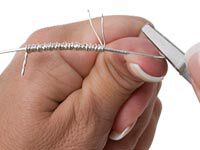
Using side-cutting pliers, trim any untwisted wire from the section extending above the 16-gauge wire, or separate the wires. Form the wire(s) into a neat spiral.
Repeat for the other end of the twisted wire.
Repeat Step 2 for a second twisted wire element.
Cut an 11-inch length of 16-gauge wire. Fold the wire in half, keeping the fold rounded (not creased). Insert one barrel of the round-nose pliers into the fold. While gripping the folded area, just above the fold, begin to work both wires into a spiral.
Once the spiral is started, using flat-nose pliers, grip across the spiraled area and gently curve the two lengths of wire, forming a larger spiral.
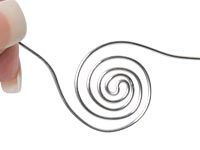
You may be able to form the spiral with your hands as it grows. Work the spiral until you have 1-inch remaining on one length of wire and about 1-1/2 inches remaining on the other.
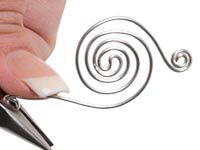
Form the remaining lengths of wire into spirals, formed in opposite directions.
Repeat to create a second spiraled element.
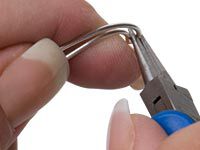
Cut a 7-inch length of wire. Form a spiral on one end, using about 1-1/2 inches of wire. Repeat on the other end of the wire. Gently curve the wire until it is shaped like a ''U.'' You can use your hands or find an object, like a handle on a hammer, to fold the wire onto.
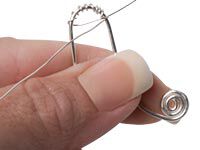
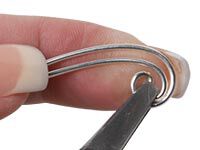
Cut a 24-inch length of 24-gauge wire. Starting at the bottom of the ''U,'' wrap one end around the curve, anchoring the wire in place as well as covering the curve. As you work the wire up onto one side of the ''U,'' bring the wire across to the other side of the ''U.''

Wrap the 24-gauge wire around the 16-gauge wire then back toward the front and across to the other side. Continue going back and forth across the opening of the shape, working in a figure-eight fashion, pulling the 16-gauge wire into shape as you weave the 24-gauge wire around.
As you near the top of the ''U,'' wrap the wire around one side, cross over to the other side and then wrap the wire until it is anchored in place. Trim any excess.
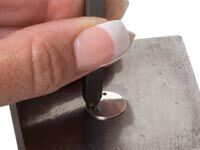
Cut a 2-3/4 inch length of 16-gauge wire. Using the hammer, hammer one end on the steel bench block. Repeat on the other end. Using round-nose pliers, form one end into a simple loop. Repeat on the other end, having the loop face the opposite direction.
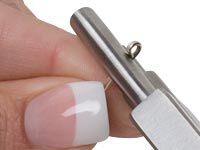
Using the wire-wrapping pliers, place the wire, with the loop coming toward you, on the center barrel on the pliers.
Rotate your wrist away from you, forming a loop and what looks like a shepherd's hook.
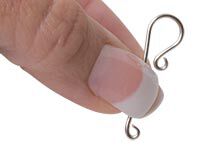
Repeat for the other end of the wire, forming an ''S'' link.
Repeat to create eight ''S'' links.
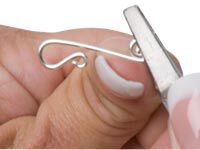
Cut a 3-inch length of 16-gauge wire. Hammer each end. Using round-nose pliers, form a simple loop on one end. Place the wire, with the loop facing toward you, into the first section of the wire-wrapping pliers and turn your wrist away from you, forming a small shepherd's hook.
Form a spiral using the remaining wire, working until the shape is pleasing to you--this will be the hook for your clasp.
Cut a 1-1/2 to 2-inch length of wire. Hammer each end. Form a large simple loop on each end, forming them in opposite directions, like a figure eight--this will be the loop for your clasp.
Optional: Fill the barrel of your tumbler with mixed stainless steel shot and all of the wire elements. Fill the barrel with burnishing solution to just above the level of the wire elements. Tumble for 30-60 minutes. Remove the elements from the barrel, clean with warm water and soap, then rinse and dry.
Open a 10mm jump ring and place it through the loops in the center of an ''S'' link. Close the jump ring. This will ensure nothing slips out of the ''S'' shape when you wear your necklace. Repeat for each of the ''S'' links.
Using 10mm jump rings, assemble the elements in the order that is pleasing to you, or by following the finished necklace shown.
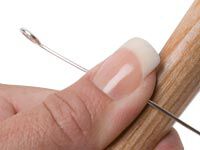
Place a sterling silver round charm onto the steel bench block. Choose the letter stamp you'd like to use and place it onto the charm. Hold the stamp straight. Hit the end firmly using the hammer.
Repeat until you have stamped in the word completely.
Repeat for as many charms as you'd like, using any shape charm you'd like.
Place a crystal onto a head pin. Form a wrapped loop on the end to form a crystal drop. Use a 6mm jump ring to connect the crystal drop to a filigree ring.
Using 6mm jump rings, connect the stamped charms, crystal drops and filigree rings to the elements in the order you'd like.
Shop for Your Materials Here:


Have a question regarding this project? Email Customer Service.
Copyright Permissions
The pieces featured in the Gallery of Designs are copyrighted designs and are provided for inspiration only. We encourage you to substitute different colors, products and techniques to make the design your own.
All works of authorship (articles, videos, tutorials and other creative works) are from the Fire Mountain Gems and Beads® Collection, and permission to copy is granted for non-commercial educational purposes only. All other reproduction requires written permission. For more information, please email copyrightpermission@firemtn.com.