Step-by-Step Approach to Making Jewelry Using a WigJig Jewelry Tool
The steps involved in starting a new jewelry-making project are essentially the same for every jewelry project. From an overview perspective the first thing you need to do is to make your jewelry wire components out of practice wire and measure the amount of practice wire you used, to learn how much wire is actually required to make your component. This step ensures that when you get ready to use expensive wire, you will be able to cut the correct length of wire on the first try. In general, with every jewelry making project, you will:
- Cut your wire
- Measure the wire
- Make a loop in the end of the wire with flush-cutters
- Hold this loop and straighten your wire
- Make your wire component starting with just two pegs in your jig and adding pegs as you go, and
- When you have completed wrapping your wire on your jig then you need to cut the excess wire and measure the amount of excess wire. Your goal should be to have about 1/2 inch of wire left over as scrap when you are done. Here are the detailed steps involved.
Instructions
Cut a length of practice wire that you estimate will be 1 - 2 inches longer than you need.
Measure the actual length of this wire and record the length.
Make a loop in one end of this wire using your round-nose pliers or wire-wrapping pliers. (We prefer the wire-wrapping pliers for making initial loops because the first step gives us a loop the size of the metal pegs for the WigJig Delphi, Cyclops or Centaur and the second step gives us a loop the size of the metal pegs for the Olympus, Olympus-Lite or Electra.) When making your loop, be sure to use the end of the wire with flush-cutters and not the sharp end. If both ends of your wire are sharp, cut one end off about 1/8 inch from the end being certain to leave the flush side of the cut on the piece of wire you plan to use. For some people it may be a good idea to cut both ends of the wire off flush to avoid possibly cutting yourself on the sharp end of the wire.
Now, while holding your wire by the loop you just made, pull the wire through the jaws of your nylon jaw pliers several times until it is straight.
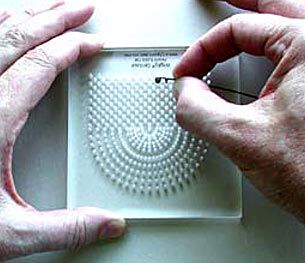
At this point our practice wire is ready to be shaped on your jig. Start with just pegs 1 and 2 from your pattern. Leave all the other pegs off the jig, out of your way. Place the initial loop that you made in Step 3 onto peg 1 and shape the wire against/around peg 2. Push the wire far enough that the wire will rest immediately next to the empty hole waiting for peg 3 with no pressure on the wire. This is important! You must release your grip on the wire to test if the wire has been pushed far enough. There are many ways to push the wire against peg 2. The important concept is that the unused wire must remain straight. The technique that works best for us is to push the wire and guide the wire with the tip of the index finger on your dominant hand while you move/twist the jig with your non-dominant hand. Pushing the wire with the finger tip of your index finger on your dominant hand as close to peg 2 as possible will help make your components as consistent as possible. If the wire gets bent at the wrong location, remove it from the jig and straighten the wire with your nylon jaw pliers, then replace the wire on the jig. If you can master the above 5 steps, making wire components on a jig will be easy. These steps are appropriate for soft or half hard wire. Remember, you are not done pushing the wire until the wire rests immediately adjacent to the empty hole for the next peg with no pressure on the wire.
Making your wire component continues by adding a single peg to your pattern and bending your wire against/around this new peg, leaving the wire adjacent to the empty hole for the next peg in the pattern with your hands removed from the wire. Continue adding one peg at a time, pushing the wire and testing to see if you pushed far enough until you have all the pegs in your pattern.
When you have added the last peg to the pattern and wrapped the wire against/around this peg as required, you are ready to remove the wire from the jig. If you have done this correctly, when you remove the wire from the jig, it will remain in the shape set by your pattern. (If you haven't done this correctly your wire might spring into a new shape. If you get the new shape, start over and remember that you need to push the wire, remove your grip on the wire and test to see if you pushed far enough, then push some more if necessary until the wire stays where it is supposed to with no pressure applied.) Now you are ready to cut the excess wire. Using your flush-cutters, with the flat side of the cutter toward the finished piece, cut the excess wire and using your bent chain-nose pliers close the final loop. Squeeze/flatten the finished piece with your nylon jaw pliers to harden and set the design.
At this point we need to measure how much excess practice wire we just cut off. If you have only 1/2 inch, your length of wire is perfect. If you have significantly more, adjust your length of wire so that when you are done you have about 1/2 inch of excess wire.
Please note that for many designs, it may actually be easier to make the design in your good wire. Practice wire is almost universally soft wire. Wire components that do not include a spiral are often easier to make in half hard wire. At present only jewelry wire made of precious metals (gold, silver, gold-filled, etc.) can be purchased as half hard. For this reason, you may find that it is easier to be consistent when making your wire components with half hard gold, gold-filled or sterling silver wire.
If you can understand and follow the steps described in these pages you should be able to make any of the jewelry designs shown in the WigJig website. You can find over 2,900 free web pages with designs, tips and techniques for making projects with wire and beads at: http://www.wigjig.com.
Find a free video on the You Tube website by searching for "WigJig Basics" at www.youtube.com.
Shop for Your Materials Here:


Have a question regarding this project? Email Customer Service.
Copyright Permissions
All works of authorship (articles, videos, tutorials and other creative works) are from the Fire Mountain Gems and Beads® Collection, and permission to copy is granted for non-commercial educational purposes only. All other reproduction requires written permission. For more information, please email copyrightpermission@firemtn.com.