Bracelet with Hill Tribes Fine Silver Beads, Pendants and Drops, Crystal Passions® Beads and Wirework

Design Idea B50Q
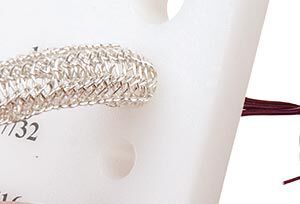
Viking Knit Bracelet
Weave wire to create a section of Viking knitted chain, then fill it with crystals for some flash and color. Finish the ends of the knitted chain with beading cones, then add a section of Hill Tribes fine-silver beads, crystals and a few dangles for a great bracelet. To create a completely different look, change the silver beads to gemstones and the color of the crystals to match or contrast. Or, weave a longer chain of Viking knit to make a necklace.
-- Designer --
Tammy Honaman, Author, Jewelry-Making Expert and Educator, Exclusively for Fire Mountain Gems and Beads®
To learn more about Tammy Honaman, read her jewelry artist success story here.
: : : Materials : : :
Please take the creative opportunity to select the products of your choice for this design, offered here at Fire Mountain Gems and Beads. Some materials may not be available or listed.
- Bead, antiqued sterling silver, 11x9mm cone with beaded design
- Bead, Crystal Passions®, amethyst AB, 8mm bicone (5328)
- Bead, Hill Tribes, fine silver, 3x2mm rondelle with stamped flower design
- Drop, Hill Tribes, antiqued fine silver, 11x7mm S-swirl
- Jump ring, sterling silver, 7.5mm round, 4.6mm inside diameter, 16 gauge
Instructions
Assemble the Viking knit tool per the manufacturer's instructions--inserting the Lazee Daizee™ into the top of the rod (if it isn't already in place). Using a pair of nylon jaw pliers, straighten a 3-foot section of 26 gauge wire.
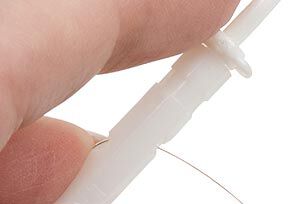
Insert one end of the wire into the diagonal anchor hole in the rod. Pass enough wire through the hole so it exits the other side and so there is a 1- to 2-inch tail.
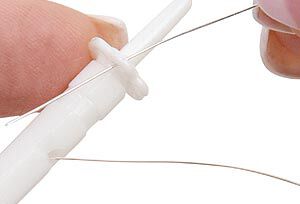
Pass the other end of the wire through the hole of the Daizee that is above the diagonal hole on the rod.
Using your non-dominant hand, anchor the Daizee with your forefinger and the wire tail with your ring finger. Using your dominant hand, gently pull all of the working wire through the Daizee. Cross the working wire over the length of the wire just created between the Daizee and the rod. Pass the end of the wire through the next hole of the Daizee.
As you are pulling, do not pull the wire from the previous loop tighter, maintain equal sizing by using the indentation on the rod as your guide.
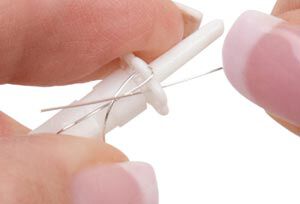
Repeat until you've completed six loops (or however many you would like in your weave). Work all the way around the Daizee, maintaining equal-sized loops and keeping each loop positioned on its coordinating flat side of the rod--this first row establishes the pattern.
Pass the working wire from right to left under the first loop.
Gently pull the wire all the way through, then pass the working wire to the right over the previously placed length of wire. Pass the end of the wire, from right to left, under the next loop.
Tip: If it is challenging to pass the wire under the loop, use the tip of a push-pin to pull the wire away from the rod.
Repeat all the way around the rod for 3-5 rows.
Pull the anchor wire (tail) out of the diagonal hole and trim closely to the work so it will be hidden.
Repeat Step 4 until you run out of wire or you reach the length you desire.
To Add New Wire:
- Prepare a new length of wire as in Step 1.
- Free the Daizee from the rod and pull the weave up the length of the rod so the last formed loop is over the diagonal anchor hole.
- Insert the end of the new length of wire through the last loop of the weave and down through the diagonal hole. Pass enough wire through so you have a 1- to 2-inch tail. While anchoring the tail to the rod, weave the new length of wire for five loops.
- Remove the knit from the rod. Neatly twist together the new tail and the tail left from the previous wire.
- Place the knit back onto the rod and begin weaving again. Be sure to pass the working wire under the twisted tails as you come around to the beginning of each new row; this will secure the start and stop points. Repeat this for three rows.
- Remove the weave from the rod and trim the tails close to the weave.
- Continue weaving until you need more wire or you reach the length you desire.
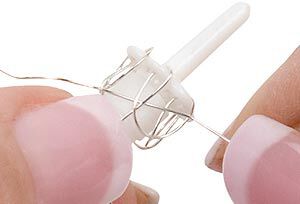
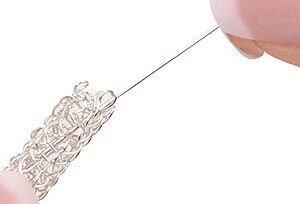
Once you reach the length you desire for your design, remove the Daizee and the woven wire section from the rod. Using wire-cutters, cut the tops of the loops along the Daizee. Remove the woven section from the Daizee. Remove any scrap pieces of wire that haven't fallen away.
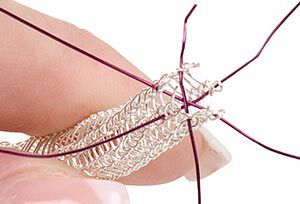
Cut three 8-inch lengths of scrap wire. Insert one wire through one loop on row 2 of the weave. Pass the wire across the opening of the woven tube and through the loop on the other side of the tube.
Insert the other two wires in the same manner--crisscrossing across the opening of the woven tube.
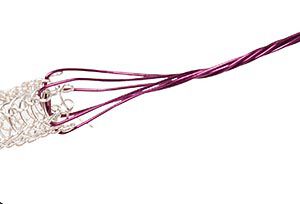
Bring the six ends of scrap wire together above the woven tube and twist them together.
Roll the tube in the conditioning cloth to even out the surface of the weave.
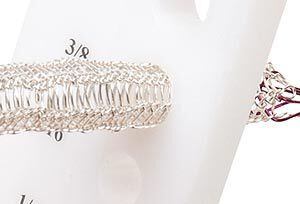
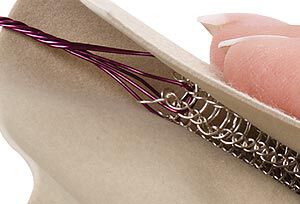
Put the twisted wires through the opening on the draw plate that is slightly larger than the diameter of the woven tube--most likely the 7/16 or 3/8 inch opening. Pull the tube through the opening.
Continue pulling the woven tube through the openings on the draw plate, working down three or four levels to the 1/4 inch opening.
Pull the tube through this opening a few times until it passes through smoothly.
Cut the scrap wire and remove it from the tube.
Cut an 8-inch length of 20 gauge half-hard sterling silver wire. Insert the wire into the tubing.
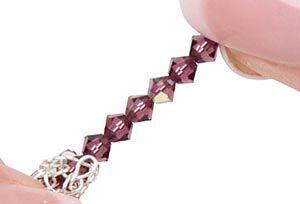
Begin stringing the 4mm crystals onto the 20 gauge wire and into the tubing.
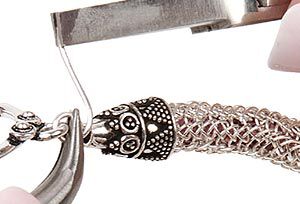
Once you have filled the tubing with crystals, place a beading cone onto the wire. Secure the cone over the woven tube so all ends are tucked in neatly.
Finish one end of the 20 gauge sterling silver wire with a wrapped loop, incorporating one half of the clasp before finishing the wrap.
Place a bead cone onto the other end of the wire then finish with a wrapped loop to complete the woven tube section.
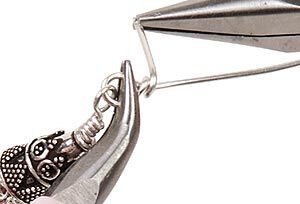
Cut a 6-inch length of 20 gauge sterling silver wire. Begin a wrapped loop on one end then incorporate the loop made in Step 13 before finishing the wrap.

Thread on a pattern of crystals and Hill Tribes silver beads. Finish the end with a wrapped loop, incorporating the second half of the clasp before finishing the wrap.
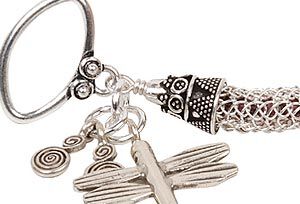
Using jumprings, add Hill Tribes silver charms to the loop on one end of the bracelet to finish.
Shop for Your Materials Here:


Have a question regarding this design idea? Email Customer Service.
Copyright Permissions
The pieces featured in the Gallery of Designs are copyrighted designs and are provided for inspiration only. We encourage you to substitute different colors, products and techniques to make the design your own.
All works of authorship (articles, videos, tutorials and other creative works) are from the Fire Mountain Gems and Beads® Collection, and permission to copy is granted for non-commercial educational purposes only. All other reproduction requires written permission. For more information, please email copyrightpermission@firemtn.com.