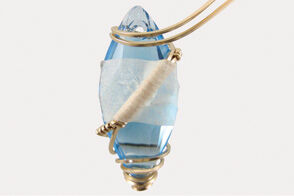
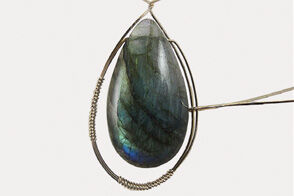
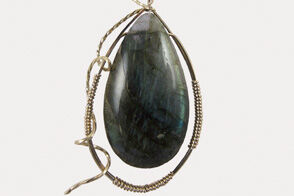
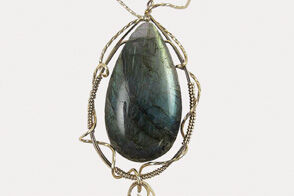
Necklace with Labradorite Gemstone Focal, Crystal Passions® Drop

Design Idea D701
-- Designer --
Sandra Lupo, Metalsmith, Jewelry Designer and Instructor
To learn more about Sandra Lupo, read her jewelry artist success story here
: : : Materials : : :
Click here to view a full list of materials used in this design.
Please take the creative opportunity to select the products of your choice for this design, offered here at Fire Mountain Gems and Beads. Some materials may not be available or listed.
- Focal, labradorite (natural), 40x22mm puffed teardrop with flat back, B- grade, Mohs hardness 6 to 6-1/2
- Necklace, sterling silver and nylon-coated stainless steel, peridot green, 48-50 strand, 18 inches with lobster claw clasp
- Wire, 12Kt gold-filled, dead-soft, half-round, 21 gauge
- Wire, 12Kt gold-filled, dead-soft, square, 22 gauge
- Wire, 12Kt gold-filled, dead-soft, twisted square, 20 gauge
Instructions
Double your creativity wire-wrapping two stones in gold-filled wire. The key to good beginnings in wire-wrapping is a pair of banding pliers, specifically designed to form a precision fit for the very first wire wrap.
Half-round wire is placed in the tool to form double right angles. The right angles are what anchor and secure the wire onto two or more square wires. From this starting point and in this design, square wires become a fanciful frame for both a stunning stone and a crystal shape.
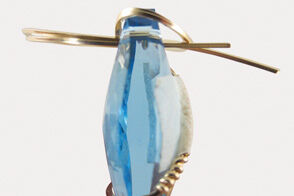
Wire-Wrapping the Crystal Marquise (30x14mm)
Using flush-cutters, cut two 10-inch pieces of 22-gauge square dead-soft wire. Use a pair of nylon jaw pliers to straighten the wire, if necessary. Lay both wires parallel on your work surface.
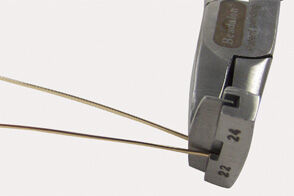
Cut one 5-inch length of 21-gauge half-round dead-soft wire. Use nylon jaw pliers to straighten, if necessary. Place the center of this half-round wire, flat side up, into the jaws of the 22/24 gauge banding pliers at the 22-gauge side of the plunger. Squeeze the handles so the plunger is pressed into the cavity, forming a double right-angled depression in the half-round wire.
Tips:
- Correlate the gauge of the wire to be wrapped (not the wire doing the wrapping) to the placement in the plunger. The right angles created will be sized accordingly.
- Make certain that the half-round wire is placed into the cavity of the plunger with the rounded wire side facing down and the flat wire side facing up

Fit the double right-angled wire onto the center of the two parallel lengths of square wire from Step 1. Secure the half-round wire by wrapping one side up around the two square wire lengths. Secure the other side of the half-round wire by wrapping down around the same two square wire lengths. Use curved-nose pliers to gently flatten the initial wraps onto the square wires.
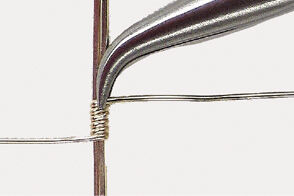
Continue to wrap the half-round wire, working side to side of the newly created wraps to total 14 consistent wraps, using the curved-nose pliers every few wraps to create tight, vertical wraps.
Tip: This number of wraps will cover the front face of the size marquise pendant used in this design. If you change this element, adjust the number of wraps accordingly.
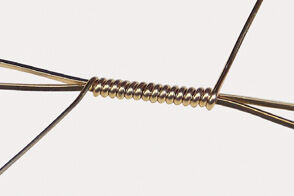
Separate the two square wires on each end of the half-round wraps just made.
Make three wraps on one end of the half-round wire around the lower square wire. Make three wraps on the other end of the half-round wire around the upper square wire. Trim the half-round wire ends and tuck in ends with the bent-nose pliers.
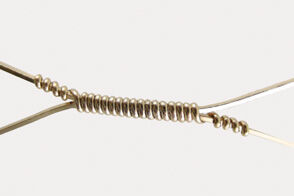
Use a needle file to smooth the wire ends, if necessary. Follow with polishing papers.
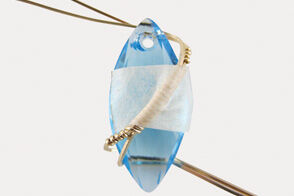
Place the center-wrapped portion of the square wires onto the face of the marquise pendant and secure the placement with a small rectangular piece of masking tape. Wrap the top two square wires toward the back of the top point of the marquise stone to help secure the placement. Wrap the bottom two square wires toward the back of the bottom point of the marquise stone to help secure the placement.
Continue to wrap the bottom 2 square wires simultaneously toward the bottom point of the marquise, creating a decreasing spiral of double wires. Use fingers and a pair of half-flat/half-round forming pliers to decrease the spiral.
Shape the decreasing spiral of wires to cover the marquise stone point. Trim the wires and tuck in the wire ends using the half-flat/half-round forming pliers.
Take the top square wires and pass them around the front of the marquise pendant then toward the back, curving the wire to clear the pendant hole.
With your fingers, gently ease the square wires through the pendant hole, allowing the wire to orbit the stone rather than pressing firmly against the stone’s sides.
Note: Since this pendant has a stringing hole that can be used to secure the pendant to the wire, it is not necessary to hug the stone tightly. If the stone was actually a cabochon you would want to be creating more of a wire bezel to ensure the stone was secure.
Make a wide pass of the two wires toward the back and cross under the first pass of wires done in Step 7. Gently pull the end wires simultaneously through the pendant hole, from back to front.

Gently pull the two wraps into two reduced circles around the top point of the marquise pendant. Control the tightening of the circles with your fingers.
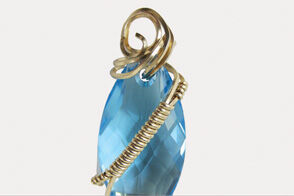
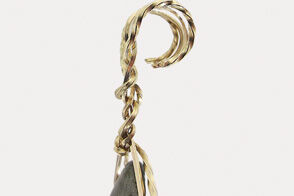
Lift the topmost of the two sets of wraps to create a horizontal bail that faces side to side (left to right). This is best done gently with fingers or a pair of flat-nose pliers. Determine how much wire you will need to continue the spirals inward to complete the bail loop. Trim and tuck in the end wire in a spiral fashion, ending the wires within the loop.
Set aside.
Wire-Wrapping the Labradorite Teardrop Pendant (40mm x 22mm)
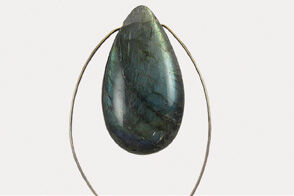
Cut 18 inches of square wire and thread through the side-drilled hole of the pendant, centering the wire.

Press the square wire down alongside the pendant’s right and left sides to form a frame. Gently snug up the wire against the side of the pendant then continue to bring the wire around the pendant forming a double-wire frame. Bring the wires together at the top of the pendant, center them above the pendant’s point and make a twist. These twists will be included in the bail later.
Set aside.
Tips:
- Avoid having the corners of the square wire showing as you create the frame
- Keep the square side of the wires similar and flat sides parallel
To facilitate wrapping the wire, use a small square of masking tape to hold the wires together on each side and at the bottom, taking care to keep wires faced flat and parallel.
Using flush-cutters, cut three 5-inch pieces of 21-gauge half-round dead-soft wire. Prepare the wire and create a double right-angled depression in the wire using the banding pliers, as you did in Step 2. Repeat to create three wires for wrapping.
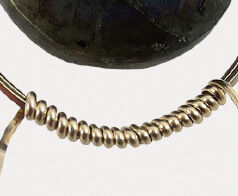
With one of the wires formed in Step 11, hug the bottom center of the frame, making certain the two frame wires are parallel and snug against each other.
Secure the wire by following Step 3, then wrap the wire about 20 times.
Trim the wires then tuck them in using curved-nose pliers. Continue wrapping the other wires formed in Step 11, making certain that the frame’s square wires are parallel to each other and the number of wraps created are the same.
Trim the wires then tuck them in using curved-nose pliers.

By hand, tightly twist the top square wires to complete three twists (figure 13a and 13b). Do not use pliers to twist since the twists should not be too tight.
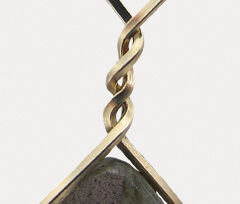
Optional: Embellishment for the Frame

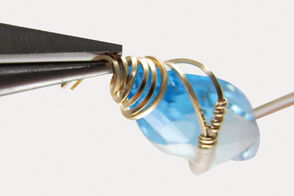
Cut a 10-inch length of 20-gauge twisted dead-soft wire. Use the banding pliers at the 22-gauge mark to make a double right-angled bend 2 inches from one end of the twisted wire.
Anchor the double right-angled twisted wire onto the frame just under the twisted section at the top, positioning the long end downward toward the side of the frame to loosely wind around the frame.
Continue to wind the twisted wire around the frame to the bottom of the pendant
Add the marquise pendant’s bail at the center bottom of the frame and continue to wrap upwards toward the top of the labradorite pendant.
Continue to wind the twisted wire upward on the other side of the frame towards the top. End by anchoring the wire around the top wires so the result is the straight square wires are on the inside and the twisted wires are on the outside.
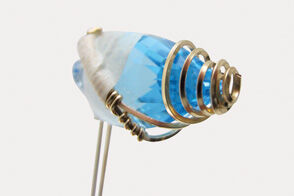
Straighten then trim the wires to equal the length of the shortest wire, which will be about 1-1/2 inches.
Forming the Bail
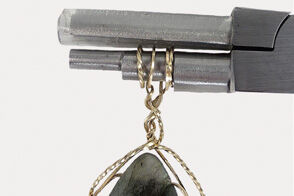
Using a pair of wire-wrapping pliers, grip the tips of all four lengths of wire with the center barrel (6mm). Turn all the wires to form a loop that will fit your cording or other 5mm or larger diameter neckwire or beaded strand.
Reposition the formed loop onto the 4mm barrel and turn to close the loop further. Trim any excess wire then tuck in the ends using a pair of curved-nose pliers.
Tip: The combination of 4 wires, both 20-gauge twisted and 22-gauge square, will be work-hardened by straightening the wires, aligning them and turning them with the wrapping pliers. Together they are strong enough to serve as a bail.
Shop for Your Materials Here:


Have a question regarding this design idea? Email Customer Service.
Copyright Permissions
The pieces featured in the Gallery of Designs are copyrighted designs and are provided for inspiration only. We encourage you to substitute different colors, products and techniques to make the design your own.
All works of authorship (articles, videos, tutorials and other creative works) are from the Fire Mountain Gems and Beads® Collection, and permission to copy is granted for non-commercial educational purposes only. All other reproduction requires written permission. For more information, please email copyrightpermission@firemtn.com.