Bracelet with Petrified Wood Freeform and Sterling Silver


Design Idea RJ3B
Forged Timber
-- Designer --
Patti, Jewelry Designer, Exclusively for Fire Mountain Gems and Beads®
To learn more about Patti Miller, read her jewelry artist success story here.
: : : Materials : : :
Click here to view a full list of materials used in this design.
Please take the creative opportunity to select the products of your choice for this design, offered here at Fire Mountain Gems and Beads. Some materials may not be available or listed.
- Adhesive, 5 Minute® Epoxy, 2-part epoxy, clear
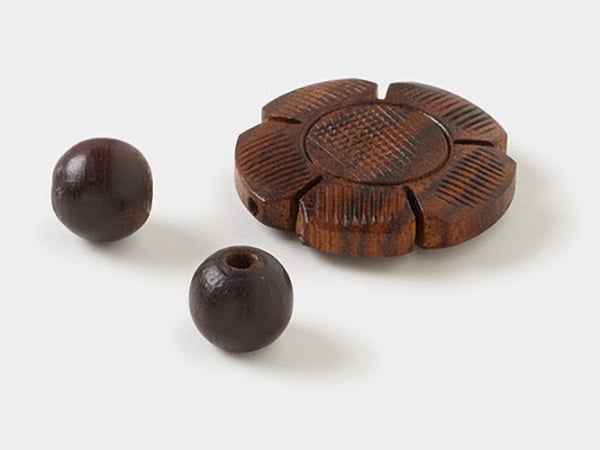
- Petrified wood, hand-cut flat freeform bead natural 20x15mm-30x26mm
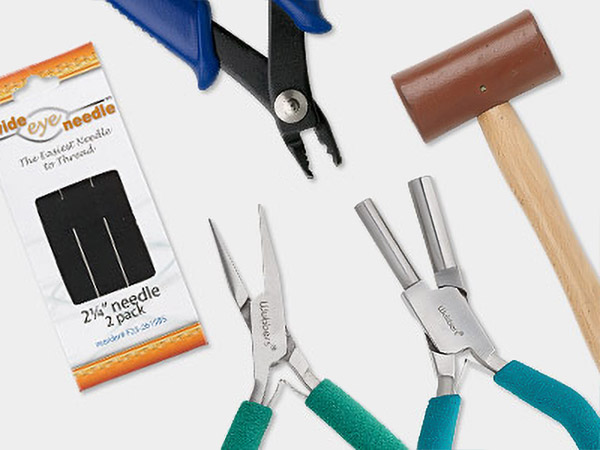
- Pliers, Wubbers® Designer Mandrel, medium bail-making, steel and rubber
- Pliers, Wubbers® Designer Mandrel, medium triangular mandrel, steel and rubber
- Rubber tool dip, liquid coating Tool Magic®, white
- Sanding swabs mixed colors
- Wire, copper, half-hard, square, 18 gauge
- Wire, sterling silver, dead-soft, 1x1mm square, 18 gauge
- Wire, sterling silver, dead-soft, half-round, 18 gauge
- Wire, sterling silver, dead-soft, twisted square, 18 gauge
Instructions
Bracelet Instructions
Dip the jaws of a pair of flat-nose pliers in Tool Magic® liquid coating and let them dry 24 hours.
After using a wire straightener to make the wire very straight, cut the following lengths of wire and tape:
18-gauge sterling silver square wire:
- Two 7-inch lengths
- Two 8-inch lengths
- One 2-1/2 inch length
- One 1-1/2 inch length
18-gauge sterling silver twisted square wire:
- Two 7-inch lengths
- One 12-inch length
18-gauge copper square wire:
- Four 8-inch lengths
18-gauge sterling silver half-round wire:
- Two 15-inch lengths
- Two 6-inch lengths
Painters tape:
- Eight 1/4 x 3/4 inch strips
Lay out the following wires in this order :
- One 8-inch square sterling silver wire
- One 7-inch square copper wire
- One 7-inch square twisted sterling silver wire
- One 7-inch square copper wire
- One 8-inch square sterling silver wire
Bring them snugly together on a flat plane so the ends of the 7-inch wires all meet evenly, and the ends of the 8-inch wires have equal amounts overlapping each end. Make sure the square wires are all facing upward and there are no gaps. If there are, straighten the wires and try again. Use flat nylon-jaw pliers as needed to straighten the wires.
Using painters tape, band the five wires snugly 1/2 inch from one end of the 7-inch wires. Repeat on the opposite end. Then repeat 1-1/4 inches from each band of tape. Snip any bits of the ends of the 7-inch wires so they are completely even. Do not snip the ends of the 8-inch wires.
Repeat Step 3 to create a second set of five tape-banded wires.
Starting 1/4 inch from the end of the 12-inch twisted sterling silver wire, use the small barrel of Wubbers® Designer Mandrel triangle pliers to make a zigzag pattern of triangular bends in the wire. Repeat down the wire until you’ve created 13 triangular bends, leaving a 1/4 inch tail. Cut off any excess wire. Use flat nylon-jaw pliers to straighten the wire so all the wire is on the same plane.
Lay the zigzagged wire along the top edge of one set of banded wires. Make sure the tail of the zigzagged wire is flat along the top edge of the banded wires, and make sure the tail meets the end of the tips of the 7-inch wires in the banded set.
Wrap the end of a 15-inch sterling silver half-round wire several times around the banded set of wires and the tail of the zigzag wire to secure them together, leaving about 5mm space of bare wire at the end of the wrap.
Bring the half-round wire behind the banded wires at an angle and wrap around the banded wires once just before the apex of the first point of the zig zag wire. Then wrap again once inside the apex of the point and around the banded wires, and again outside the point around the banded wires. Remove the painter’s tape as you come to it before wrapping.
Bring the half-round wire behind the banded wires and repeat as you did the last wrap. Continue until you’ve wrapped five points of twisted square wire.
Tip: Make all wraps with the half-round wire very snug, as these hold the bracelet together and give it structure. Flatten them as you go with flat-nose pliers dipped in Tool Magic.
Tip: The domed side of the wire must always be on the outside as you wrap.
Bring the tail of the half-round wire out on the zigzag side. Make a 90-degree bend in the wire about 6mm from the edge of the banded wires.
Thread on a petrified wood flat freeform bead.
With the bead snugly against the bend in the wire, bring the tail of the half-round wire back to the banded wire, skipping three points of the zigzag underneath the bead, and wrap the half-round wire around the banded wire to continue attaching the zigzag wire.
When you come to the last point, wrap it as you did the others, but finish with three wraps. Then cut off the excess wire. Securely tuck in the ends of the half-round wire on the back side of the band.
Repeat Step 7 with the second set of banded wires to form the opposite side of the bracelet.
Curve the bracelet into a cuff shape using your fingers.
Use a 6-inch length of half-round wire to wrap around one side of the bare banded wire at the tail once, then up around the whole cuff. Wrap the cuff three to four times to take up the bare space, then wrap it once around one side of the banded wire to finish it. Cut off any excess wire and tuck it in securely.
Repeat for the opposite end of the bracelet.
Mix a drop of Devcon 5 Minute® Epoxy 2-part adhesive and, using a toothpick, apply a tiny drop to each of the ends of the half-round wire.
At each of the four wire tails, make a simple loop facing inward. Cut off any excess wire.
Use the smaller barrel of Wubbers® Designer Mandrel round pliers to form a half circle in the center of the 1-1/2 inch sterling silver square wire.
About a quarter of the way up the barrel of round-nose pliers, make a simple loop at each end of the half circle you just made, turning the wire in the opposite direction to make the eye portion of the hook-and-eye clasp.
Attach the loops to one end of the bracelet.
Make a 180-degree bend in the 2-1/2 inch sterling silver square wire. Using the large barrel of Wubbers Designer Mandrel bail-making pliers, make a hook 1/4 inch from the tip of the bend. Use chain-nose pliers to kick the tip of the hook outward. Press the hook inward to lessen the gap between the top hook and its base. Flair the tails of the hooks with your fingers so they will be in line with the loops at the end of the bracelet. Make a simple loop on either side of the hook, facing upward toward the hook. Cut off any excess wire.
Attach the hook to the loops at the free end of the bracelet, with the hooks facing outward.
Shop for Your Materials Here:


Copyright Permissions
The pieces featured in the Gallery of Designs are copyrighted designs and are provided for inspiration only. We encourage you to substitute different colors, products and techniques to make the design your own.
All works of authorship (articles, videos, tutorials and other creative works) are from the Fire Mountain Gems and Beads® Collection, and permission to copy is granted for non-commercial educational purposes only. All other reproduction requires written permission. For more information, please email copyrightpermission@firemtn.com.