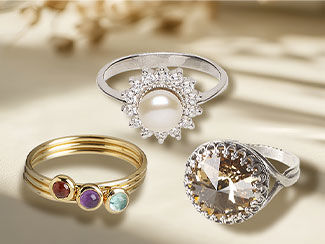
Pendant made of Art Clay®
As seen on the back cover of the 2011-2012 Jewelry-Maker's Comprehensive Catalog
-- Designer --
Tammy Honaman, Author, Jewelry-Making Expert and Educator, Exclusively for Fire Mountain Gems and Beads®
To learn more about Tammy Honaman, read her jewelry artist success story here
- Art Clay, Silver 650, low fire
- Art Clay Silver 650 paste, low fire
- Bar finding, fine silver, 11.5x5.5x2mm curved
- Cool Tools Patina Gel, stabilized liver of sulfur
- Liver of sulfur, antiquing solution
- Fiber blanket, 5x6x1-inch
- Fine steel wire brush
- Tool, slats, acrylic
- Roller, clear acrylic
- Tool set, beading awl
- Rotary tumbler shot mix
- Lortone Model 3A rotary rock and jewelry tumbler
- Polishing paper, green, 400 grit, 5x5 inch square
- Polishing paper, grey, 600 grit, 5x5 inch square
- Polishing paper, blue, 1,200 grit, 5x5 inch square
- Polishing paper, pink, 4,000 grit, 5x5 inch square
- Polishing paper, mint, 6,000 grit, 5x5 inch square
- Polishing paper, light green, 8,000 grit, 5x5 inch square
- Tool, sanding swab, 2-1/4 inch 9-piece set, 1500-12000 grit
- Tool, micro-mesh sanding pads, 2x2-inch square, 1500-12000 grit
- Stamp, Lisa Pavelka Signature Series, silicone, grey, 4-1/4x5-1/2 inch extra-deep finely detailed square with romance texture
- Stamp, Lisa Pavelka Signature Series, silicone, grey, 4-3/4x5-1/2 inch finely detailed square with cultural detail
- Stamp, Lisa Pavelka Signature Series, silicone, grey, 5-1/2 x 4-1/4-inch finely detailed square with steampunk design
- Texture plates, plastic, clear, 5x4 inch
- Non-stick art sheet, Teflon, white, 6x6 inch
- Tool set, Klay Kutter, tin, 20, 30 and 40mm round
- Klay Kutter, Kemper, brass, 9mm, 11mm, 13mm, 15mm and 19mm circle with built-in pop-out tool
- Stamps and molds
-
Chain, sterling silver, 3mm domed omega, 16 inches with lobster claw clasp
-
Mold, Deep Flex, plastic, semitransparent clear, 14mm-31x18mm assorted round and teardrop
-
Paragon kiln
-
Circle drawing template
-
Olive oil
-
Water
-
Dish soap
-
Lint-free cloth
-
Paintbrush
-
Bowl filled with cool water
-
Bowl filled with warm water
-
Bowl filled with water and baking soda
-
Dust mask
-
Lint free cloth
-
Gloves
A variation of this pendant was featured on the cover of the Jewelry Maker's Comprehensive Catalog 2011-2012.
STEP 1
 |
|
Lightly oil your hands, roller, work surface and textures of your choice. Open the package of clay and remove about 10 grams. Compress it between your fingers a few times then place it between blue slats. Using an acrylic roller or brayer, roll over the clay 1-2 times. Flip the clay over and roll again. Repeat until the clay is level with the guide and has a nice round shape. |
 |
|
Transfer the clay to the oiled texture. Place the yellow slats on either side of the clay yet on top of the texture; roll the clay out. |
STEP 2
 |
|
Carefully transfer the clay, textured-side up, onto a Teflon worksheet. Place a circle in the circle template that is larger than the largest circle clay cutter on top of the clay. Using the tip of a beading awl or fine knitting needle, cut out the circle. Put the Teflon sheet aside so the clay circle can dry flat. |
STEP 3
 |
|
Repeat Step 1. Carefully transfer the textured clay, textured-side up, onto a Teflon worksheet. Use the largest circle clay cutter to cut out a second circle of clay. |
STEP 4
 |
|
Carefully transfer the circle to the mold either textured-side down on the outside of the mold for a more shallow curve or textured-side up in the mold for a more significant curve. Gently press into place. Allow to dry. |
STEP 5
 |
|
Repeat Steps 1, 3 and 4 using the different sizes of circle cutters as well as one Kemper circle cutter to create circles which get successively smaller. |
 |
|
Place the littlest circle into the smallest circle mold so you get the greatest curve.
Allow all of the circles to dry completely. |
STEP 6
 |
|
Using a progression of the polishing papers, refine the surfaces of the circles until they are round and smooth on the front and the back sides. |
STEP 7
 |
|
Assemble the circles to get a sense of placement. If needed, make a mark on the large circle where the next circle will be placed. Using a paintbrush, apply a dab of metal-clay paste to the large circle. |
 |
|
Place the curved circle into place. Remove and then apply a dab of paste on the curved circle where paste was left from the large flat circle. This will ensure there is enough paste between the two layers, because when the paste dries it shrinks. Using a paintbrush, apply a small amount of water to the area to ensure there is a bond between the two layers. |
 |
|
Repeat to connect all the circles together. Once dry, determine the center of the top of the pendant and draw lines on the back side of the large circle. Using the paintbrush, apply water to this area. Press two small (3-4mm) amounts of clay at the pencil marks, one above the other, and space them to fit the fine-silver bar finding. |
STEP 8
 |
|
Use the tip of a beading awl, the paintbrush or other suitable tool to clean up the clay so the join between the clay and the finding is secure and the back of the circle is neat.
Set this aside and let it dry. Refine using the sanding pads and polishing papers as needed.
While wearing a protective mask, break off small pieces of fiber blanket and place them into the areas between the circles so they maintain their shape in firing. Place the pendant face down into a larger piece of the fiber blanket and place in kiln.
Ramp the kiln at full speed to 1472-degrees F; hold for 30 minutes then allow the kiln to cool to room temperature.
Assess the pendant. If needed, work carefully using flat-nose pliers to adjust any of the layers which may have become misshapen in firing.
Use a steel-wire brush to burnish the surface of the pendant. |
 |
|
If desired....
Tumble the pendant in the tumbler along with stainless steel shot and burnishing solution.
Patina the pendant using Liver of Sulfur™ or patina gel. |
The pieces featured in the Gallery of Designs are copyrighted designs and are provided for inspiration only. We
encourage you to substitute different colors, products and techniques to make the design your own.
Have a question regarding this design idea? Email Customer Service.