Shipping Alert for Middle East
☰
menu
Help
800-355-2137
Chat with Us
Live Chat
All-Assortable Pricing
Shipping Information
Returns
More Customer Service ...
Create / Login
Account
account
Login to Your Account
Login
Create Your Account
Easy as E-Mail & Password!
Checkout faster.
View previous orders.
Easy re-ordering.
Keep track of favorites.
Never lose your shopping cart!
0
cart
Gift Certificates
Wholesale Program
Free Catalog
My Favorites
Back
Beads
Beads by Type
Gemstone Beads
Crystal Beads
Seed Beads
Acrylic Beads
Bone and Horn Beads
Glass Beads
Metal Beads
Pearls
Porcelain Beads
Shell Beads
Wood and Nut Beads
Add a Bead System
Beads by Brand
Celestial Crystal®
Crystal Passions®
Dyna-Mites™
Ming Tree™
Miyuki
Preciosa Crystal
Preciosa Seed Beads
Swarovski® Crystal
TierraCast®
TOHO BEADS®
Jewelry Supplies
Findings
Earring Findings
Clasps
Bails
Crimp Beads
Crimp Bead Covers
Head Pins and Eye Pins
Jump Rings
Mountings and Settings
Bead Cages and Frames
Bead Caps
Links
Almost Instant Jewelry®
Supplies by Type
Gemstones
Cabochons
Faceted Gems
Chains
Charms
Components
Glues and Adhesives
Memory Wire
Metal Clay
Pendants
Polymer Clay
Rhinestones
Stringing Material
Beading Wire
Accu-Flex® Beading Wire
Beadalon®
Acculon
Cord
Elastic Cord
Cotton Cord
Leather Cord
Thread
FireLine®
Silk Thread
Nylon Thread
Wire-Wrapping Wire
Sterling Silver Wire
Sterling Silver-Filled Wire
Gold-Filled Wire
Copper Wire
Aluminum Wire
Wire-Wrapping Brands
ParaWire
Zebra Wire
Artistic Wire
Beadalon®
Wrapit® Wire
Themes
Seasonal
Top 10 Gifts
St. Patrick's Day
Easter
Mother's Day
4th of July
Weddings
Halloween
Day of the Dead
Christmas
Hanukkah
Valentine's Day
Supplies by Medium
Bead Mosaics
Cold Connections
Kumihimo
Leatherworking
Enameling
Glassworking
Knotting and Macrame
Special Selections
Best Sellers
Awareness and Charities
Bulk Buys
Assortments
Birthstones
Kits
Recently Discontinued
Rosary Supplies
Western Collection
Décor
Glass Bottles
Beading Frames
Wind Chime Components
Suncatcher Components
Home Décor and Gifts
Tools
Tools by Type
Pliers
Wire Jigs
Sets and Kits
Needles
Stamping
Bead Boards
Cleaners and Polishers
Hammers
Looms
Rock Tumbler and Accessories
Displays
Racks
Earring Cards
Display Cases
Trays and Inserts
Multipurpose Displays
Displays by Jewelry Type
Bracelet and Watch Displays
Earring Displays
Necklace and Chain Displays
Packaging
Presentation Boxes
Display Cards
Pouches
Gift Bags
Tags and Labels
Storage Bags
Organizers
Storage
Carrying Cases
Bottles and Vials
New
New Products
March 2026
February 2026
January 2026
December 2025
November 2025
October 2025
Jewelry
Jewelry and Gifts
Earrings
Bracelets
Necklaces
Pendants
Rings
Gifts
Jewelry Sets
Shop by Jewelry Collection
Everyday Jewelry
Impact Bracelets
Create Compliments® Jewelry
BohoSTAR Bracelets
Impulse Jewelry
One of a Kind Jewelry
Learn
Jewelry Maker's Library
Visit the Jewelry Maker's Library
Jewelry Medium
Bead Mosaic
Bead Stringing
Chainmaille
Fiber & Textiles
Metalworking
Polymer Clay
Resin & Mixed Media
Seed Beading
Wireworking
Design Style
Décor
Seasonal & Holiday
Trends in Jewelry Making
Wedding Jewelry & Décor
Inspiration
Gallery of Designs
Jewelry-Making Contests
Jewelry Artists Success Stories
Reference
Ask the Experts
Books and DVDs
Business & Marketing
Essential Resources
Charts
EncycloBEADia®
Gemstone Meanings and Properties
Getting Started In Jewelry Making
Sale
Sale
Help
Search Results for e90c
Refine Your Results
Categories
Essential Resources (1)
How-Tos (1)
Tools & Supplies (1)
Tags
Jewelry Type: Brooch (17)
Jewelry Type: Bracelet (908)
Jewelry Type: Crown (13)
Jewelry Type: Earrings (2090)
Jewelry Type: Hair Pin (14)
Jewelry Type: Jewelry Set (1009)
Jewelry Type: Necklace (1742)
Jewelry Type: Ring (67)
Type: Non-Jewelry (107)
Color: Beige / Cream (85)
Color: Black (298)
Color: Blue (833)
Color: Brown and Tan (365)
Color: Clear (164)
Color: Copper (204)
Color: Gold (719)
Color: Green (591)
Color: Grey (82)
Color: Mixed (420)
Color: Multi-Colored (167)
Color: Orange and Peach (163)
Color: Pink (304)
Color: Purple and Lavender (302)
Color: Red (461)
Color: Silver (860)
Color: White (365)
Color: Yellow (105)
Jewelry Material: Clay (207)
Jewelry Material: Crystal & Glass (1750)
Jewelry Material: Gemstone (1247)
Jewelry Material: Metal (2024)
Jewelry Material: Metal Clay (10)
Jewelry Material: Organic (289)
Jewelry Material: Pearl (163)
Jewelry Material: Plastic & Acrylic (78)
Jewelry Material: Polymer Clay (28)
Jewelry Material: Pourable Resin (36)
Jewelry Material: Seed Bead (744)
Jewelry Material: Wire (47)
You Searched for:
e90c
Products
(0)
Resource
(1)
Results Per Page
24
|
48
|
96
Refine
Sort By
Name A-Z
Name Z-A
Newest First
Oldest First
Sort
Name A-Z
Name Z-A
Newest First
Oldest First
Page
1
of
1
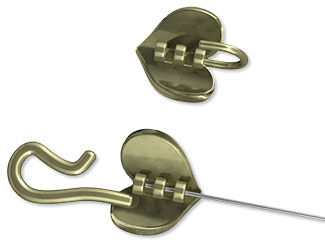
How to Use the Hidden Crimp End Clasp
Hidden crimp end clasps give a finished, professional look to any strung bead design. Learn how to incorporate them into your jewelry creations with these animated instructions.
Results Per Page
24
|
48
|
96
Refine
Sort By
Name A-Z
Name Z-A
Newest First
Oldest First
Sort
Name A-Z
Name Z-A
Newest First
Oldest First
1
Resource Found
Page
1
of
1
×