Artistic Wire® Hook and Eye Clasp Jig

Courtesy of Beadalon®
E94V
STEP 1
Bend Wire in Half Bend a 5'' (12.7cm) piece of wire (20-24 gauge) in half, push the fold with your fingers, make sure to leave space between the wires.
STEP 2
Insert a Wire through Fold in Bent Wire Insert an additional piece of wire (20-24 gauge) 2'' (5cm) in length through the fold of the wire, then insert the folded wire between the second and third pegs on lower group of pegs of the findings form.
STEP 3
Bend Wire Around Third Peg Bend the double wire around the third peg (counterclockwise) then up and around the top peg (clockwise). Make sure both wires stay side-by-side.
STEP 4
Bend Wire Aroung First Peg Continue bending the double wire down onto the first peg (counterclockwise).
STEP 5
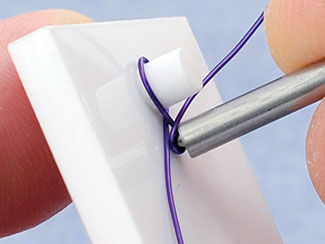
Flaten Double Wire Down Use the pusher-tube to flatten the double wire down onto the surface of the findings form. To make two open circles, cut the wire at the point where they meet with the others. For a more secure hook leave the wires long and once the Hook is attached wrap the two ends back around the two wires just above the loop.
STEP 6
Place Wire Across Finding Form Begin the eye with a piece of wire (20-24 gauge) 4'' in length, place it across the top portion of the findings form as shown.
STEP 7
Bend Right Side of Wire Around Form Bend the right portion of the wire (counterclockwise) around the top form.
STEP 8
Wrap wire around Bottom Peg Using the same piece of wire from Step 7. Wrap the wire clockwise one full revolution around the bottom peg.
STEP 9
Flatten Wire with Pusher-Tube Use the pusher-tube to flatten the wire onto the surface of the findings form.
STEP 10
Grasp with Pliers and Wrap Wire Around Intersection Grasp the large loop with chain-nose pliers and wrap the original left wire around the intersection of the two circles. Make almost a full revolution.
STEP 11
Grasp with Pliers and Wrap Wire Around Intersection Grasp the small loop with chain-nose pliers and wrap the original right wire, in the same direction as the other wire. Repeat Steps 10 and 11 until the connection is secure. Make sure to tuck in the ends of the wire with the chain-nose pliers.

Have a question regarding this project? Email Customer Service.

Copyright Permissions

Permission to copy this instruction sheet is granted for non-commercial educational purposes only. All other reproduction requires written permission. Please email copyrightpermission@firemtn.com for more information.