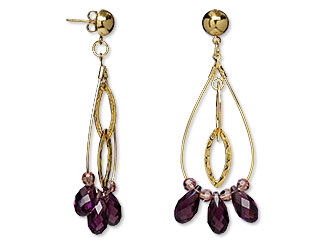
Steampunk Factory

Presented by Lisa Pavelka, Award-Winning Artist, Author and Instructor,
Exclusively for Fire Mountain Gems and Beads®
G84V

Make steampunk jewelry components out of polymer clay as you follow along with Lisa Pavelka in this jewelry-making project that includes how to make your cogs, keys and more look ancient, old or rusted with the help of Swllegant!™ metal coatings and patinas.

Metalized Steampunk Components

STEP 1
Condition and roll black Fimo® polymer clay through the thinnest setting on a pasta machine then place on a thin ceramic tile.

Tips:
  • Use the approximately 5th or 6th largest setting on the pasta machine
  • For those pasta machines with larger settings, try using approximately the 7th largest setting
STEP 2
Apply the craft foil onto the clay's surface with the color side facing up.

Tip: Avoid cutting the foil; having Mylar to pull from makes the foil stick easier.

Using a scrap of paper and the padded part of your fingers, burnish the foil onto the clay by rubbing the paper over the foil for 30 - 60 seconds.

Quickly rip the Mylar from the clay, leaving the foil behind, paying close attention to which direction you are ripping from.

Tips:
  • Avoid pulling the Mylar slowly from clay; ripping quickly is much more effective
  • If some of the clay surface is not foiled, apply the foil again to the area that did not take previously then burnish again and rip from a different direction; it does not have to be the opposite direction however.
STEP 3
Holding a clay blade at a 45-degree angle, slide it back and forth underneath the clay to remove it from the ceramic tile.

Tip: Hold down the clay blade with a non-dominant hand while pivoting with the dominant hand.
STEP 4
Trim a small piece of foiled clay then align it, face down, over the desired stamp.

Tip: Avoid using a release agent which could prevent the clay from sticking in the stamp.

Add a small piece of scrap clay onto the foiled clay then firmly and evenly press into the stamp.

Hold a clay blade down over the entire stamp then pivot with your dominant hand to shave off the top, leaving much of the clay embedded in the stamp. Bake for approximately 45 to 60 minutes before letting cool and removing the clay from the stamp.

Tips:
  • Use a medium clay blade that is neither too flexible or too rigid
  • Bend the stamp in the direction that the piece is shaped, then lift the piece out using tweezers
  • Bend the stamp in multiple directions when removing more circular shapes
  • Use broken components to embellish in corners or edges where unbroken ones won't fit
  • Sometimes the result will provide you with negatives of the original which can be used as embellishments in later projects

Rusted Components

STEP 1
Place a piece of prebaked clay onto a ceramic tile then apply one layer of Swellegant!™ iron using a paint brush. Bake a second time. After the clay has cooled, repeat, adding a second layer then remove the clay from the stamp.

Tips:
  • Using a heat gun is an alternative to baking
  • Let the stamp cool before removing the clay
  • Bake the rubber stamp for quick-drying
STEP 2
When the clay has cooled, soak the clay with Tiffany Green Rust patina by dipping the paintbrush into the patina then dab the patina onto the clay, letting the patina soak into the clay. Bake.

Repeat adding 3 - 4 layers of patina in between baking sections.

Creating Embellishments and Textures

STEP 1
Select two different colors of unbaked clay and a rubber stamp then pour a very small amount of mica powder into a cap. Dab a finger into the mica powder then lightly dust the surface of the texture in the rubber stamp.

Tip: To create a more dramatic effect, select black and white as the two colors.
STEP 2
Place the clay over the textured rubber stamp then lightly burnish it using a parchment paper and your fingers, creating a surface impression.

Remove the clay from the stamp to inspect the results then wipe the mica powder from the stamp.

Tips:
  • Use a roller to create a more embossed effect
  • Repeat from Step 1 if the desired effect isn't achieved
  • Use a baby wipe or wet towel to remove any mica powder from tools, stamps and fingers
STEP 3
Apply ink to the rubber stamp by lightly tapping the ink stamp onto the textured stamp then place the same mica-covered clay from Step 2 face down over the rubber stamp to create a mirrored or shadowed effect.

Remove the clay from the stamp to inspect the results.

Optional:

STEP 1
Condition a piece of unbaked clay then roll it through a thin setting on a pasta machine. Place the clay onto a parchment paper, apply mica powder to it then stamp to emboss. Apply a very small amount of Lisa Pavelka's Poly Bonder™ glue to the baked clay from a previous project, place the unbaked clay over the glue then lightly burnish to allow the glue to evenly grab hold of the clay. Remove the parchment paper.
STEP 2
Cut the white lettered clay roughly in the same shape of the tin but slightly smaller to create a black border effect.

Tip: Hold the white lettered clay down with a circle cutter and tear away at the outside edge of the clay with a hobby knife, creating a torn paper effect.
STEP 3
Apply 1 or 2 dabs of glue onto the underside of a desired finding then lightly place it onto the clay. Continue adding as many findings as desired.

Gently press the findings into the clay using a finger or small tile then glue a foiled border to the rim of the tin using poly-bonder. Bake according to manufacturer's instructions.

Note: For more information about ''Applying Foils to Rounded Polyclay'', watch Lisa Pavelka's Fire Mountain Fix how-to video.

Have a question regarding this project? Email Customer Service.

Copyright Permissions

Permission to copy this instruction sheet is granted for non-commercial educational purposes only. All other reproduction requires written permission. Please email copyrightpermission@firemtn.com for more information.