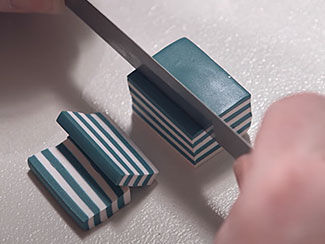
How to Create a Zipper Cane Using Polymer Clay

Presented by Rose, Jewelry Designer, Exclusively for Fire Mountain Gems and BeadsĀ®
H11R

Rose Wingenbach, in-house jewelry designer, explains how to make a zipper cane, a polymer clay cane that may look complex, but is actually simple--especially with step-by-step instructions from this tutorial.
STEP 1
Condition black, white, green and salmon clay by running them through a polymer clay roller until soft and pliable.

Run a piece of black clay through the thinnest setting of the clay machine.

Run the salmon colored clay through the clay roller (approximately twice the thickness of the black) then run the remaining colored clays through the clay machine, separately, on the thickest setting.

Tip: The green and white stripes can be rolled on any setting depending on the desired thickness of the stipes.
STEP 2
Create a layered pattern by placing the white sheet of clay on your working surface then place the green sheet over it. Trim the edges of the clay even. Compress the sheets together then run the stack through the clay machine on the thickest setting. Slice the sheets in half then stack the two pieces.

Cut the clay in half then stack the halves so the colors alternate. Use your fingers to smooth the clay from one end to the other, eliminating air bubbles.

Repeat to stack a total of four times, making sure the colors alternate, creating a block of stripes.
STEP 3
Using a clay blade, cut the piece of black clay in half then sandwich the salmon clay between the pieces of the black clay.
STEP 4
Carefully glide the clay blade underneath the sandwiched clay to remove from the work surface then run through the clay machine on a thick setting.

Tip: If the setting is too thick, run the sandwiched clay through once more on a slightly thinner setting.

Cut the sandwich in half long-ways then set the halves aside for later use.
STEP 5
Cut the block of stripes into even slices, approximately 1/4 inch thick. Run each slice through the clay machine, making sure the stripes are going in vertically to prevent distortion.

Note: Running the stripes through vertically will cause distortion.
STEP 6
Place each striped slice over an area of the sandwiched clay, making sure the stripes alternate. Place the other half of the sandwiched clay on top of the stripes then gently roll the layers together using a clay roller. Slice the finished clay in half to reveal the zipper cane.

Have a question regarding this project? Email Customer Service.

Copyright Permissions

Permission to copy this instruction sheet is granted for non-commercial educational purposes only. All other reproduction requires written permission. Please email copyrightpermission@firemtn.com for more information.