Making Beads with the Paper Bead Roller

Paper Bead Roller invented by Vicki Dehne, Instructions Adapted from Papercrafts Around the World, by Phyllis and Noel Fiarotta (Sterling Publishing Co., Inc., New York)
Presented by Tammy Honaman, Author, Jewelry-Making Expert and Educator, Exclusively for Fire Mountain Gems and Beads®
Instructions
Step 1
Trim paper according to the type of bead you wish to create. (Refer to the sample panel of bead types below.)
Step 2
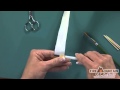
Slide the wide end of the cut paper into the slotted end of the roller.
Step 3
Twist the roller, maintaining tension for the first two or three turns. Loosen the tension and adjust the paper to achieve the desired look. Continue to roll the paper until you are about 2 or 3 inches from the end.
Step 4
While holding the paper bead roller in your non-dominant hand, use the paintbrush in your dominant hand to apply a thin layer of Mod Podge® glue sealer along the underside of the remaining two or three inches of paper.
Step 5

Roll the remaining paper until the entire strip of paper is wound around the roller and the bead is formed. Using the paintbrush, smooth any glue that has seeped out; apply a final layer of glue if you like.
Step 6
Slide your bead off the roller. Using a toothpick, clean out the glue that may have seeped into the hole of the bead, so you create a clean edge. Place onto a non-stick surface to air dry.
Tip: Use Mod Podge sealer on your finished beads to create a durable and strong bead.
Bead Samples
Shop for Your Materials Here:

Copyright Permissions
All works of authorship (articles, videos, tutorials and other creative works) are from the Fire Mountain Gems and Beads® Collection, and permission to copy is granted for non-commercial educational purposes only. All other reproduction requires written permission. For more information, please email copyrightpermission@firemtn.com.