The Talk About Pliers

The Deal on Steel
Even if you're familiar with using jewelry-making pliers, these often associated terms may not be familiar to you: hardened steel, forged steel, tempered tool steel and carbon-hardened steel. In general, these terms relate to the treatment and forming of the steel that was used to make the pliers. Steel used in tool making is hardened by annealing, cooling and then tempering. Annealing is the process of heating the metal to alter the molecular structure, eliminating any stress, making it more ductile or able to be manipulated. Cooling is usually done slowly where steel is concerned, and tempering is done by applying heat at a lower temperature than annealing. This eliminates brittleness and achieves just the right amount of hardness for the tool's maximum performance. Fine quality tools made of corrosion-resistant stainless steel are subject to the same manufacturing processes to ensure strength.


Lap Joint, Box Joint, Rivet Joint or Screw Joint
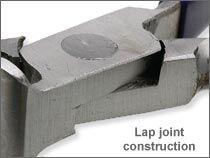
One major difference between economy and better-quality pliers lies in the joint construction. Scissors are constructed using a lap joint; the two layers are joined where they overlap at the pivot point. Pliers can also fit this type. Look for lap joint pliers that are reinforced with set screws that can be adjusted. Set screws will prevent the jaws of the pliers from closing past a certain distance, which is a benefit in protecting the material you are working with as well as preventing the jaws from hitting one another.
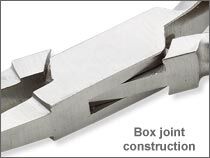
With box joint construction, the jaws are forged to sit into each other and then they are riveted in position. This feature keeps joints from loosening and offers more stability over time and usage. Some pliers are manufactured as box joint with lap joint screws. Consider longevity when choosing your very first or your fourth pair of pliers.
To Spring or Not to Spring
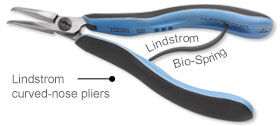
Springs are inserted into the handles of some pliers for better control of the tool. There may be one stainless steel leaf or two, a spring coil or an adjustable spring device that sits between the handles, allowing for a custom tension, as with Lindstrom's® Bio-Spring®. All spring mechanisms can be manually removed if the user prefers. Springs can move or break over time, but replacements are usually available for the better-quality pliers.
When to Buy Heavyweight Pliers
You'll understand the need for heavyweight pliers when you try to shape thick-gauge wire with lightweight pliers and have little success. Keep your application in mind and match the tool to the metal thickness for best results. Tool manufacturers may recommend a range of wire gauges for certain tools in their labeling. It's a good idea to seek out those numbers if they're not readily available.
How About Those Ergonomic Handles
Treating yourself to ergonomically designed pliers is not only a treat, it's also a necessity. With repetitive tasks there is a strong need for comfort in the handles. Whether hands are small or large, there is a pliers length that is right for every size. An average woman's hand might need a modestly long handle that ranges from 5" to 6". For larger hands, choose handles with longer lengths. Look to reduce the pressure of the handle-end when pressing into the palm. Travel size pliers are good in a pinch, but not for long-term use and not for repetitive work.
Cushioning is also a comfort factor. It's hard to decide which type is better, spongy soft handles or molded plastic grips. Since there is an industry-wide conscious effort to offer ergonomically designed pliers, we the end-users must keep ergonomics in our decision-making mix and seek out what is most comfortable for the task at hand.
In a classroom situation, look around at the various pliers sets instructors and students use. Ask to handle a pair. What does the owner like about these pliers? Do the pliers meet her/his comfort needs? Are they used often? How old are the pliers? This may very well help narrow the field.
As you progress as a jewelry maker, you may be handling these pliers every day. Step up to special wire-working tools such as forming pliers when you find your needs are no longer satisfied with the standard round-, chain- or flat-nose pliers. There is a great assortment, with a tool for every application, and they are a joy to work with.
Owning Tools--How to Take Care of Them and Make Them Your Own
There will be a breaking-in period, regardless of the quality of the pliers you own. Keep your pliers well maintained-- that is, keep them clean of debris on their jaws. Take down just the sharp edges with abrasive media such as a pen eraser, a rotary tool rubber wheel or with a series of polishing paper grits that will also remove scratches and nicks. This is called "dressing" your pliers.
When in a class, mark your pliers with your initials. Keep a permanent marker in your toolkit or use a rotary tool bur attachment or etching pen and you'll never have to re-mark. Place etched initials on the flat side of the tool near its joint. When you pack up to leave class, you and others can identify your tools with ease.


Keep a WD-40® pen handy and use as a light lubricant for the joints of your tools when they are not moving smoothly. If your tools will sit idle while you are on vacation, or you live in a humid climate, apply a heavier 3-in-1 type oil (found at your local hardware store) or a general-purpose lubricant, suitable for tools as recommended by the manufacturer, then store your tools in a plastic bag to help prevent rust from forming on the steel.
These are just a few ways to make your pliers purchase an informed decision and especially your own.


Have a question regarding this project? Email Customer Service.
Copyright Permissions
All works of authorship (articles, videos, tutorials and other creative works) are from the Fire Mountain Gems and Beads® Collection, and permission to copy is granted for non-commercial educational purposes only. All other reproduction requires written permission. For more information, please email copyrightpermission@firemtn.com.