Crimping with Screw-Tite Crimps™

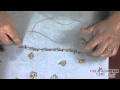
Instructions
Screw-Tite Crimps are a secure way to connect your beading wire to a finding, such as a clasp. What makes this style crimp different from other crimps is that it is secured in place with a set screw. And not only is this crimp secure it can also be removed at any time. This feature allows you to change your beaded design or clasp, should you decide you want a different look.
Step 1
Cut a piece of Accu-Flex® Professional Quality Beading Wire to the size needed for your beading project.
Step 2
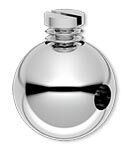
Using the Screw-Tite Crimps screwdriver, loosen the set screw in the side of the crimp until it can accommodate two passes of the wire. Do not loosen too much, as the set screw will fall out. Pass 1-inch of the Accu-Flex through the flat end of the crimp.
Step 3
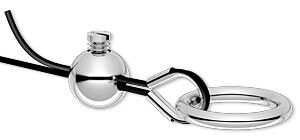
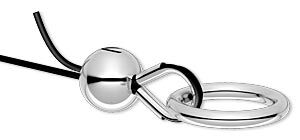
Pass the end of the Accu-Flex Professional Quality Beading Wire through one tube of the wire protector and back through the second tube. Slide the end of the clasp onto the Accu-Flex Professional Quality Beading Wire then down into the bend in the wire protector. Thread the Accu-Flex back through the crimp finding then pull the Accu-Flex so there is no slack in the wire between the crimp and the wire protector.
For complete instructions on using Accu-Guards™ wire protectors, visit our "Using Accu-Guard™ Wire Protectors" how-to video and illustrated instructions.
Step 4
Tighten the set screw with the Screw-Tite Crimps screwdriver, and give a tug on the Accu-Flex to ensure a secure fit.
Step 5
Using wire cutters, trim any excess wire. String beads onto the beading wire.
Step 6
Once the beads for your design are strung, repeat Steps 2 and 3 using the other half of the clasp. Pull the Accu-Flex to make sure there is no slack along the length of the design. Tighten the set screw to secure the clasp in place. Trim any excess wire.
Shop for Your Materials Here:


Have a question regarding this project? Email Customer Service.
Copyright Permissions
The pieces featured in the Gallery of Designs are copyrighted designs and are provided for inspiration only. We encourage you to substitute different colors, products and techniques to make the design your own.
All works of authorship (articles, videos, tutorials and other creative works) are from the Fire Mountain Gems and Beads® Collection, and permission to copy is granted for non-commercial educational purposes only. All other reproduction requires written permission. For more information, please email copyrightpermission@firemtn.com.