Art Clay® Silver--Firing FAQ's

Jewelry experts answer frequently asked questions about how to fire with a butane torch and remove the white finish from fired pieces.
When you work with Art Clay® you can't help but have questions, even if you have taken classes. Questions arise in the moment, when you are in the process of rolling the clay, cleaning, firing or finishing. Even in the design stage, being unsure of the processes brings on the questions: Will the clay be strong enough? Will the clay fall when I fire it? How can I get the white off the clay after it's fired?
How do you know your piece is fired when you fire with a torch?
You can achieve the same great results you get when firing Art Clay® Silver in a kiln by using a butane gas torch. There are restrictions, however. You cannot fire any piece that weighs more than 25 grams or is larger than a silver dollar. You cannot fire pieces made over cork clay, paper or organic materials, or projects that include glass, ceramic, porcelain or sterling silver findings.
You can use a torch to:
- Fire any Art Clay® design that is within the size restrictions
- Fire pure silver findings in place
- Fire designs with small gemstone (rated to withstand firing), 5mm and under in size
- Fire onto already fired Art Clay® Silver
- Fire an already fired, finished piece to add additional embellishments
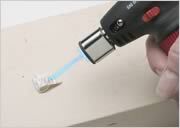
Before using the butane torch for the first time, please review all instructions that come with the torch so you know how to load and operate it. Set up an area that is clear of all flammable objects, like paper, curtains or table cloths. Use a fire block to set your dried Art Clay® project onto and have a fiber blanket available to help support your piece if it's concave or textured, or if you have any embedded gemstones that need to be cooled slowly after firing.
When you light the torch, look at the fire stream and take notice of the blue tip within that stream. Direct the flame at a 45 degree angle, keep the blue tip 1/4 inch away from the piece, and rotate the flame around the Art Clay® so you heat the entire piece evenly. As you heat the Art Clay®, the piece will start to soak, then the binder will burn off which you'll see as a small flame. Keep the torch going around and around the piece during this stage--it doesn't last long. As the piece continues to heat, it will turn dark brown and then white. Pay close attention to the changes in the color--the piece will remain white, but will start to glow with a salmon-colored hue. Hold this salmon hue until the piece is heated thoroughly for its size - 1-1/2 minutes if the clay volume is up to 5 grams; 2 minutes if the volume is between 6 and 15 grams; and up to 4 minutes if the clay volume is 16 to 25 grams. If the clay starts to turn shiny and bubble--you are melting the silver, so raise the flame enough that you maintain the salmon color but have a cooler burn. Maintain the salmon hue for the required time; this is the key to successful torch firing.
Some additional torch firing tips:
- Make sure the Art Clay® piece is completely dry before firing--if there is any remaining moisture, the molecules of water will boil and will need to escape--this will leave a blemish on the surface of your design (which may or may not be something you desire)
- Watch where you are pointing the torch when you turn it on; make sure your clothing and hair are not in the path of the flame; watch your hair especially if you use hair spray
- If you are firing gemstones, turn the piece upside down and place it onto a fiber blanket before firing; the fiber blanket won't burn
- If you're having trouble seeing the salmon hue--dim the lights in the room, so the glow can be seen more easily
How do I remove the white residue from my fired Art Clay® pieces?
The whitish appearance on fired Art Clay® pieces is not a residue at all; it's just how the surface of the clay appears after firing. During firing, the topography of the clay's surface changes to a more bumpy finish. The bumps diminish light reflection, making the surface appear white or dull. To change the appearance of the surface, you need to burnish your fired designs.
You can burnish the clay using different methods--the one you choose will depend on the end result you are looking for.
For a matte silver finish, brush the surface of the fired piece using a fine steel wire brush.
For a shiny silver finish, brush the surface of the fired piece using a fine steel wire brush, followed by burnishing with an agate or steel burnisher. To further enhance the shine, and to prolong the finish, use Wenol metal polish after burnishing.
| Melting Points of selected Metals | ||
| Metal | Degree Celsius | Degrees fahrenheit |
| Aluminum | 660.2 | 1220.4 |
| Brass | 956 | 1749 |
| Bronze | 1060 | 1945 |
| Copper | 1083 | 1981.4 |
| Gold | ||
| 22Kt yellow | 1063 | 1954.5 |
| 18Kt green | 988 | 1810 |
| 18Kt yellow | 927 | 1700 |
| 18Kt white | 943 | 1700 |
| 18Kt red | 902 | 1655 |
| 14Kt green | 963 | 1765 |
| 14Kt yellow | 879 | 1615 |
| 14Kt white | 996 | 1825 |
| 14Kt red | 935 | 1715 |
| 10Kt green | 860 | 1580 |
| 10Kt yellow | 907 | 1665 |
| 10Kt white | 1079 | 1975 |
| 10Kt red | 960 | 1760 |
| Iron | 1535 | 2793 |
| Nickel Silver | 1110 | 2030 |
| Palladium | 1554 | 2829 |
| Platinum | 1773.5 | 3224.3 |
| Silver | ||
| Fine 99.9% | 960.5 | 1760 |
| Coin | 879 | 1615 |
| Sterling 92.5% | 879 | 1615 |
| Steel | ||
| 99FE 1C | 1511 | 2750 |
| Stainless 91FE 9C | 1371 | 2500 |
| Titanium | 1800 | 3272 |
Have a question regarding this project? Email Customer Service.
Copyright Permissions
All works of authorship (articles, videos, tutorials and other creative works) are from the Fire Mountain Gems and Beads® Collection, and permission to copy is granted for non-commercial educational purposes only. All other reproduction requires written permission. For more information, please email copyrightpermission@firemtn.com.