Millefiori Jelly Roll Caning
Learn how to use a polymer clay gradient technique to make a millefiori jelly roll cane from Fimo® Professional jewelry clay in this step-by-step tutorial led by world-renowned mixed media artist Lisa Pavelka.
Instructions
Step 1
Condition each white, black, magenta, blue and yellow Fimo® Professional polymer clay well by hand or by running them through a poly-roller until soft and pliable.
Continue to graduate the black sheet through the poly-roller to an approximately 1mm thickness. Repeat using the white sheet of clay.
Roll each color of magenta, blue and yellow clay through the roller on the thickest setting. Cut the sheets in half and stack the colors.
Slice the white sheet into small strips.
Step 2
Form the yellow and blue sheets into isosceles triangles and the magenta sheet into two right angle triangles. Trim the top point from each triangle so they are blunted along each edge.
Abut the long edges of one magenta right angle, the yellow triangle, the blue triangle and the second magenta right angle to form a rectangle. Press the edges together, so they stick together while rolling through the poly-roller.
Step 3
Roll the rectangle through the poly-roller. Lay the sheet flat then arrange the strips of white clay to the surface of one half of the colored sheet. Spread them as desired to add visual interest to the blend.
Tips:
- It is very important to create a proper skinner blend to fold the sheet so the colors on the outer edge are identical with each pass. If different colors touch when folding, the colors will mix instead of forming a skinner blend.
- The fold is correct if all the colors touch the roller on the poly-roller machine
Fold the sheet in half then run it through the roller on the thickest setting once more. Repeat a few more times until the colors begin to blend.
Tip: The goal for this nautical roll is to get striations and not quite a full blend between the colors.
Step 4
Slice the sheet in half horizontally, then stack the halves so the colors are identical.
Run the sheet through the roller the opposite way, so one color will touch the roller causing the sheet to lengthen.
Tip: Be sure the roller is very clean to avoid contaminants in the sheet.
Step 5
Trim one end of the colored sheet of clay even then place the black sheet over the colored sheet. Smooth the sheets together to remove air bubbles. Trim excess black clay from around the colored sheet.
Tip: The sheet may not initially be long enough to cover the entire long colored sheet.
Step 6
Gather the excess black clay then roll it through the poly-roller gradually reducing to the thinnest setting. Cover the remainder of the clay sheet with the black clay trimming the edges and ends even with the colored sheet.
Trim each edge of the sheet at a 45-degree angle then gently begin to fold the edge up, being sure that the black fold in as well.
Tip: Cutting each edge at an angle will allow for a smooth roll.
Step 7
Reduce the cane to approximately 1/2 inch, by squeezing and rotating, beginning in the center and working toward the edges.
Tips:
- It's very important to release air that may be between the layers of the cane to prevent bubbles in the center of the cane
- It's typically not recommended to roll a cane along the work surface, but a couple of quick rolls will help to smooth the cane in this instance
- It is normal for distortion on the ends to occur this will be trimmed away and can be used in other projects
Step 8
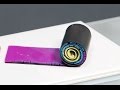
Trim one end from the cane revealing the jelly roll cane.
Note: View Lisa Pavelka's ''Jelly Roll Jewelry'' how-to video for Part 2 of this video and inspiration on creating designs with the Jelly Roll cane.
Shop for Your Materials Here:


Have a question regarding this project? Email Customer Service.
Copyright Permissions
All works of authorship (articles, videos, tutorials and other creative works) are from the Fire Mountain Gems and Beads® Collection, and permission to copy is granted for non-commercial educational purposes only. All other reproduction requires written permission. For more information, please email copyrightpermission@firemtn.com.