How to Create an Even and Odd Count Peyote Stitch

Instructions
Even Count Peyote Stitch
Step 1
Cut an approximately 3-foot length of size D red Nymo® thread. Thread a #10 beading needle almost doubling the thread (to make it easier to work with) but leaving a tail so you are working with only one thread. Place a stop bead on the end of the working thread by stringing one #11 seed bead onto the needle then sliding it to the end of the thread, leaving an approximately 10-inch tail. Pass back through the seed bead in the same directions securing the bead in place.
Note: Adding a stop bead to your thread will help keep your first row of beads in place. Be sure not to incorporate your stop bead into your beadwork.
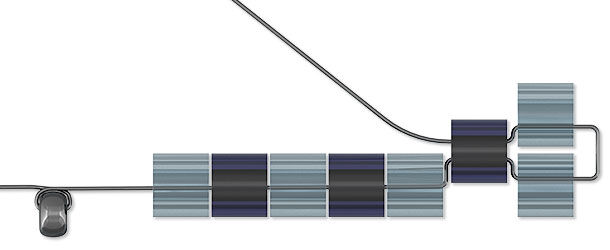
Step 2
String six (or an even number of) #8 seed beads onto the needle, in the color pattern of your choice. Slide the seed beads down close to the stop bead. This is the first two rows.
Tip: Bring the thread around your index finger to keep them taught so they don't twist around.
Note:
- #8 seed beads are larger than the typically used seed bead and make it easier to see the technique
- The first few rows of basic peyote are the most difficult. It gets much easier once these rows are complete.
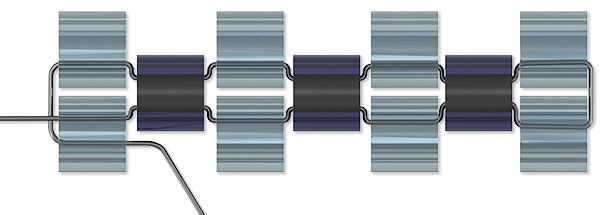
Step 3
.jpg)
String an additional #8 seed bead, skip the previous seed bead then pass through the next bead in the row. Pull the thread so the last seed bead rests on top of the one next to it, beginning the next row. String an additional seed bead, skip a bead and pass through the next bead.
Continue the peyote stitch to the desired length.
Tip: Pass through the top of each bead so the needle doesn't pass through and catch previous thread.
.jpg)
Once the length is complete, pass through adjacent seed beads to create several loops to secure the thread in place then trim excess.
Peyote Stitch Starter Tip
Step 1
Cut an approximately 4-inch length of wrapping wire. Form a wrapped loop on one end of the wire then use a wire straightener to straighten the remainder of the wire.
Step 2
String the desired number of seed beads for the first row ONLY onto the straight end of the wire.
Step 3
Cut the desired length of thread then thread a beading needle almost doubling the thread. Place a stop bead on the end of the working thread, by stringing one #11 seed bead onto the needle then sliding it to the end of the thread, leaving an approximately 10-inch tail. Pass back through the seed bead in the same directions securing the bead in place.
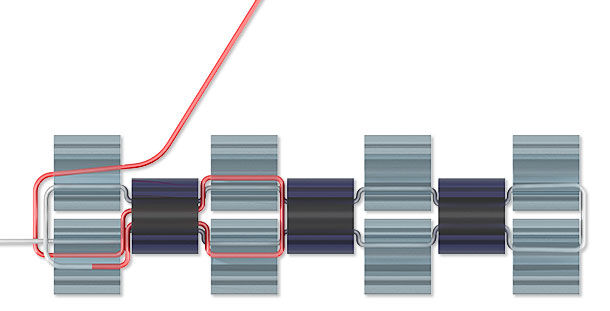
Step 4
.jpg)
String one seed bead then pass through the first bead on the wire.
String an additional seed bead then pass through the second seed bead on the wire. Repeat to add additional seed beads passing through each of the remaining seed beads on the wire.
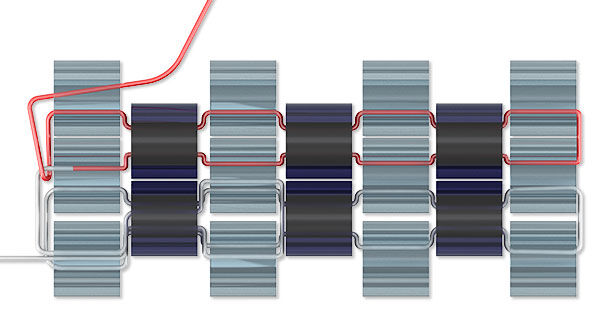
Step 5
.jpg)
Flip the wire over then continue to add a third row stitching through each bead in the second row (not on the wire). Repeat to create a total of six rows then secure the thread.
This creates a frame that allows you to easily begin working new peyote stitch designs from using this frame as a base section then simple separate the starter strip from the finished design and secure the tail.
Odd Count Peyote Stitch
Step 1
Cut one 5-foot length of thread.
Note: It may be necessary to cut additional lengths of thread later in the design.
Thread a beading needle almost doubling the thread (to make it easier to work with) but leaving a tail so you are working with only one thread. Place a stop bead on the end of the working thread leaving an approximately 12-inch tail.
Step 2
Begin the odd count peyote stitch by stringing an odd number of beads (typically seed beads) in the color of your choice.
Tip: The number of beads strung should be double the number desired in each row.
Continue to string one bead, skip the last bead in the previous row, then pass the needle through the next bead in the previous row. Pull the thread so the bead rests on top of the last bead in the previous row, beginning the next (third) row.
Continue the peyote stitch, skipping every other bead in the previous row. At the end of the row the needle will exit the second from the last bead in the previous row.
Step 3
String the last bead then pass the needle through the bead directly below it. Continue through the next two adjacent seed beads. Pass back through the seed bead directly above where you exited.
Continue down through the next two seed beads (diagonal) exiting the last seed bead in the previous row then pass through the first seed bead directly above it once more. Continue the normal peyote stitch.
Step 4
The next row will continue in the typical peyote stitch, exiting the last bead in the row. There is no need to repeat Step 3, just string a new bead then continue to stitch the next row.
Step 5
At the end of the next (fifth) row, instead of passing the needle through the bead directly below (Step 3), pass the needle through the loop of thread at the end of the previous row (instead of the turn-around technique in Step 3).
Step 6
Continue the odd count peyote stitch, passing through the loop from the previous row at the end of every other new row.
Shop for Your Materials Here:


Have a question regarding this project? Email Customer Service.
Copyright Permissions
All works of authorship (articles, videos, tutorials and other creative works) are from the Fire Mountain Gems and Beads® Collection, and permission to copy is granted for non-commercial educational purposes only. All other reproduction requires written permission. For more information, please email copyrightpermission@firemtn.com.