How To Crimp a Crimp Bead/Crimp Tube

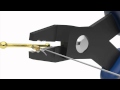
Looking at the closed jaws of the crimping pliers, you will note the two crimp forming areas: the initial crimping station (E) and the final rounding station (F).
Instructions
Step 1
Using flush-cutters, cut a length of Accu-Flex® Professional Quality beading wire long enough for your design.
Step 2
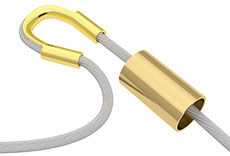
String a crimp bead or crimp tube and one side of an Accu-Guard™ wire protector onto one end of the beading wire.
Step 3
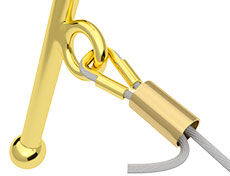
Continue to string the loop (or ring) on one portion of the clasp. Pass the loop into the curved center of the Accu-Guard.
Pass the beading wire back through the crimp.
Step 4
Pull the beading wire so it lays in the channel of the Accu-Guard then slide the crimp up so it rests snug against the base the Accu-Guard, leaving approximately 1/4 inch of beading wire on the end.
Step 5
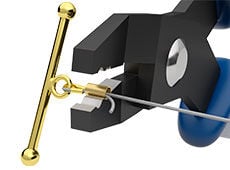
Place the crimp tube into the notch closest to the handles of the crimping pliers. Separate the wires inside the crimp tube so they lay on either side of the crimp.
Tip: This placement will make for a stronger crimped connection when the crimp is compressed.
Squeeze the handles of the pliers until you feel the crimp tube collapse. The crimp tube should form a "V" shape.
Step 6
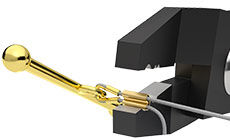
Place the crimp in the first notch of the pliers so the "V" is on its side in the notch.
Squeeze the pliers until the crimp bead has fully collapsed, forming a smaller tube.
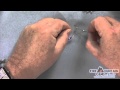
Remove the crimp from the pliers then pull on one end of the beading wire to make sure the crimp is secure.
Using flush-cutters, trim the short end of the wire flush with the crimp tube. This will eliminate any poking a longer length of wire might cause.
Step 7
String on the beads in your design.
Step 8
Repeat Steps 2 - 6 to finish the other end of the design.
Step 9

For a more professional look, place a crimp cover over the crimps. Using the front notch on the crimping pliers or a pair of chain-nose pliers, gently close each crimp cover. The tubes will then be concealed inside the crimp cover.


Copyright Permissions
All works of authorship (articles, videos, tutorials and other creative works) are from the Fire Mountain Gems and Beads® Collection, and permission to copy is granted for non-commercial educational purposes only. All other reproduction requires written permission. For more information, please email copyrightpermission@firemtn.com.