Creating a Sheet of Kato Polyclay™ Clear Medium Liquid

Instructions
Step 1
Pour a small amount of the Kato Polyclay Clear Medium Liquid onto a ceramic tile. Tilt the tile to spread the liquid out in an even layer. This will be the base of your sheet so work the liquid until it is as large as you would like.
Alternatively, you can use a large (1-inch) artist-quality paintbrush to spread the liquid clay on the tile. Avoid creating bubbles in the liquid. If any appear, pop them with a toothpick or fine piece of wire.
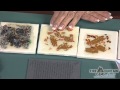
Add in bits and pieces of your inclusions.
Place the ceramic tile into the Clay Craft oven and bake at 300 degrees Fahrenheit for at least 5 minutes. The liquid clay should be clear before removing from the oven. Using oven mitts, remove the tile and place onto a heat-proof surface to let the tile cool. Let the tile and the liquid clay cool completely before proceeding.
Step 2
Pour a new layer of liquid on top of the previous layer. Tilt the tile to spread the liquid out evenly across the previous layer. Add in bits and pieces of your inclusions, layering elements over the below to add depth and dimension.
Place the ceramic tile into the Clay Craft oven and bake at 300 degrees Fahrenheit for at least 5 minutes. The liquid clay should be clear before removing from the oven.
Step 3
Repeat Step 2.
Step 4
Create as many layers as you would like in your sheet. When you are on your last or next to last layer, consider placing a stamped image into the design. Add ink to a rubber stamp then place onto the surface of the cooled liquid clay. Press firmly so the image transfers cleanly.
Pour a new layer of liquid clay and tilt the tile to spread the liquid out evenly. Bake the liquid clay sheet as you did before, removing once the liquid clay is clear. Remove the tile and let the tile and liquid clay cool
Using the super slicer, carefully lift the cooled Kato Polyclay Clear Medium Liquid sheet off of the surface of the tile. Use in a design of your choice.
Shop for Your Materials Here:


Have a question regarding this project? Email Customer Service.
Copyright Permissions
All works of authorship (articles, videos, tutorials and other creative works) are from the Fire Mountain Gems and Beads® Collection, and permission to copy is granted for non-commercial educational purposes only. All other reproduction requires written permission. For more information, please email copyrightpermission@firemtn.com.