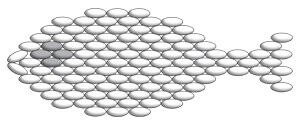
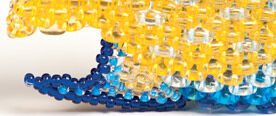
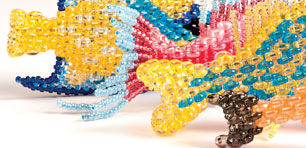
Home Décor Fish with Twin™ Seed Beads

Fish From The Caribbean
Sun, holidays, the colorful sea world ... Try out the creative options provided by unique Czech PRECIOSA Twin seed beads and create several fish from the underwater world of the coral reef just for fun. Use your free time during the summer holidays for creative work using this oval two-hole seed bead. PRECIOSA ORNELA offers instructions and inspiration for the production of several colorful sea fish. We have chosen color combinations corresponding to the Preciosa Ornela fashion trends for the Spring/Summer 2013 season from among our wide range of surface finishes. We wish you much summer holiday inspiration with PRECIOSA Twin seed beads and all the other types of Czech seed beads.

Instructions
The Procedure:
Step 1
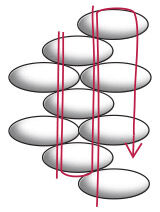
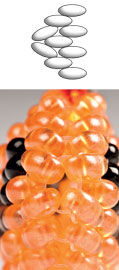
The fish consist of two identical adjacent surfaces, between which a cavity is created and on whose joints the fins are placed. Start the fish by sewing through the basic column of seed beads twice (figure no. 1).
The basic shape of the fish is created from 25 columns, which mesh together like a zip, and 13 rows (figure no. 2). Sew both sides of the fish together by passing the needle and line through the row of free Twin holes on the opposite side of the fish; wind the line around the entire body of the fish (figure no. 3).

Step 2

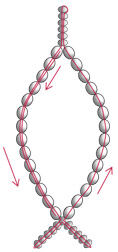
The fins on the back are only single-layered. Place the seed bead fins at the connection point for these surfaces. String the required number of rocailles. Use the top rocaille as a stop bead and pass the needle and the line back through all the rocailles.
Step 3
Create the bottom bifurcated fin in a similar way to the back fin. Leave out the last rocaille before the fish’ torso. String the same number of seed beads as in the already completed section. Once again, pass the needle and the line back through them all, including the last one next to the body; only leave out the top one again as a stop bead.
Step 4
In the case of the larger fins, sew the frame in advance and attach them to the body. Then fill in and reinforce the fins after completing the sewing of the fish.
Step 5

Form the eye from 4x T; in ones at the edge of the eye and in twos in the central column.
Step 6
Modify the number of rows and the number of T in the individual rows according to the shape of the selected fish.
Step 7
Sew the tail in the same way as the fish’ body. The number of columns depends on the length of the tail.
Step 8
The snout in smaller fish consists of only 2x T in one half; a total of 4x T (figure no. 4a). In the case of the bigger fish, insert 1x R between the 2x T (figure no. 4b). In wider fish, the snout is created using 3x T and 2x R (figure no. 4c).


Shop for Your Materials Here:


Have a question regarding this project? Email Customer Service.
Copyright Permissions
All works of authorship (articles, videos, tutorials and other creative works) are from the Fire Mountain Gems and Beads® Collection, and permission to copy is granted for non-commercial educational purposes only. All other reproduction requires written permission. For more information, please email copyrightpermission@firemtn.com.