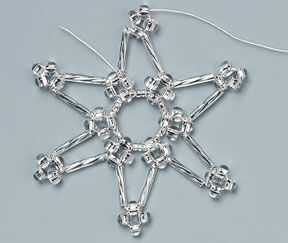
Ornament with Seed and Bugle Beads

Instructions
The Procedure:
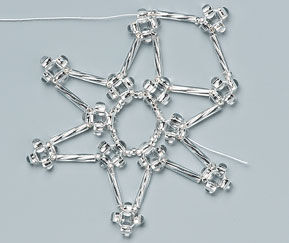
Step 1
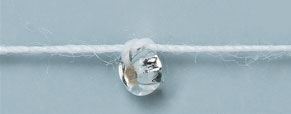
String the first rocaille and secure it with a simple knot.
Step 2
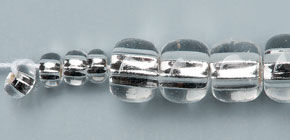
String 3x 10/0 rocailles and 4x 6/0 rocailles.
Step 3
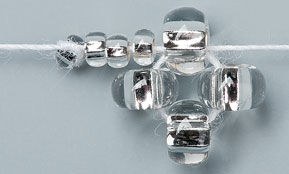
String the four 6/0 rocailles once again, tighten them well and string the first 6/0 rocaille again.
Step 4
String 4x 10/0 rocailles and 4x 6/0 rocailles.
Step 5
Pass the thread through the four 6/0 rocailles once again, tighten well and then pass the thread through the first 6/0 rocaille again.
Step 6

Repeat the procedure according to points 4 and 5 another 4 times.
Step 7

Join the beginning of the thread and the end of the stringing in a circle and secure with a knot.
Step 8
Pass the thread through the nearest three 6/0 rocailles.
Step 9
The first row: string 1x 10/0 rocaille, 1x 5° bugle, 1x 1/0 rocaille and 4x 6/0 rocailles.
Step 10
Pass the thread through the four 6/0 rocailles once again, tighten well and then pass the thread through the first 6/0 rocaille again.
Step 11

Pass the needle and thread through the top 6/0 rocaille from the nearest group of rocailles from the basic link.
Step 12
Repeat the procedure from points 9 - 11 another 5 times.
Step 13
In order to finish this row, pass the thread through the stringing with 1x 10/0 rocaille, 1x 5° bugle, 1x 1/0 rocaille and three 6/0 rocailles according to the picture.
Step 14
The second row: string 2x 10/0 rocailles, 1x 5° bugle and 2x 1/0 rocailles.
Step 15
Repeat the procedure according to point 10 and point 14.
Step 16
Pass the needle and thread through the top 6/0 rocaille from the nearest group of rocailles from the first row.
Step 17
Repeat the procedure from point 14 - 16 another 5 times.
Step 18
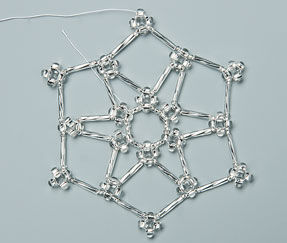
Once this row is completed, pass the thread through the stringing with 2x 10/0, rocailles, 1x 5° bugle, 2x 1/0 rocailles and three 6/0 rocailles according to the picture and thus complete the 2nd row.
Step 19
The third row is the same as the second one: create it using the same procedure according to points 14-18.
Step 20
The fourth row is the same as the first row: create it using the procedure according to points 9 -13.
Step 21
Attach the finished stringing to the glass ball’s clasp with the basic link.
Step 22
String 4x 10/0 rocailles, pass the thread through the top 6/0 rocaille from the last row of the stringing.
Step 23
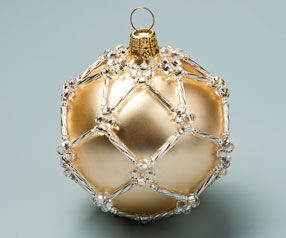
Repeat the procedure according to point 22 another 5 times, pull into a circle and secure with a knot. Pull the end of the thread through the nearest beads, finish off and cut.
Shop for Your Materials Here:


Have a question regarding this tutorial? Email Customer Service.
Copyright Permissions
All works of authorship (articles, videos, tutorials and other creative works) are from the Fire Mountain Gems and Beads® Collection, and permission to copy is granted for non-commercial educational purposes only. All other reproduction requires written permission. For more information, please email copyrightpermission@firemtn.com.