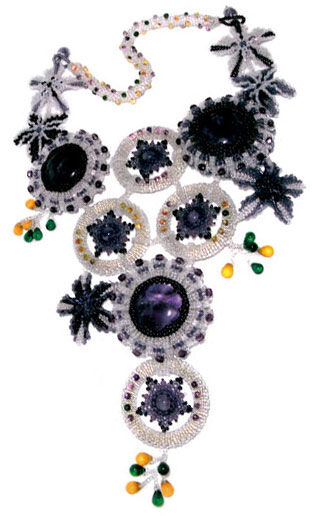
How to Make a Bib-Style Necklace with Amethyst Gemstone Beads and Cabochons, Seed Beads and Czech Glass Drops
Instructions
Flowers
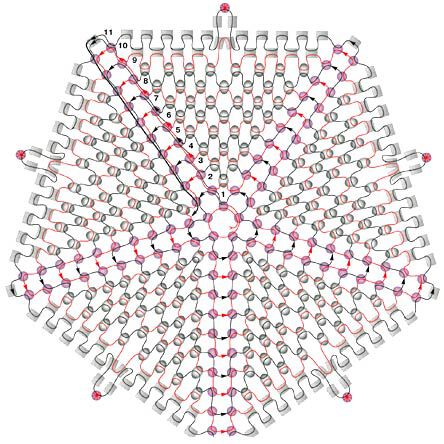
You will need six flowers for the necklace. All of them are made in the same way (Fig. 1).
- Bead 1st flower in D, F, I, H and N,
- 2nd flower in E, I, H and N
- 3rd flower in D, E, J, H and N
- 4th flower in D, F, J, H and N
- 5th flower in F, I, H and N
- 6th flower in E, D, I, H and N
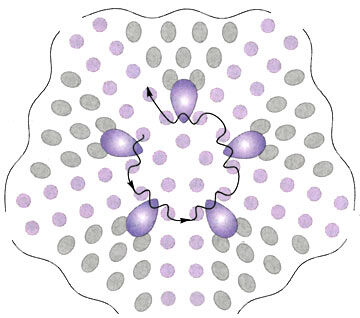
Now bring the needle and thread to the centre of a flower, going through seed beads of the petals and attach one O bead (Fig. 2) in the centre. Bring the needle and thread to any seed bead, marked * on Fig. 1 to get into position for the next step. Run through all the seed beads marked *, pulling the thread taut.
Star Elements

Bezeling Around A Bead
Pick up twenty E and close them into a ring. This is the basic row of the bezel. Start beading the bezel from its upper part. Work in peyote stitch: one row in H and one more row in E. Repeatedly go through the last bead row, pulling tightly on the thread.
Bring the needle and the thread back to the basic row. Bead the lower part of the bezel in peyote stitch: one row in E and one more row in H.
Beading a Star
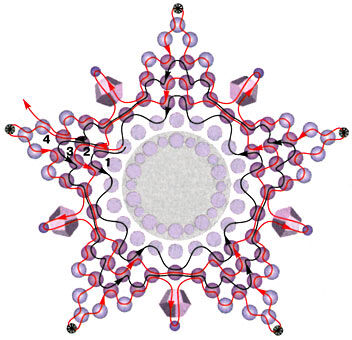
Bring the needle and thread to the basic row again. Bead a star around A in E, F, G, H, and C (Fig. 4).
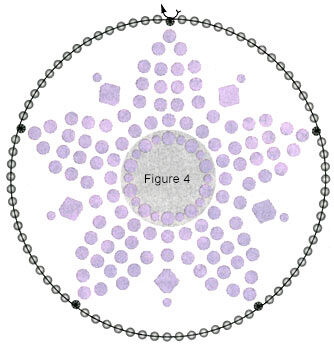
A Ring Around the Star
What we are going to do now is to bead a torus-shaped ring around a star in peyote stitch.
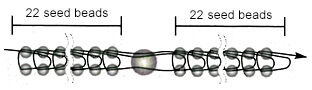
- Anchor a length of thread at any G bead (Fig. 4). String 15 G beads and go through the G bead at the end of the nearest star ray (Picture 1). Working in this manner, connect the ends of all the rays by strings of 15 G beads, thus forming a circle of 80 beads all together. This is the basic row. Now we are going to bead a stripe, starting from that row.
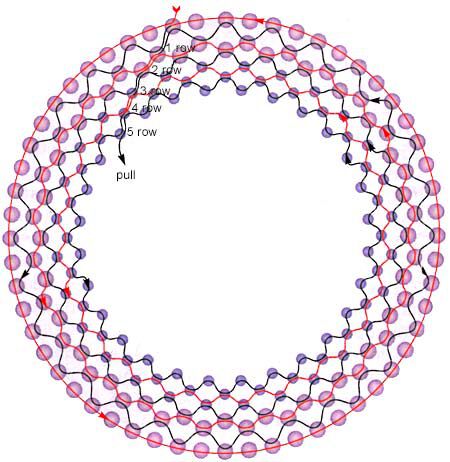
- Go down the circle and bead eight rows in peyote stitch: five rows in G and three rows in D. Bring the needle back to the basic row of 80 beads to get into position.
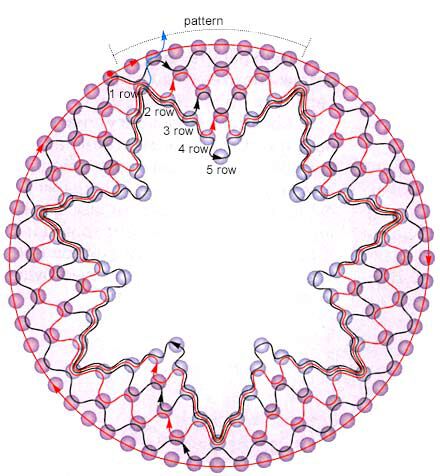
- Go up the circle and work eight more peyote stitch rows: five rows in G and three rows in D. Be very attentive when you work the first G row: do not forget to incorporate M beads in two opposite spots (4 M on one side and 5 M on the other).
- Now take a metal ring and insert your beading into the ring. Fold the ends of the beaded stripe around the metal ring. Turn the stripe into a torus, connecting along the edge, so that the metal ring is hidden inside the torus. Work three more star elements in the same way.
Bezeling Cabochons
Take three more metal rings and bead a torus around each ring.
- Pick up 80 G and close them into a circle. This is the basic row. Bead a stripe in peyote stitch, starting from that row. Bead the upper part of the stripe, working 5 rows in G and 3 rows in D. Come back to the basic row to work the lower part of the stripe. Bead 5 rows in G and 3 rows in D.
- Now take a metal ring and insert your stripe into the ring. Fold the ends of the beaded stripe around the metal ring. Turn the stripe into a torus, connecting along the edge, so that the metal ring is hidden inside the torus. Bead around two more rings in the same way.
Beading Around the Cabochons
String 56 E and close them into a ring. Bead the lower part of the bezel in circular peyote stitch, working two rows in E and three rows in H (Fig. 5). Go through the last row for several times, pulling tightly on the thread.
Bring the needle and thread back to the basic row of 56 E beads. Now bead the upper part of the bezel. Work two rows in E and F; insert the cabochon, and bead three more rows in E and F (Fig. 6). Go through the last row more than once, pulling the thread taut.
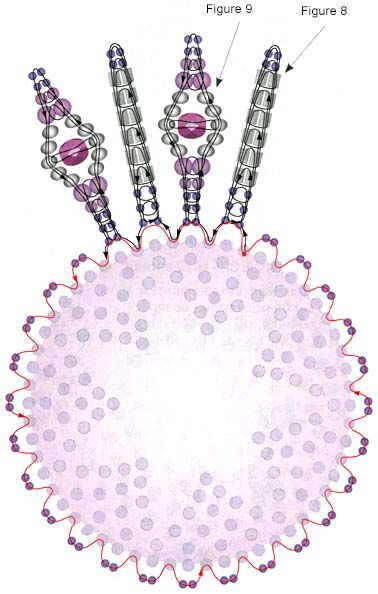
Anchor a new length of thread at any bead of the basic row and work one row in H (Fig. 7). Now bead 28 rays around the cabochon. Each ray is worked, basing on a pair of H beads. There are rays of two types, worked in turn:
- Type one is worked in H and I, (Fig. 8) and
- Type two is worked in H, E, K, D (Fig. 9).
Attach the outermost H beads to the beaded torus, going through every third bead of the torus middle row.
The Rope
Crochet a rope in D and M. Tip. Before you start look through the crochet class, provided by Fashion magazine #12, 2009.
Attach bead caps to the ends of the rope and work loops in E and F. These loops are "buttonholes." Attach one A bead to flowers in each corner of the necklace and fasten these beads with the buttonhole loops.
Assembling
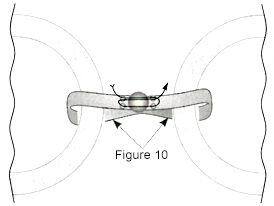
Connect all the elements together (Pic. 2). Work like this: bead a stripe in G with 1 L in the middle (Fig. 10). Twine the stripe around two neighboring elements and connect the ends of the stripe together.
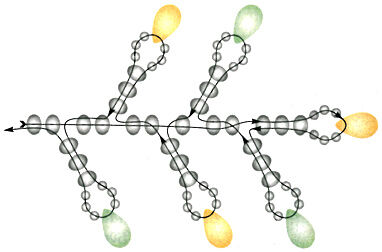
Attach the flowers. Make twigs in D, G and O (Fig. 11).
Shop for Your Materials Here:

Have a question regarding this project? Email Customer Service.
Copyright Permissions
All works of authorship (articles, videos, tutorials and other creative works) are from the Fire Mountain Gems and Beads® Collection, and permission to copy is granted for non-commercial educational purposes only. All other reproduction requires written permission. For more information, please email copyrightpermission@firemtn.com.