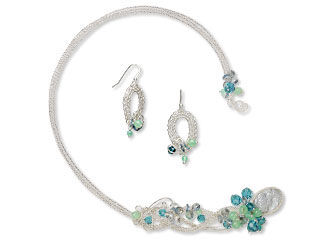
Open-Ended Necklace, Cufflett and Earring Set with Crystal Passions® Beads, Mother-of-Pearl Shell Cabochons and Wirework

Necklace

STEP 1
Use an artist brush to dab Swellegant!™ prep coat to the front of the 25x18mm oval cameo then allow to dry (approximately 5 - 15 minutes). Apply the desired number of coats of Swellegant! silver metal coating (until no gaps are visible) allowing each coat to dry.

Repeat to create a 30x22mm Swellegant! cameo (for bracelet).

Set the cameos aside to dry for approximately 72 hours then add a thin layer of Swellegant matte clear sealant.

View ''Using Swellegant! Coatings and Colorants'' for more information.
STEP 2
Use pliers to bend the 2-inch length of twisted wire into a ring approximately the size of the cameo.

Mix a small amount of Devcon® 5-Minute Epoxy according to manufacturer's instructions. Apply a small amount of epoxy around the edge of the front of the cameo then wrap the twisted wire around the Swellegant! cameo, like a frame. Set aside to dry. Repeat to create a frame for the second cameo.
STEP 3
Cut the following:
  • 18-gauge sterling silver wire: three 3-1/2 foot and one 1-foot lengths
  • One 3-foot length of 26-gauge sterling silver wire
  • One 2-inch length of 18-gauge sterling silver twisted wire
Tip: It may be necessary to cut other 3-foot lengths of working wire as the previous wire runs low.
STEP 4
String one chrysoprase 4mm round onto one 1-1/4 inch ball headpin then form a simple loop. Repeat to create a total of six chrysoprase 4mm drops.

Repeat to create the following:
  • 15 chrysoprase 4mm drops
  • 12 chrysoprase 6mm drops
  • Four indicolite 4mm round drops
  • 12 indicolite 6mm round drops
  • Five indicolite 8mm round drops
STEP 5
Match up one end of each 3-1/2 foot length of 18-gauge base wire so they lay parallel, spaced approximately double the width of the 26-gauge working wire. Use painter's tape to secure the base wires approximately 6 inches from the end.
STEP 6
Wrap the working wire around the first base wire, close to the tape to secure. Continue over and around the second base wire then the third. Repeat to wrap the working wire over the base wires in the opposite direction.

Continue back and forth over the base wires working toward the opposite end of the base wires for approximately 15 inches. Secure the working wire then trim excess.
STEP 7
Leave approximately 1/2 inch of each base wire bare then wrap the working wire around the first base wire to secure. Continue to wrap over the second and third wires.

Separate the third base wire. Continue over the second base wire then pass under and around the first wire. Continue to alternate wrapping over then under the first and second base wires for approximately 1 inch.

String one indicolite 6mm round onto the third base wire. Bring the base wires together and continue to wrap over each for approximately 3/4 inch.
STEP 8
Separate the first base wire. Continue to alternate wrapping over then under the second and third base wires for approximately 1 inch. String one indicolite 6mm round onto the first base wire. Bring the base wires together and continue to wrap over each for approximately 1-1/2 inch.

Using pliers bend the parallel lengths of base wire so they create a loop approximately the size of the 25x18mm cameo.
STEP 9
Mix equal amounts of Apoxie Sculpt® (equaling approximately the size of a small grape) for two minutes, or until thoroughly blended. Roll the Apoxie into a ball and set aside.

Place the looped wires onto the back of the cameo then place one end of the 1-foot length of wire next to the third base wire. Press the Apoxie tightly onto the back of the cameo securing the wires in place. Remove excess Apoxie from around the edges of the cameo then allow Apoxie to harden for approximately 1 hour.
STEP 10
Separate the first and second base wires from the third and 1-foot, fourth, base wires. Secure a length of wrapping wire around the fourth base wire. Continuously wrap around the fourth wire for approximately 1/4 inch then wrap over the third and fourth base wires once. Continue to wrap around the fourth wire for approximately 1-inch.
STEP 11
String one indicolite 6mm round onto the third base wire then wrap over the third and fourth wire twice to secure. Wrap around the third wire for approximately 1/4 inch then wrap twice around both wires.

Continue to wrap around the fourth base wire for approximately 1/4 inch, around both wires, around the fourth base wire for approximately 1/4 inch then around both wires.

Wrap over the third base wire for approximately 1-1/2 inches. String one indicolite 6mm round onto the fourth base wire then wrap over the third and fourth wire to secure. Continue to around the third wire wrapping around both wire intermittently for approximately 1 inch then trim excess wrapping wire.
STEP 12
Secure a length of wrapping wire around the first base wire then wrap over the second wire. Continue to wrap the around the second base wire approximately seven times then create a wrap over the first base wire. Repeat to wrap the first and second wire for approximately 2-inches.

Begin to alternate wrapping over then under the first and second base wires for approximately 4-inches. Secure the wrapping wire then trim excess.
STEP 13
Wrap the first and second base wire around the four wires, at the top of the cameo then bring the three wrapped sections of wire together above the wrapped area. Loosely braid the three sections together to the bare then tightly wrap the wire around the bare section in the first wrapped section (Step 7) to secure.
STEP 14
Use pliers to wrap and bend and coil the unwrapped ends of each wire over the braid then trim excess. Repeat using the opposite ends of the base wires.
STEP 15
Cut a length of 28-gauge wire then weave through the braided section of wrapped wire attaching approximately 38 drops in the pattern of your choice. Repeat to attach nine drops to the opposite end of the base wires.

Cufflet

STEP 1
Cut the following:
  • 18-gauge sterling silver wire: three 3 foot and one 6-inch lengths
  • One 3-foot 26-gauge sterling silver wire
  • One 2-1/2 inch length 18-gauge sterling silver twisted wire
  • One 2-1/2 inch length 2.5mm Figaro chain
Tip: It may be necessary to cut other 3-foot lengths of working wire as the previous wire runs low.Attach one 4.5mm jumpring to the first link on the length of Figaro chain
STEP 2
Match up one end of each 3-foot length of 18-gauge base wire, then secure with painter's tape approximately 6 inches from the end.

Secure the working wire around the first base wire, close to the tape. Continue to over and around the base wires working toward the opposite end of the wires for approximately 9 inches.
STEP 3
Separate the first base wire. Alternate wrapping over then under around the second and third base wires for approximately 2 inches.

String one indicolite 6mm round onto the third base wire. Bring the base wires together and continue to wrap over each for approximately 1 inch.
STEP 4
Using pliers bend the parallel lengths of base wire so they create a loop approximately the size of the 30x22mm cameo. String the 4.5mm jumpring (Sep 1) onto the first base wire then use 28-gauge wire to wire wrap it in place at the base of the cameo.
STEP 5
Use Apoxie to secure the looped wires to the back of the cameo and cover the wire wrap on the jumpring. Place one end of the 6-inch length of wire next to the third base wire.
STEP 6
Separate the first and second base wires from the third and fourth, base wires. Secure a length of wrapping wire around the third base wire. Continuously wrap around the third wire for approximately 1/4 inch then wrap over the third and fourth base wires once. Continue to wrap around the third wire for approximately 1/4 inch.

Switch to the fourth base wire then wrap for approximately 1-inch.
STEP 7
String one indicolite 6mm round onto the third base wire then wrap over the third and fourth wire twice to secure. Wrap around the third wire for approximately 1/4 inch then wrap once around both wires.

Continue to wrap around the third wire for approximately 1/2 inch, around both wires once, then around the third wire for approximately 1/2 inch.
STEP 8
Secure a length of wrapping wire around the first base wire then wrap over the second wire. Continue to wrap the around the first base wire approximately 1/4 inch then create a wrap over the second base wire. Repeat to wrap the first and second wire for approximately 1-1/2 inches.

Begin to alternate wrapping over then under the first and second base wires for approximately 4-inches. Secure the wrapping wire then trim excess.
STEP 9
Wrap the first and second base wire around the four wires, at the top of the cameo then bring the three wrapped sections of wire together above the wrapped area. Loosely braid the three sections together 1 - 2 times then tightly wrap the wire around the first wrapped section to secure.
STEP 10
Use pliers to wrap and bend and coil the unwrapped ends of each wire over the braid creating a hook portion for the clasp, facing toward the cameo.

Use the opposite ends of the base wires to create a wrapped loop, the second portion of the clasp. Curl the ends slightly for decoration then trim excess.
STEP 11
Cut a length of 28-gauge wire then weave through wrapped wire above the cameo, attaching approximately 25 drops in the pattern of your choice.
STEP 12
Pass one 4.5mm jumpring through two drops, the last link on the Figaro chain and the loop on the wire-wrapped ring then close. Use 4.5mm jumpring to attach two more sets of drops two drops to the loop on the wrapped ring.

Earrings

STEP 1
Cut six 4-inch lengths of 20-gauge sterling silver wire, two 2-foot lengths of 28-gauge sterling silver wire and two 6-inch lengths of 30-gauge wire.
STEP 2
Match up one end of three 4-inch lengths of 20-gauge base wire, then secure with painter's tape approximately 1-inch from the end.

Secure the working wire around the first base wire, close to the tape. Wrap the working wire over and around the base wires working toward the opposite end of the wires for approximately 1-1/2 inches.
STEP 3
Using pliers bend the parallel lengths of base wire so they create an approximately 32x22mm loop.

String one fishhook earwire onto the outside base wire then continue to wrap over the base wires for approximately 1-1/2 inches. Make the last set of wraps particularly tight.
STEP 4
Bring the ends of the base wire together to the longer ends cover the shorter then weave the working wire through the overlapping base wires to secure the end together. Trim the shorter ends of the base wires close to the end of the working wire. Use pliers to coil the unwrapped longer end of each of the base wires.

Secure one end of one 6-inch length of 30-gaue wire to the back side of wrapped component then bring it through to the front. Wrap approximately 5 drops among the coiled ends of the component in the pattern of your choice. Secure the end of the 30-gauge wire then trim excess.
STEP 5
Repeat Steps 2 - 4 to create a second earring.

: : : Additional Resources : : :

The pieces featured in the Gallery of Designs are copyrighted designs and are provided for inspiration only. We encourage you to substitute different colors, products and techniques to make the design your own.

Have a question regarding this design idea? Email Customer Service.

Wireworking Design Inspirations View All