Metal Clay Information
and Suggested Jewelry-Making Tools to Use with Precious Metal Clay Projects

by Debbie Edmonds, Design Idea A35F
What You Can Do with Precious Metal Clay
You can create jewelry components by manipulating--shaping, pinching, rolling and sculpting--precious metal clay to your desired shape, texture and thickness. After firing, metal clay pieces can be refined with traditional metalsmithing techniques. The result is a high-quality piece of fine jewelry rendered in gleaming silver or gold. To get started, with this article, you'll learn exactly what metal clay is, how it is used, the brands of metal clay and general instructions on how it is used. Then, you'll be given a list of suggested tools you will need to create metal clay jewelry. When you are ready to try it yourself, read the section "Easily Create Custom Jewelry with Precious Metal Clay" below.
Metal Clay Information
Amazing precious metal clay, sold in sealed airtight packages, is made from salvaged precious metals found in household waste such as computers and electronics. This recovered precious metal is ground to a fine powder and then mixed with a natural binder and water to make a pliable clay that, when fired, turns into solid 22Kt gold or 99.9% fine silver! This process by which the binder is burned away and the particles of metal bond together is known as sintering. How ingenious is that! As the binder burns away during the sintering process, the precious metal clay mass will shrink by approximately 8 to 12%, depending on brand type and thickness of the piece. This trait can be used to your advantage with benefits to your design such as sharper texture details and tightening stone settings.
Skill-intensive metalsmith techniques aren't required to make beautiful objects d'art with precious metal clay. Basic pottery skills and techniques, with a few minor adaptations, are all one needs to use this innovative jewelry-grade medium. However, once the metal clay is fired and sinters to 99.9% fine silver metal, it can be worked using traditional metalsmithing skills and tools if you choose.
Original formula precious metal clays are very low in moisture, so they become dry to the touch within 30 minutes, depending on the climate where you live. A slow- dry formula dries more slowly, giving you more working time with the clay--as much as an hour depending on the climate where you live. The following tips apply equally to all brands of precious metal clay .
When you take clay out to use, only take what you will use immediately. To keep the unused portion moist and workable, keep it stored tightly wrapped in plastic cling wrap inside a small airtight container, such as a sealable sandwich bag or old pill bottle with a piece of damp paper towel or sponge. If the clay you remove to work with dries completely before you are finished manipulating your design, refresh it to a workable state by lightly spritzing it with distilled water from a spray bottle or gently brushing water onto it until you can see that the surface is evenly moist. Avoid immersing or soaking in water because the clay can lose relief detail or dissolve entirely into a form of slip--a.k.a. clay mud. Purposefully creating and using slip as a tool is needed for gluing unfired clay pieces together.
After re-moistening dried out clay designs with water, seal them in an airtight plastic container and let sit to become thoroughly hydrated and pliable again. This is made easiest if you place the design to be re- moistened in the container before you apply water to it. Special care must be taken to evenly moisten the entire piece or cracking can result due to uneven drying. If you add a little too much water, it will be okay, just loosen the plastic container lid and give the clay a little bit of drying time to firm up enough to handle.
Suggested Tools to Use with Precious Metal Clay Projects
Workspace
- Sturdy work surface such as an 8x8-inch piece of cut tile or 1/4 inch drywall
- Smooth non-porous rolling surface, such as acrylic sheets, safety glass or a plastic report cover
- Plastic wrap
- Teflon® non-stick sheets
- Wet sponge
- Distilled water
- Hot plate for speed drying
- Olive oil or mineral oil
Flattening and Cutting Tools
- Acrylic roller or PVC tube
- Acrylic slats or playing cards
- Low- adhesive masking tape
- Craft knife of various length and style razor or tissue blades
Shaping and Texturing Tools
- Metal clay slip to draw designs, glue pieces together and repair cracks
- Squeeze bottle or syringe with various-sized syringe tips
- Two-part molding compound for mold making
- Needle tool or awl for piercing and scribing
- Clay or wood carving tool set
- Fine-tip good quality paintbrushes
- Water- soluble liquid wax
- Klay Kutters™ in various sizes and shapes
- Drafting templates or stencils
- Drinking and cocktail straws (for making consistent holes)
- Texture plates. Your imagination is vital here; anything with a pattern can be used to texture clay. Think outside the box with ideas such as linen fabric, lace, sticks or branches, leaves, rubber stamps or molds, etc.
- Texturizing tools
Finishing Tools for Pre-fired Clay
- Emery boards
- Various fine grit sandpaper to smooth out the surface and to remove fingerprints before firing
- Assorted needle files for refining holes before firing
- Rubber block
Firing Tools
- Kiln or butane torch
- Firing block
- Solder pick
- Safety glasses
- Oven mitt
Finishing Tools for Fired Clay
- Stainless steel or brass wire brush
- Rotary tools and accessories for polishing and grinding
- Agate or steel burnisher
- Texture hammers
- Steel anvil
- Lortone Model 3A Rotary Jewelry and Rock Tumbler and steel shot mix
- Jooltool™ and accessories
Easily Create Custom Jewelry with Precious Metal Clay
Below are some simple, common ways for preparing metal clay for use as jewelry components. Once you've mastered these techniques, you can use them to create pieces as unique as your imagination.
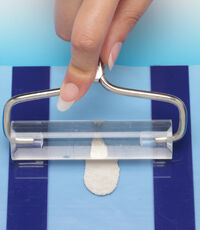
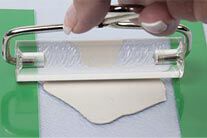
Flattening
Place a ball of clay onto your non-stick worksheet. Using a brayer, roll it out to desired thickness. Slats can be placed on either side of your working surface to create an even thickness. Rolling clay out to specific thicknesses is easy with acrylic spacer strips or playing cards stacked and taped together. It is easy to begin with thicker strips and work your way down to thinner strips. Roll clay while it is wet.
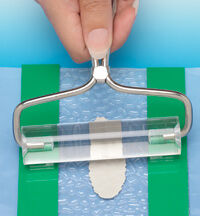
Texturing
Move clay onto the texture of your choice, then place thinner slats on either side of the clay. Roll across the surface of the clay to achieve desired impression.
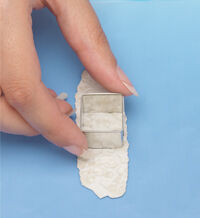
Cutting Out
Move clay to non-stick worksheet and cut out desired shape.
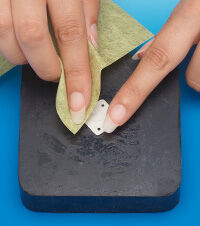
Sanding
Refine the surface of the clay using progressive grits of sandpaper and polishing papers.
Sticking, Rolling and Cutting
The fine particles of clay and binder, when wet, have amazing adhering properties, which is very helpful when sticking pieces together in a design. It is helpful to work on Teflon sheets because it will make picking up and positioning moist clay designs easier, while preventing the bottom of the clay from drying out too quickly. Sparingly apply olive oil or mineral oil to hands, tools and work surfaces to keep wet clay from sticking excessively.
Reconstituted clay can be sticky and tends to adhere to your fingers and tools as you knead and work it. Precious metal clay is an upscale material that is too precious to waste. Recovering any clay lost from filing and sticking to fingers and tools can be done by using a paintbrush and a small amount of distilled water. Saturate the paintbrush with distilled water and use it to "mop and sop up" clay residue from fingers and tools. Periodically rinsing the clay off the brush into the cup of distilled water will deposit the clay residue into the water. As the water evaporates, it will leave behind a smooth clay slip.
There are several tools to cut moist precious metal clay such as the Klay Kutter™, Super Slicer blades, craft knives, razor blades and even the edges of a single playing card. Paper- type precious metal clay can be punched and stamped with scrapbooking paper punches and embossers or cut with rectangle and deckled-edge scissors. Long razor blades or a playing card can be used to slide between working surfaces and clay designs to aid in unsticking and removing the design from the working surface.
Dry and Refine
Precious metal clay must be completely dry before you can fire it. It is often easier to refine and finish a design that is completely dry. Finishing dry designs before firing also makes polishing and finishing after firing easier.

Clay has several stages of drying--semi-moist, leather-hard and bone-dry . Semi-moist clay is still wet and malleable but quickly begins to dry along the edges. Leather-hard clay is still too moist to fire, and you can make an indentation in it with your fingernail or dental tool. Bone-dry clay is completely dry and can be sanded and fired. Semi-moist and leather-hard clays are the easiest stages of dryness to make repairs or add additional clay to your design.
Leather-hard clay can be fragile, but it is still possible to lightly file, carve, sand, make holes in and otherwise continue to refine. It is much easier to finish leather-hard clay than trying to alter the clay once it is fired to sintered metal .
Constructing in a Dry State
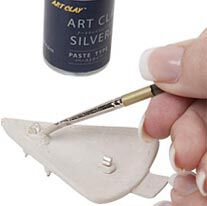
Sometimes it can be easier to create clay designs and design components with dry clay. You can put them together with the use of clay slip. When creating designs in the "dry state," you may encounter minor chips or dislodged clay pieces that can be repaired by re- moistening the clay evenly with water and then applying precious metal clay slip to adhere pieces and fill chips. To do this, paint the slip along one edge of a re- moistened piece and press the two broken pieces together. Let the join dry completely. Follow up with additional coats of thin slip over the seam until the join line disappears. Smooth out imperfections by thinning the surface of the applied slip with water. Once it is bone- dry, you can sand the seam smooth and fire.
Clay slips and pastes are available premade, or you can make your own by blending water with wet clay until it is the consistency of pudding. You can also collect unfired bone- dry clay scraps over time and grind them to powder in a non-porous pestle. Combine the powdered clay dust with a few drops of water in a small jar and let it sit until all the moisture is absorbed. Add more powder or water as needed to achieve the right consistency. Blend the slip mix with a spatula or paintbrush. Seal the jar with a tight-fitting leak-proof lid. The slip needs to be thick enough to cling to the container bottom if held upside down, yet thin enough to spread easily with a spatula or paintbrush.
Firing and Polishing
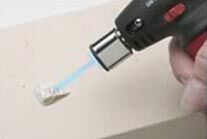
There are several firing options once your precious metal clay designs are ready. You can fire them in a kiln, with a butane torch, on a gas stovetop or in a pot such as cast iron over intense heat. The manufacturer's directions included with each package of clay will tell you the correct temperatures and times for each firing application.
Once fired, metal clay appears to have a white or grey residue on the surface. This is actually not a residue; it is a bumpy texture caused by an effect known as scaling. As the silver sinters, it sticks up from the surface of the metal as the binder is burned away. If you looked under a microscope at the metal, you would see that these scales resemble the texture of sandpaper. Rubbing the surface smooth causes the metal to become smooth, and it will again reflect light and appear shiny.
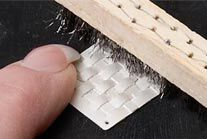
You can use a steel brush and soapy water to give the metal a brushed finish. To give the metal a brighter polish, use an agate or steel burnisher. Tumble pieces for 30 minutes with the appropriate steel shot and burnishing compound or polish using the appropriate wheels and polishing compounds with a rotary tool.


Have a question regarding this project? Email Customer Service.
Copyright Permissions
All works of authorship (articles, videos, tutorials and other creative works) are from the Fire Mountain Gems and Beads® Collection, and permission to copy is granted for non-commercial educational purposes only. All other reproduction requires written permission. For more information, please email copyrightpermission@firemtn.com.