Using The Bead Knotter™

Instructions
Step 1
Determine the length of your finished necklace.
Step 2
Cut a length of thread 4 times your determined finished length.
Step 3
Thread on your needle, doublling the thread. Tie the ends of the lengh of thread in an overhand knot, securing them together. Note: Thread used is for illustration purposes only. It is recommended that you choose a thread color that matches the beads in your design.
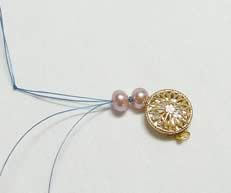
Step 4
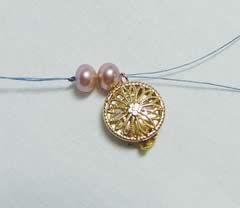
Thread on two beads and your clasp. Slide them down toward the knot.
Step 5
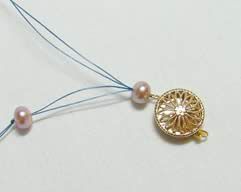
Pass the needle back through the bead closest to the clasp.
Step 6
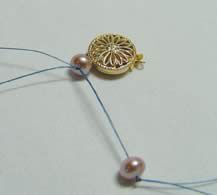
Pull the working thread until the clasp is snug against the first bead and 1-inch of thread remains between the first and second bead. Tie an overhand knot using the tail end and the working thread. Pull the knot tight so it rests against the pearl closest to the clasp.
Step 7
Pass the working thread through the second bead then slide it against the first knot.
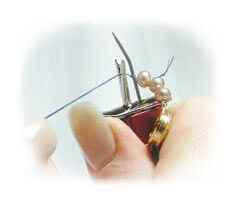
Step 8
Make an overhand knot using the tail thread and working thread. Slip the knot over the awl (long tip end) of The Bead Knotter. Slide the knot all the way down so it rests against the base. Hold The Bead Knotter in one hand and place your thumb under the tab. Place the working thread over the fork on The Bead Knotter and pull with your other hand, so the knot is pulled snugly against the bead.
Step 9

Hold the working thread firmly while pushing your thumb upward against the tab. The knot will slide up and off the awl.
Step 10
Thread on the rest of your beads. Space the beads 8-10" from the beads that are already knotted. Slide the bead next in line up against the last knot. Repeat Steps 8 - 9 until you've placed knots between all of your beads except for the last two.
Step 11
Thread the other loop of the clasp onto the working thread. Bring the thread back through the last strung bead. Pull the thread so the beads are tight against the clasp.
Step 12
Tie a half-hitch knot between the last two beads; pull tight.
Step 13
Bring the working thread through the second to last bead.
Step 14
Trim the thread on both ends of the necklace. Apply glue to the first knot on both ends (optional).
Shop for Your Materials Here:


Have a question regarding this project? Email Customer Service.
Copyright Permissions
The pieces featured in the Gallery of Designs are copyrighted designs and are provided for inspiration only. We encourage you to substitute different colors, products and techniques to make the design your own.
All works of authorship (articles, videos, tutorials and other creative works) are from the Fire Mountain Gems and Beads® Collection, and permission to copy is granted for non-commercial educational purposes only. All other reproduction requires written permission. For more information, please email copyrightpermission@firemtn.com.