Polymer Clay - Basics and Techniques
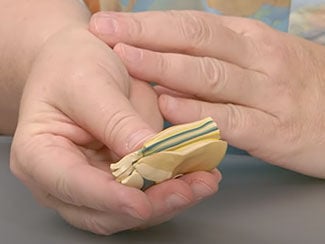
Presented by Christi Friesen, Award-Winning Artist, Author and Educator,
Exclusively for Fire Mountain Gems and Beads®
E64K

Christi Friesen is here to cover all the polymer clay basics you could want, including how to condition clay, color blending, jewelry clay tools, clay baking tips, how to add beads to your polymer clay and more.
Everything basic about polymer clay, specifically Premo! Sculpey® clay!

Polymer Clay Information

Storage and Packaging

Since Premo! clay is an oven-curing clay, it will not dry out when exposed to air; however, do store it in cool temperatures (under 100 degrees).

Polymer clay may be stored or resealed in its original packaging, if desired. Another option is to repackage scrap polymer clay in a jar, sandwich bag or any other air-tight container.

Conditioning Clay

Condition polymer clay by hand or by running it through a polymer clay roller until it's soft and pliable, making it easy to work with before each use.

Note: The clay is properly conditioned when smooth and soft and no signs of cracking appear when bended or rolled.

Clay Tools

Fingers come in very handy to condition clay since friction and heat make the clay pliable while fingerprints are amazing for creating texture.

Metal tools are best for working with clay but plastic or wood works well too. Have needle tools, brushes or any kind of sculpting tool on hand for texturing.

Cutting blades are very important for cutting clay. Be sure to use proper safety protection when working with sharp tools.

Wire-cutters, pliers, wire and needle-nose tweezers are also useful tools for adding embellishments into polymer clay.

Tweezers are helpful in placing beads and components with precision.

A polymer clay machine is an important asset to include in any collection of polymer clay tools since it allows for quick and easy conditioning of polymer clay.

Basic Techniques

Polymer clay does not shrink when baked; therefore, any oven-friendly components can be used as embellishments including, but not limited to, glass beads, gemstones, crystals, feathers, fossils and fabric.

Tip: To test if something is oven-friendly, set the item on a sheet of aluminum foil and place in a preheated oven.

Reusing Scrap Pieces / Blending Colors or Creating Stripes

Scrap pieces blend very nicely to create new colors by conditioning separate colors together until a new color is created. They can also be used to create patterns and designs by layering separate colors and folding or rolling them together, creating stripes or canes.

Adding Beads

Option 1
String a bead onto a length of wire then twist the ends of the wire together. Trim excess wire then form a hook on the end of the wire. Press the hook into the clay to add the bead as an embellishment.

If desired, apply adhesive (like E-6000® Jewelry and Craft Adhesive) to loose embellishments after baking to ensure they are secure.

Option 2
String a bead onto a headpin then form a hook on the end. Press the hook into the clay.

Tornado Twist

STEP 1
Stack different colored clay scraps together, creating layers, then pass them through the clay conditioning machine. Smash the layers into each other with your fingers to make them "all wiggly" then rip the sheet into two pieces. Stack the ripped pieces then continue to mash. Repeat as desired. Roll the sheet up like a taquito. Roll it between your hands to swirl the layers and twist while pushing your hands towards each other, squishing the clay into itself.

Slice the twisted clay in half, length-wise, with a clay blade.
STEP 2
Match up one edge of the sliced sides, press the pieces together then smash the clay by hand. Feed the clay through the clay conditioning machine on a wide setting.

Fold the clay so that any undesirable sections are hidden behind the desired portion then feed the clay through the clay conditioning machine. Repeat until the desired pattern is achieved.

Note: If this step is repeated too much the pattern will disappear, leaving only one color.

This is your best tool: not my fingers, yours. Fingers are terrific.

Mica Powder

Brush mica powder on desired areas of the clay pieces before baking.

Have a question regarding this project? Email Customer Service.

Copyright Permissions

Permission to copy this instruction sheet is granted for non-commercial educational purposes only. All other reproduction requires written permission. Please email copyrightpermission@firemtn.com for more information.