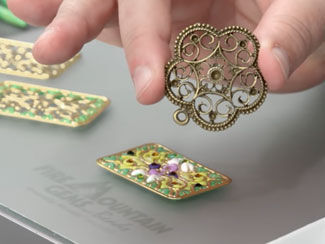
Presented by Christi Friesen, Award-Winning Artist, Author and Educator,
Exclusively for Fire Mountain Gems and Beads®
E658
The always entertaining Christi Friesen, award-winning artist, walks you through the steps on how to create what she calls a Galumphus bird out of Premo! Sculpey® polymer clay, feathers and two beads for eyes.
Condition each color of Kato Polyclay well by running them through a polymer clay roller until soft and pliable. Combine colors to create the shades of your choice.
Stack the sheets of clay, which will form stripes.
Use a cutting blade to cut the stacked clay in half. Stack the cut sheets then stack once more.
Once the sheets have been cut and stacked at desired, trim the clay around the edges to reveal neat stripes. Press the clay into a column to remove the cut edge and begin forming the body.
STEP 3
Begin forming the tail on one side, close to one end. Trim undesirable areas to reveal striped clay beneath. Form the neck and beginning of a head on the opposite end.
STEP 4
String a dark colored approximately 10mm bead onto an approximately 3-inch length of 28-gauge wire. Bring the ends of the wire around the bead. Use chain-nose pliers to hold the wire then twist the ends with fingers up to the edge of the bead, securing it in place.
Trim the wire to approximately 1/2 inch then form a hook on the end of the wire. (The hook keeps the bead embedded in the clay after baking.)
STEP 5
Use the rounded tip of an artist brush or other tool to create eye-holes on each side of the head. Insert the eye beads, then twist the beads so the wire faces up and can be concealed. Press the beads deep into the clay.
STEP 6
Form small sections of excess clay (in the color of your choice) into a rice shape, pointed on either end, then curve the pieces to resemble eyelids. Place the eyelids along the top of the bead concealing the wire.
Tip: Placing the eyelids in different positions far forward may cause your bird to look angry.
STEP 7
Form a piece of "beaky" colored clay into a teardrop shape then press a ridge along the top and flatten the base of the beak. Trim the rounded end of the beak then press it onto the Galumphus Bird. Form the beak as desired.
STEP 8
Optional:
If desired, form a smaller beak and place it below the upper part of the beak.
It may be necessary to insert an approximately 3-inch length of 18-gauge wire down into the top of the bird's head and through the body to keep him stiff for baking.
STEP 9
If no wire was used, insert an awl or pointed tool into the top of the bird's head to create a small hole.
Apply a small amount of liquid clay inside the hole. Trim feathers as desired then gather a little group of feathers. Insert the quills of the feathers into the hole.
Repeat to attach feathers to the tail and create wings.
Tip: Insert an eyepin in the top of the head to create an ornament.
STEP 10
Bake according to manufacturer's instructions.
Tip: Place a rolled piece of tissue paper under the chin to prevent the Galumphus Bird from drooping during baking.
Permission to copy this instruction sheet is granted for non-commercial educational purposes only. All other reproduction requires written permission. Please email copyrightpermission@firemtn.com for more information.