How (and Why) to Make a Christmas Spider


Discover the fascinating tale of Christmas spiders and learn how to craft your own as gifts this holiday season.
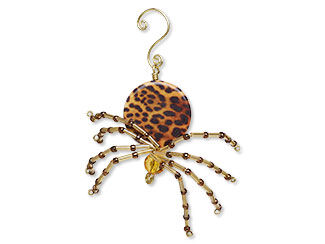
Are you ready to create a Christmas spider ornament? Yes, you read that right—a Christmas spider! Discover the rich history of Christmas spiders and embark on your creative journey by crafting a beaded spider with these comprehensive instructions.
Legend of the Christmas Spider
While Christmas spiders may not hold the same iconic status as Rudolph and Frosty in western cultures, the placement of eight-legged ornaments on a Christmas tree is a well-established and recognized tradition in Europe. According to the folktale, a mother was busily cleaning her home for Christmas. As she swept and tidied, spiders scurried to the attic to stay out of the way. On Christmas Eve night, the spiders emerged for a peek and exclaimed, "What a magnificent tree!"
In their excitement, the spiders scurried along the branches, weaving their gray webs into the decorations. When Santa arrived with gifts for the children and witnessed the spiders' delight, he was filled with joy. However, aware that the mother might be saddened to see her tree draped in dull webbing, he transformed the strands into dazzling silver, making the tree even more radiant than before.
Various versions of this story exist, one suggesting that the Christ child transformed the webbing into tinsel because spiders were considered God's creatures, deserving of love as well. Another take on the story proposes that a widowed mother and her children were too poor to decorate their Christmas tree. On Christmas Eve, the spiders carefully spun their webs along the branches. When the family awoke on Christmas morning and witnessed the sunlight transforming the webbing into silver and gold, they were overjoyed by the stunning and unexpected display.
No matter which version you believe, the result was the placement of both tinsel and a spider ornament amid the branches of Christmas trees.
Spider Symbolism
While spiders may cause unease for some, many cultures throughout history have viewed these arachnids as symbols of luck or good omens. The following examples represent just a small fraction of those beliefs.
- In ancient China, the sight of a spider spinning its web was considered a good sign, foretelling financial blessings. The ancient Chinese were not alone in this belief. Across various cultures, such as Japan and ancient Rome, spiders have been revered as symbols of prosperity.
- Many Native Americans held a deep reverence for spiders, attributing the creation of dreamcatchers to a benevolent Grandmother Spider.
- In West African folklore, Anansi was a clever spider god associated with the realms of storytelling and wisdom.
- According to ancient Indian writings, a large female spider wove the fabric of the universe we inhabit. This spider sits at the center of the web, orchestrating the course of events with her unbreakable strands.
- Spiders are acknowledged in the Bible as humble creatures, and yet they make their homes even in the palaces of kings.
Christmas Spider Components
Feeling inspired? Now that you grasp the history behind the Christmas spider, it's time to create your own beaded arachnid. As the designer of the ornament, you have the freedom to choose both the color and size of the Christmas spider. Here are a few suggestions for different parts of the spider, inspired by examples we've encountered:

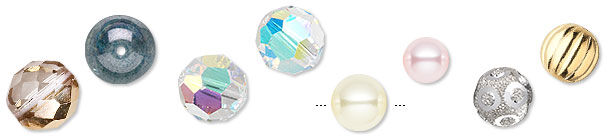
Head:
Body:
- Cloisonné beads
- Large round pearls
- Pavé beads
- Seed-beaded balls
- Small ornaments
- Oval glass beads
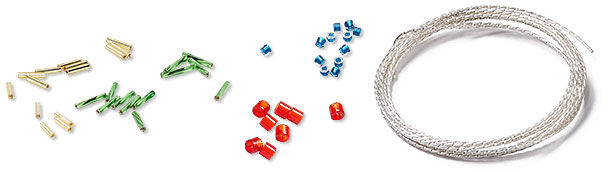
Legs:
- Seed beads
- Bugle beads
- Tube beads with small beads at joints
- Twisted wire
Additional Embellishments:
- Bead Caps on body
- Rondelle neck
- Red flower cones and small white beads at end of head as Santa hat
Make a Christmas Spider
Cut four 7-inch lengths of 24-gauge wire and one 6-inch length of 20-gauge wire.
At the end of the 6-inch length of wire, create a wrapped loop. Then set it aside.
Note: View ''Secrets to a Wrapped Loop'' how-to video for detailed directions.
Gather the 7-inch lengths of wire together. Using all the lengths at once, curve the center of the wires around the jaw of round-nose pliers. Continue to bend the wire ends in opposite directions to create a loop.
String the body bead, the wire loop created in Step 3 and a head bead onto the straight end of the 6-inch length of wire. Create a spiral on the 6-inch length of wire, tight against the head bead.
Note: View ''Forming a Wire Spiral'' illustrated instructions for detailed directions.
Onto each leg string six sets of one bugle bead and one seed bead, creating a simple loop at the end.
Note: View “Secrets to Simple Loops” how-to video for detailed directions.
Shop for Your Materials Here:


Have a question regarding this project? Email Customer Service.
Copyright Permissions
All works of authorship (articles, videos, tutorials and other creative works) are from the Fire Mountain Gems and Beads® Collection, and permission to copy is granted for non-commercial educational purposes only. All other reproduction requires written permission. For more information, please email copyrightpermission@firemtn.com.