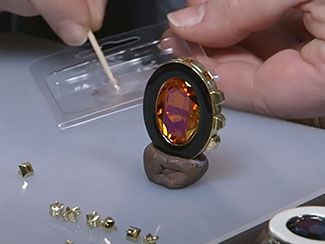
Lump Cats

Design by Christi Friesen, Award-Winning Artist, Author and Educator, Exclusively for Fire Mountain Gems and Beads®
E61K

So named because they start with a lump of clay and when they're finished, they're still lumps--but really cute lumps! Can anything called "lump" really be worthwhile, you may well ask? Well, let me tell you a little story (ok, it's more of an anecdote than a story, or maybe it's more of an illustrative example, hmmm). I went to Maryland once and had a fun weekend with a cool group of polymer clay gals (they weren't made out of polymer clay, of course, they were polymer clay artisans) and we went out to dinner together after a day of claying. On the menu was one of Maryland's most famous culinary delights: lump crab cakes. Now normally, I don't voluntarily choose to order anything with the word "lump" in it as a food choice, but the local gals were insistent that "lump crab cakes" were delicious and that I'd love them. Maryland is to crab what San Francisco is to sourdough--so I ordered it and determined to take at least a little bite, not to be rude. The dishes were brought and it was indeed a lump. Not a pretty lump, no garnish of parsley or artful dollop of sauce to drown it in. Just a lumpy lump all alone in the middle of the plate. Well, if you've had Maryland crab, you know the rest--delicious! Really, really delicious. I think they call it a lump and make it a lump so the rest of the country won't know how wonderful they are and flock to Maryland and take them all!

So, now you should be thoroughly optimistic about how wonderful a lump cat can be. Especially with tartar sauce. Just kidding, cats go better with catsup, of course.
STEP 1
Start with a lump of clay, naturally. It can be a thoroughly blended color, or have plenty of streaks and variations of color. Your lump of clay should be about the size of an avocado pit. Pull some of the clay off so you have extra to use for facial details (you won't need much--about the size of a marble). Shape the main lump into an oval.
STEP 2
At one end, pull out a tail by squeezing and gently pulling the clay into a tail shape--just a long log that can end pointy or roundy.
STEP 3
Firm up that end of the clay so that the cat will stand without tipping by pulling the opposite side of the tail into a bit of a bulge (just a pinch and pull a little to make a wider bottom). Set it down on the work surface and press down a little to flatten the bottom--it should stand well (adjust the bulge until it does).
STEP 4

Now squeeze and gently pull the top of the lump (this will become the head) so that it tapers a bit more. Pinch out the ears on either side of the top in the same way as we did for the cat faces--pinch all around with equal pressure to make a point and then flatten it slightly.

This is essentially your lump cat--it just needs a face--so position the body, tail and head in some fun way.
STEP 5
Of course you can add leg nubs if you really want to--remember it's a lump, don't get too realistic, just the hint of legs are all you need (and you don't even need those!). Just pinch a little bit to make the nub--same way as you did the ears, just not so pointy. Put him back down again to see if he still stands up, and make any adjustments if he doesn't.

Add a face! A simplified version of the faces we've already done--eye socket indentations are optional. Add the wired beads for eyes. Round balls of clay for cheeks and chin. Nose is the simple triangle pressed onto the cheeks. If you want to leave off the nose bridge just press the top of the nose down onto the cheeks with a tool edge. Whiskers and stylish neckwear are optional.

: : : Additional Resources : : :

Have a question regarding this project? Email Customer Service.

Copyright Permissions

Permission to copy this instruction sheet is granted for non-commercial educational purposes only. All other reproduction requires written permission. Please email copyrightpermission@firemtn.com for more information.